 Cambia lingua
L’interfaccia grafica
L’Interfaccia Grafica (GUI) dà accesso a tutte le funzionalità di gestione della biblioteca e di conversione degli e-book nei vari formati. Il primo passo per utilizzare calibre prevede l’aggiunta di libri alla biblioteca dal tuo disco rigido. calibre cercherà di reperire automaticamente i metadati dai libri e di aggiungerli al proprio database interno. Una volta nel database potrai effettuare alcune Azioni su di essi, tra cui la conversione da un formato all’altro, il trasferimento su un dispositivo di lettura, la visualizzazione sul tuo computer e la modifica dei metadati. Quest’ultima azione consente, tra gli altri, la modifica di copertina, descrizione e tag. Nota che calibre crea una copia dei file che vi sono aggiunti. I file originali non vengono modificati.
L’interfaccia è divisa in diverse sezioni:
Azioni

La barra delle azioni fornisce comode scorciatoie alle funzioni più usate. Se fai clic con il tasto destro sui pulsanti, puoi eseguire varianti dell’azione predefinita. Tieni presente che la barra delle azioni apparirà leggermente diversa se hai un lettore di e-book collegato al tuo computer.
Aggiungi libri
 The Add books action has many variations accessed by doing a right-click on the button.
Add books from a single folder: Opens a file chooser dialog and allows you to specify which books in a folder should be added. This action is context sensitive, i.e. it depends on which catalog you have selected. If you have selected the Library, books will be added to the library. If you have selected the e-book reader device, the books will be uploaded to the device, and so on.
Add books from folders and sub-folders: Allows you to choose a folder. The folder and all its sub-folders are scanned recursively, and any e-books found are added to the library. You can choose whether to have calibre add all files present in a single folder to a single book record or multiple book records. calibre assumes that each folder contains a single book. All e-book files in a folder are assumed to be the same book in different formats. This action is the inverse of the Save to disk action, i.e. you can Save to disk, delete the books and re-add them in single book per folder mode, with no lost information except for the date (this assumes you have not changed any of the settings for the Save to disk action).
Add multiple books from archive (ZIP/RAR/7z): Allows you to add multiple e-books that are stored inside the selected archive files. It is a convenient shortcut that avoids having to first unzip the archive and then add the books via add books from folders.
Aggiungi un libro vuoto (iscrizione di un libro senza formati): Permette di creare un record vuoto di un libro. Questo può essere utilizzato per inserire manualmente successivamente le informazioni relative a un libro che potreste non avere ancora nella vostra raccolta.
Aggiungi con ISBN: Permette di aggiungere uno o più libri inserendo il loro codice ISBN.
Aggiungi file ai record del libro selezionati: Permette di aggiungere o di aggiornare i file associati con un libro esistente nella vostra libreria.
Add files to selected book records from clipboard: Allows you to add or update the files associated with an existing book in your library from the current contents of the clipboard
Aggiungi file di dati alle voci di libro selezionate: Ti permette di aggiungere un numero qualsiasi di file aggiuntivi che saranno conservati in una sottocartella
datanella cartella del libro vedi Aggiunta di file di dati a un libro per dettagli.Aggiungi un file vuoto ai record del libro selezionati: Permette di aggiungere un file vuoto del formato specificato ai record del libro selezionati.
L’azione Aggiungere libri può leggere i metadati da una ampia varietà di formati di ebook. Inoltre, prova ad indovinare i metadati dal nome del file, vedere la sezione Estrazione dei metadati dai nomi dei file per apprendere come configurare questa opzione.
Per aggiungere un formato ad un libro già esistente, è possibile fare una delle seguenti tre cose:
Trascina il file sul pannello dei Dettagli del Libro, sulla parte destra della finestra principale
Fai clic con il tasto destro sul pulsante Aggiungi libri e scegli Aggiungi file ai libri selezionati.
Fai clic sul pulsante Aggiungi libri nella zona in alto a destra della finestra Modifica metadati, accessibile con l’azione Modifica metadati.
Modifica metadati
 The Edit metadata action has many variations which can be accessed by doing a right-click on the button.
Modifica i metadati individualmente: Permette di modificare i metadati dei libri uno per uno con l’opzione di scaricare i metadati, incluse le copertine, da Internet. Vi consente inoltre di aggiungere o rimuovere formati di ebook particolari da un libro.
Modifica i metadati in massa: Permette di modificare i campi comuni dei metadati per un grande numero di libri simultaneamente. Opera su tutti i libri che avete selezionato nella Library view.
Scarica metadati e copertine: Scarica metadati e copertine (se disponibili) per i libri che sono selezionati nella lista dei libri.
Copy metadata: Copy metadata for the current book onto the system clipboard
Paste metadata: Paste metadata from the system clipboard onto the currently selected books
Unisci i record dei libri: Vi da la capacità di unire i metadati ed i formati di due o più record di libri. potete scegliere di eliminare o mantenere i record che non sono stati cliccati prima.
Gestisci i file di dati: Gestisce i file di dati aggiuntivi associati ai libri selezionati.
Per maggiori dettagli vedi metadato.
Converti libri
 Gli e-book possono essere convertiti da vari formati in qualunque altro formato il tuo lettore di e-book preferisca. Molti degli e-book disponibili all’acquisto sono protetti da una tecnologia Digital Rights Management (DRM). calibre non convertirà questi e-book. È facile rimuovere il DRM da molti formati, ma considerati i possibili problemi legali, dovrai trovare da solo gli strumenti che ti permetteranno di liberare i tuoi libri, e poi usare calibre per convertirli.
Per la maggior parte delle persone, la conversione dovrebbe essere un semplice affare da un click. Se vuoi apprendere di più riguardo al processo di conversione, vedi conversione.
L’azione Converti libri ha tre varianti, accessibili facendo clic con il tasto destro sul pulsante.
Converti individualmente: Permette di specificare le opzioni per personalizzare la conversione di ognuno degli e-book selezionati.
Converti in gruppo: Permette di specificare le opzioni una volta sola per convertire un certo numero di e-book in gruppo.
Creare un catalogo dei libri nella vostra libreria di calibre: Permette di generare un elenco completo dei libri nella vostra libreria, inclusi tutti i metadati, in diversi formati quali XML, CSV, BiBTeX, EPUB e MOBI. Il cataglogo conterrà tutti i libri al momento presenti nella vista della libreria. Questo vi consente di utilizzare le funzionalità di ricerca per limitare la catalogazione dei libri. In aggiunta, se selezionate più libri utilizzando il mouse, solo quei libri saranno aggiunti al catalogo. Se generate il catalogo in un formato ebook quale EPUB, MOBI o AZW3, la prossima volta che connettete il vostro lettore di ebook il catalogo sarà automaticamente inviato al dispositivo. Per maggiori informazioni sul funzionamento del catalogo, leggete il Creazione di cataloghi AZW3 • EPUB • MOBI.
Leggi
L’azione Leggi visualizza il libro in un programma di lettura degli ebook. calibre ha un lettore incoporato per diversi formati di ebook. Per altri formati utilizza l’applicazione predefinita del sistema operativo. Potete configurare quali formati devono essere aperti con il lettore interno mediante Preferenze → Interfaccia → Comportamento. Se un libro ha più di un formato, potete leggere un particolare formato effettuando un click destro sul pulsante.
Invia al dispositivo
 L’azione Invia al dispositivo ha otto varianti, accessibili facendo clic con il tasto destro sul pulsante.
Invia alla memoria principale: I libri selezionati sono trasferiti alla memoria principale del lettore di ebook.
Invia alla scheda (A): I libri selezionati sono trasferiti alla scheda di memoria (A) sul lettore di ebook.
Invia alla scheda (B): I libri selezionati sono trasferiti alla scheda di memoria (B) sul lettore di ebook.
Send specific format to: The selected books are transferred to the selected storage location on the device, in the format that you specify.
Espelli dispositivo: Scollega il dispositivo da calibre.
Set default send to device action: Allows you to specify which of the options, 1 through 5 above or 7 below, will be the default action when you click the main button.
Invia ed elimina dalla libreria: I libri selezionati sono trasferiti alla posizione di archiviazione selezionata sul dispositivo e poi eliminati dalla Libreria.
Scarica Annotazioni (sperimentale): Trasferisce le annotazioni che potreste avere fatto su un ebook sul vostro dispositivo ai metadati dei commenti del libro nella libreria di Calibre.
You can control the file name and folder structure of files sent to the device by setting up a template in Preferences → Import/export → Sending books to devices. Also see Il linguaggio dei modelli di calibre.
Scarica notizie
 The Fetch news action downloads news from various websites and converts it into an e-book that can be read on your e-book reader. Normally, the newly created e-book is added to your e-book library, but if an e-book reader is connected at the time the download finishes, the news is also uploaded to the reader automatically.
The Fetch news action uses simple recipes (10-15 lines of code) for each news site. To learn how to create recipes for your own news sources, see Aggiunta del tuo sito di notizie preferito.
L’azione Scarica novità ha tre variazioni a cui si accede con un click destro sul pulsante.
Schedule news download: Allows you to schedule the download of your selected news sources from a list of hundreds available. Scheduling can be set individually for each news source you select and the scheduling is flexible allowing you to select specific days of the week or a frequency of days between downloads.
Add a custom news source: Allows you to create a simple recipe for downloading news from a custom news site that you wish to access. Creating the recipe can be as simple as specifying an RSS news feed URL, or you can be more prescriptive by creating Python-based code for the task. For more information, see Aggiunta del tuo sito di notizie preferito.
Download all scheduled news sources: Causes calibre to immediately begin downloading all news sources that you have scheduled.
Biblioteca
 L’azione Libreria permette di creare, commutare tra, rinominare o rimuovere una libreria. calibre permette di creare quante librerie si vogliono. Potete, per esempio, creare una libreria di narrativa, una libreria di saggistica, una libreria in lingua straniera, una libreria di progetti, o qualsiasi altra struttura che si adatti alle vostre esigenze. Le librerie sono la massima struttura organizzativa all’interno di calibre. Ogni libreria ha il proprio insieme di libri, etichette, categorie e posizioni di archiviazione di base.
Commuta/crea libreria: permette di; a) connettersi a una pre-esistente libreria di calibre in una diversa posizione, b) creare una libreria vuota in una nuova posizione oppure, c) spostare la libreria corrente in una nuova specifica posizione.
Commutazione veloce: Permette di commutare tra le librerie che sono state registrate o create in calibre.
Rinomina libreria: Vi consente di rinominare una Libreria.
Scegli un libro in maniera casuale: Sceglie per voi un libro in maniera casuale nella Libreria.
Rimuovi libreria: Vi consente di annullare la registrazione di una libreria da Calibre.
Esporta/importa tutti i dati di Calibre: Vi consente di esportare i dati di calibre per la migrazione ad un nuovo computer oppure di importare i dati precedentemente esportati.
<library name>: Actions 7, 8 etc… give you immediate switch access between multiple libraries that you have created or attached to. This list contains only the 5 most frequently used libraries. For the complete list, use the Quick Switch menu.
Library maintenance: Allows you to check the current library for data consistency issues and restore the current library’s database from backups.
Nota
I metadati relativi ai vostri ebook, per esempio il titolo, l’autore e le etichette, sono immagazzinati in un singolo file nella vostra cartella della libreria di calibre chiamata metadata.db. Se questo file si corrompe ( un evento molto raro), potreste perdere i metadati. Per fortuna, calibre fa automaticamente il backup dei metadati per ogni singolo libro nella cartella dei libri come un file OPF. Utilizzando l’azione Ripristina Database sotto Manutenzione Libreria descritta sopra, potete ottenere che calibre ricostruisca il file metadata.db dal rispettivo file OPF per voi.
Potete copiare o spostare libri tra differenti librerie (una volta che avrete impostato più di una libreria) facendo click destro sul libro e selezionando l’azione Copia nella libreria.
Dispositivo
 The Device action allows you to view the books in the main memory or storage cards of your device, or to eject the device (detach it from calibre).
This icon shows up automatically on the main calibre toolbar when you connect a supported device. You can click on it to see the books on your device. You can also drag and drop books from your calibre library onto the icon to transfer them to your device. Conversely, you can drag and drop books from your device onto the library icon on the toolbar to transfer books from your device to the calibre library.
The Device action allows you to view the books in the main memory or storage cards of your device, or to eject the device (detach it from calibre).
This icon shows up automatically on the main calibre toolbar when you connect a supported device. You can click on it to see the books on your device. You can also drag and drop books from your calibre library onto the icon to transfer them to your device. Conversely, you can drag and drop books from your device onto the library icon on the toolbar to transfer books from your device to the calibre library.
Salva su disco
 L’azione Salva su disco ha cinque varianti, accessibili facendo clic con il tasto destro sul pulsante.
Salva sul disco: Salva i libri selezionati sul disco organizzati in cartelle. La struttura della cartella ha questo aspetto:
Author_(sort)
    Title
        Book Files
Potete controllare il nome del file e la struttura della cartella dei file salvati su disco impostando un modello in Preferenze → Importare/esportare → Salvare libri sul disco. Vedere anche Il linguaggio dei modelli di calibre.
Salva su disco in una singola cartella: Salva i libri selezionati sul disco in una singola cartella.
For 1. and 2., all available formats, as well as metadata, are stored to disk for each selected book. Metadata is stored in an OPF file. Saved books can be re-imported to the library without any loss of information by using the Add books action.
Save only *<your preferred>* format to disk: Saves the selected books to disk in the folder structure as shown in (1.) but only in your preferred e-book format. You can set your preferred format in Preferences → Interface → Behaviour → Preferred output format
Save only *<your preferred>* format to disk in a single folder: Saves the selected books to disk in a single folder but only in your preferred e-book format. You can set your preferred format in Preferences → Interface → Behaviour → Preferred output format
Save single format to disk…: Saves the selected books to disk in the folder structure as shown in (1.) but only in the format you select from the popup list.
Connetti/condividi
 The Connect/share action allows you to manually connect to a device or folder on your computer. It also allows you to set up your calibre library for access via a web browser or email.
L’azione Connetti/condividi ha quattro varianti, alle quali si accede facendo un click destro sul pulsante.
Connect to folder: Allows you to connect to any folder on your computer as though it were a device and use all the facilities calibre has for devices with that folder. Useful if your device cannot be supported by calibre but is available as a USB disk.
Start Content server: Starts calibre’s built-in web server. When started, your calibre library will be accessible via a web browser from the Internet (if you choose). You can configure how the web server is accessed by setting preferences at Preferences → Sharing → Sharing over the net
Setup email based sharing of books: Allows sharing of books and news feeds by email. After setting up email addresses for this option, calibre will send news updates and book updates to the entered email addresses. You can configure how calibre sends email by setting preferences at Preferences → Sharing → Sharing books by email. Once you have set up one or more email addresses, this menu entry will be replaced by menu entries to send books to the configured email addresses.
Rimuovi libri
 The Remove books action deletes books permanently, so use it with care. It is context sensitive, i.e. it depends on which catalog you have selected. If you have selected the Library, books will be removed from the library. If you have selected the e-book reader device, books will be removed from the device. To remove only a particular format for a given book use the Modifica metadati action. Remove books also has five variations which can be accessed by doing a right-click on the button.
Rimuovi libri selezionati: Vi consente di rimuovere permanentemente tutti i libri che sono selezionati nell’elenco dei libri.
°°Rimuovere i file di uno specifico formato dai libri selezionati…**: Permette di rimuovere permanentemente file ebook di uno specifico formato dai libri che sono selezionati nella lista dei libri.
Remove all formats from selected books, except…: Allows you to permanently remove e-book files of any format except a specified format from books that are selected in the book list.
Remove all formats from selected books: Allows you to permanently remove all e-book files from books that are selected in the book list. Only the metadata will remain.
Rimuovi le copertine dai libri selezionati: Vi consente di rimuovere permanentemente i file di immagine delle copertine dai libri selezionati nella lista dei libri.
Remove matching books from device: Allows you to remove e-book files from a connected device that match the books that are selected in the book list.
Ripristina eliminati di recente: Vi consente di annullare la rimozione di libri o formati.
Nota
Note that when you use Remove books to delete books from your calibre library, the book record is deleted, but the books are temporarily stored, for a few days, in a trash folder. You can undo the delete by right clicking the Remove books button and choosing to Restore recently deleted books.
Preferenze
 The Preferences action allows you to change the way various aspects of calibre work. It has four variations, accessed by doing a right-click on the button.
Preferenze: Vi consente di modificare il modo in curi vari aspetti di Calibre funzionano. Anche cliccando il pulsante si esegue questa azione.
Esegui il Wizard di benvenuto: Ti permette di avviare il Wizard di benvenuto, apparso la prima volta che hai avviato calibre.
Ottieni plugin per migliorare calibre: Apre una nuova finestra che mostra i plugin per calibre. Questi plugin sono sviluppati da terze parti per ampliare le funzionalità di calibre.
Restart in debug mode: Allows you to enable a debugging mode that can assist the calibre developers in solving problems you encounter with the program. For most users this should remain disabled unless instructed by a developer to enable it.
Cataloghi
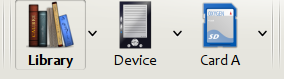
Un catalogo è una raccolta di libri. Calibre può gestire due differenti tipi di cataloghi:
Libreria: Questa è una raccolta di libri immagazzinata nella vostra libreria di Calibre sul vostro computer.
Dispositivo: Questa è una raccolta di libri immagazzinata nel vostro lettore di ebook. Sarà resa disponibile quando connettete il lettore al vostro computer.
Many operations, such as adding books, deleting, viewing, etc., are context sensitive. So, for example, if you click the View button when you have the Device catalog selected, calibre will open the files on the device to view. If you have the Library catalog selected, files in your calibre library will be opened instead.
Cerca e riordina
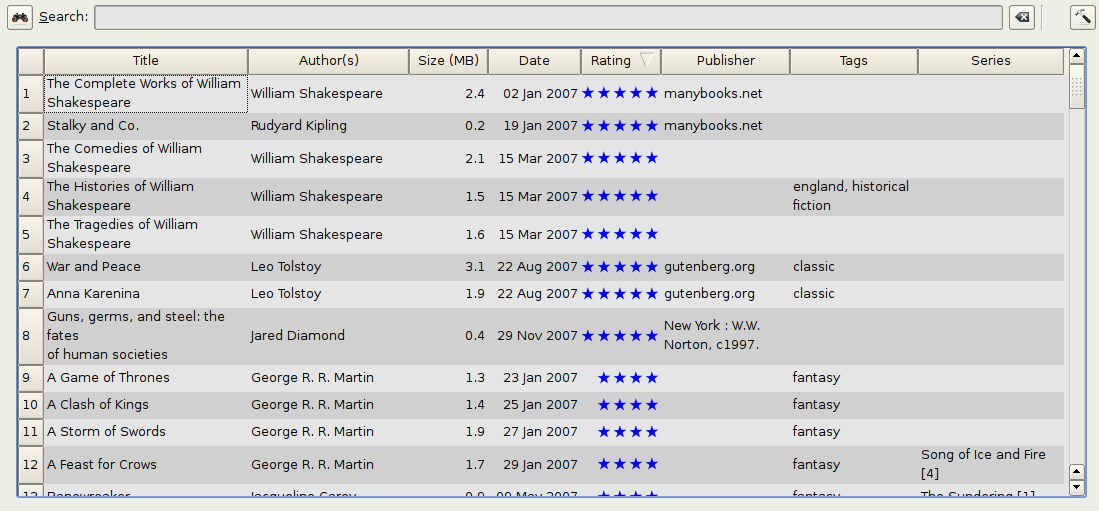
La sezione Cerca e Riordina vi consente di compiere diverse poderose azioni sulla vostra collezione di libri.
You can sort them by title, author, date, rating, etc. by clicking on the column titles. You can also sub-sort, i.e. sort on multiple columns. For example, if you click on the title column and then the author column, the book will be sorted by author and then all the entries for the same author will be sorted by title.
You can search for a particular book or set of books using the Search bar. More on that below.
You can quickly and conveniently edit metadata by selecting the entry you want changed in the list and pressing the E key.
You can perform Azioni on sets of books. To select multiple books you can either:
Keep the Ctrl key pressed and click on the books you want selected.
Keep the Shift key pressed and click on the starting and ending book of a range of books you want selected.
You can configure which fields you want displayed by using the Preferenze dialog.
To perform complex multiple column based sub-sorting add the Sort by tool to a toolbar via Preferences → Toolbars & menus.
L’interfaccia di ricerca
Potete ricercare tutti i metadati del libro inserendo i termini della ricerca nella Barra di ricerca. Ad esempio:
Asimov Foundation format:lrf
This will match all books in your library that have Asimov and Foundation in their metadata and
are available in the LRF format. Some more examples:
author:Asimov and not series:Foundation
title:"The Ring" or "This book is about a ring"
format:epub publisher:feedbooks.com
Ricerca tipi
There are four search kinds: contains, equality, regular expression (see regular expressions), and character variant. You choose the search kind with a prefix character.
“Contains” searches
Searches with no prefix character are contains and are by default case insensitive. An item matches if the search string appears anywhere in the indicated metadata. You can make contains searches case sensitive by checking the option Case sensitive searching in Preferences / Searching. If the search option Unaccented characters match accented characters and punctuation is ignored is checked then a character will match all its variants (e.g., e matches é, è, ê, and ë) and all punctuation and whitespace are ignored. For example, if the Unaccented characters match … option is checked then given the two book titles:
Big, Bothéred, and Bad
Big Bummer
then these searches find:
title:"er"matches both (“e” matches both “é” and “e”).
title:"g "matches both because spaces are ignored.
title:"g,"matches both because the comma is ignored.
title:"gb"matches both because “, “ is ignored in book 1 and spaces are ignored in book 2.
title:"g b"matches both because comma and space are ignored.
title:"db"matches #1 because the space in “and Bad” is ignored.
title:","matches both (it actually matches all books) because commas are ignored.
If the Unaccented characters match … option is not checked then character variants, punctuation, and spacing are all significant.
You can set only one of the search options Case sensitive searching and Unaccented characters match accented characters and punctuation is ignored.
“Equality” searches
Equality searches are indicated by prefixing the search string with an equals sign (=). For example, the query
tag:"=science" will match science, but not science fiction or hard science. Character variants are significant: é doesn’t match e.
Two variants of equality searches are used for hierarchical items (e.g., A.B.C): hierarchical prefix searches and hierarchical component searches. The first, indicated by a single period after the equals (=.) matches the initial parts of a hierarchical item. The second, indicated by two periods after the equals (=..) matches an internal name in the hierarchical item. Examples, using the tag History.Military.WWII as the value:
tags:"=.History": True.Historyis a prefix of the tag.
tags:"=.History.Military": True.History.Militaryis a prefix of the tag.
tags:"=.History.Military.WWII": True.History.Military.WWIIis a prefix of the tag, albeit an improper one.
tags:"=.Military": False.Militaryis not a prefix of the tag.
tags:"=.WWII": False.WWIIis not a prefix of the tag.
tags:"=..History": True. The hierarchy contains the valueHistory.
tags:"=..Military": True. The hierarchy contains the valueMilitary.
tags:"=..WWII": True. The hierarchy contains the valueWWII.
tags:"=..Military.WWII": False. The..search looks for single values.
“Regular expression” searches
Regular expression searches are indicated by prefixing the search string with a tilde (~). Any Python-compatible regular expression can be used. Backslashes used to escape special characters in regular expressions must be doubled because single backslashes will be removed during query parsing. For example, to match a literal parenthesis you must enter \\( or alternatively use super-quotes (see below). Regular expression searches are “contains” searches unless the expression is anchored. Character variants are significant: ~e doesn’t match é.
“Character variant” searches
Character variant searches are indicated by prefixing the search string with a caret (^). This search is similar to the contains search (above) except that:
letter case is always ignored.
character variants always match each other.
punteggiatura e spazi vuoti sono sempre significativi.
The search options Unaccented characters match accented characters and punctuation is ignored and Case sensitive searching are ignored. They have no effect on this search’s behavior.
The following compares this search to a contains search assuming the Unaccented characters match… option is checked (see above) given the same two book titles:
Big, Bothéred, and Bad
Big Bummer
then these character variant searches find:
title:"^g"corrisponde ad entrambe (“e” corrisponde ad entrambe “é” ed “e”)
title:"^g"corrisponde a entrambi
title:"^g "corrisponde a #2 perchè lo spazio è significativo
title:"^g,"corrisponde a #1 perchè la virgola è significativa
title:"^gb"non corrisponde a niente perché lo spazio e la virgola sono significativi
title:"^g b"corrisponde a #2 perché la virgola è significativa
title:"^db"non corrisponde a nulla
title:"^,"corrisponde a #1 (invece di tutti i libri) perché la virgola è significativa
Sintassi per le Espressioni di Ricerca
A search expression is a sequence of search terms optionally separated by the operators and and or. If two search terms occur without a separating operator, and is assumed. The and operator has priority over the or operator; for example the expression a or b and c is the same as a or (b and c). You can use parenthesis to change the priority; for example (a or b) and c to make the or evaluate before the and. You can use the operator not to negate (invert) the result of evaluating a search expression. Examples:
not tag:fooricerca tutti i libri che non contengono l’etichettafoo
not (author:Asimov or author:Weber)ricerca tutti i libri non scritti da Asimov o Weber.
The above examples show examples of search terms. A basic search term is a sequence of characters not including spaces, quotes ("), backslashes (\), or parentheses (( )). It can be optionally preceded by a column name specifier: the lookup name of a column followed by a colon (:), for example author:Asimov. If a search term must contain a space then the entire term must be enclosed in quotes, as in title:"The Ring". If the search term must contain quotes then they must be escaped with backslashes. For example, to search for a series named The «Ball» and The «Chain», use:
series:"The \"Ball\" and The \"Chain\"
If you need an actual backslash, something that happens frequently in regular expression searches, use two of them (\\).
It is sometimes hard to get all the escapes right so the result is what you want, especially in regular expression and template searches. In these cases use the super-quote: """sequence of characters""". Super-quoted characters are used unchanged: no escape processing is done.
Più informazioni
To search for a string that begins with an equals, tilde, or caret; prefix the string with a backslash.
Enclose search strings with quotes (») if the string contains parenthesis or spaces. For example, to find books with the tag Science Fiction you must search for tag:"=science fiction". If you search for tag:=science fiction you will find all books with the tag science and the word fiction in any metadata.
You can build advanced search queries easily using the Advanced search dialog accessed by
clicking the button  on the left of the search box.
Available fields for searching are: tag, title, author, publisher, series, series_index, rating, cover, comments, format, identifiers, date, pubdate, search, size, vl and custom columns. If a device is plugged in, the ondevice field becomes available, when searching the calibre library view. To find the search name (actually called the lookup name) for a custom column, hover your mouse over the column header in the library view.
Date
La sintassi per ricercare per date è:
pubdate:>2000-1 Will find all books published after Jan, 2000
date:<=2000-1-3 Will find all books added to calibre before 3 Jan, 2000
pubdate:=2009 Will find all books published in 2009
If the date is ambiguous then the current locale is used for date comparison. For example, in an mm/dd/yyyy
locale 2/1/2009 is interpreted as 1 Feb 2009. In a dd/mm/yyyy locale it is interpreted as 2 Jan 2009. Some
special date strings are available. The string today translates to today’s date, whatever it is. The
strings yesterday and thismonth (or the translated equivalent in the current language) also work.
In addition, the string daysago (also translated) can be used to compare to a date some number of days ago.
For example:
date:>10daysago
date:<=45daysago
Per evitare potenziali problemi con le stringhe tradotte quando si utilizza una versione di calibre non in lingua inglese, le stringhe _today, _yesterday, _thismonth, e _daysago sono sempre disponibili. Esse non sono tradotte.
Ricercando date e valori numerici con confronti relazionali
Dates and numeric fields support the relational operators = (equals), > (greater than), >=
(greater than or equal to), < (less than), <= (less than or equal to), and != (not equal to).
Rating fields are considered to be numeric. For example, the search rating:>=3 will find all books rated 3
or higher.
Potete ricercare per libri che hanno un formato di una certa dimensione come questo:
size:>1.1Mtroverà libri di un formato più grande di 1.1 MB
size:<=1Ktroverà libri con un formato inferiore o uguale a 1 KB
You can search for the number of items in multiple-valued fields such as tags using the character # then using the same syntax as numeric fields. For example, to find all books with more than 4 tags use tags:#>4. To find all books with exactly 10 tags use tags:#=10.
Indici di serie
Series indices are searchable. For the standard series, the search name is series_index. For
custom series columns, use the column search name followed by _index. For example, to search the indices for a
custom series column named #my_series, you would use the search name #my_series_index.
Series indices are numbers, so you can use the relational operators described above.
Ricerche salvate
The special field search is used for saved searches. If you save a search with the name
«My spouse’s books» you can enter search:"My spouse's books" in the Search bar to reuse the saved
search. More about saving searches below.
Librerie virtuali
The special field vl is used to search for books in a Virtual library. For
example, vl:Read will find all the books in the Read Virtual library. The search
vl:Read and vl:"Science Fiction" will find all the books that are in both the Read and
Science Fiction virtual libraries. The value following vl: must be the name of a
Virtual library. If the Virtual library name contains spaces then surround it with quotes.
Se un campo ha un valore
Potete ricercare per l’assenza o la presenza di un valore per un campo usando «vero» e «falso». Per esempio:
cover:falsetrova tutti il libri senza una copertina
series:truetrova tutti i libri che sono in una serie
series:falsetrova tutti i libri che non sono in una serie
comments:falsetrova tutti i libri con una nota vuota
formats:falsefinds all books with no book files (empty records)
Colonne personalizzate si/no
Searching Yes/no custom columns for false, empty, or blank will find all books
with undefined values in the column. Searching for true will find all books that do not have undefined
values in the column. Searching for yes or checked will find all books with Yes in the column.
Searching for no or unchecked will find all books with No in the column. Note that the words yes, no, blank, empty, checked and unchecked are translated; you can use either the current language’s equivalent word or the English word. The words true and false and the special values _yes, _no, and _empty are not translated.
Identificatori
Identifiers (e.g., ISBN, DOI, LCCN, etc.) use an extended syntax. An identifier has the form type:value, as in isbn:123456789. The extended syntax permits you to specify independently the type and value to search for. Both the type and the value parts of the query can use any of the search kinds. Examples:
identifiers:truetroverà libri con qualsiasi identificatore
identifiers:falsetroverà libri senza identificatori
identifiers:123ricercheranno libri di qualsiasi genere avente un valore contenente 123.
identifiers:=123456789will search for books with any type having a value equal to 123456789.
identifiers:=isbn:andidentifiers:isbn:truewill find books with a type equal to ISBN having any value
identifiers:=isbn:falsewill find books with no type equal to ISBN.
identifiers:=isbn:123will find books with a type equal to ISBN having a value containing 123.
identifiers:=isbn:=123456789will find books with a type equal to ISBN having a value equal to 123456789.
identifiers:i:1will find books with a type containing an i having a value containing a 1.
Categories visible in the Tag browser
The search in_tag_browser:true finds all books that are in categories
(tags, authors, etc.) currently shown in the Tag browser. This is
useful if you set the two preferences Preferences → Look & feel → Tag
browser → Hide empty categories and Find shows all items that
match. With those two preferences set, doing a Find in the
Tag browser shows only categories containing items matched by the
Find. Then, the search in_tag_browser:true additionally finds books
with these categories / items. You can easily run this search by pressing the
key Ctrl+Alt+Shift+F or clicking the configure button in the
Tag browser and choosing the Show only books that have
visible categories entry.
ricerca utilizzando modelli
You can search using a template in Il linguaggio dei modelli di calibre instead of a metadata field. To do so you enter a template, a search type, and the value to search for. The syntax is:
template: (the template) #@#: (search type) : (the value)
The template is any valid calibre template language template. The search type must be one of t (text search), d (date search), n (numeric search), or b (set/not set (boolean)). The value is whatever you want, and can use the search kinds described above for the various search types. You must quote the entire search string if there are spaces anywhere in it.
Esempi:
template:"program: connected_device_name('main')#@#:t:kindle"– is true when thekindledevice is connected.
template:"program: select(formats_sizes(), 'EPUB')#@#:n:>1000000"– finds books with EPUB files larger than 1 MB.
template:"program: select(formats_modtimes('iso'), 'EPUB')#@#:d:>10daysago"– finds books with EPUB files newer than 10 days ago.
template:"""program: book_count('tags:^"' & $series & '"', 0) != 0#@#:n:1"""– finds all books containing the series name in the tags. This example uses super-quoting because the template uses both single quotes (') and double quotes (") when constructing the search expression.
You can build template search queries easily using the Advanced search dialog accessed by clicking the button . You can test templates on specific books using the calibre Template tester, which can be added to the toolbars or menus via Preferences → Toolbars & menus. It can also be assigned a keyboard shortcut via Preferences → Shortcuts.
Finestra di ricerca avanzata
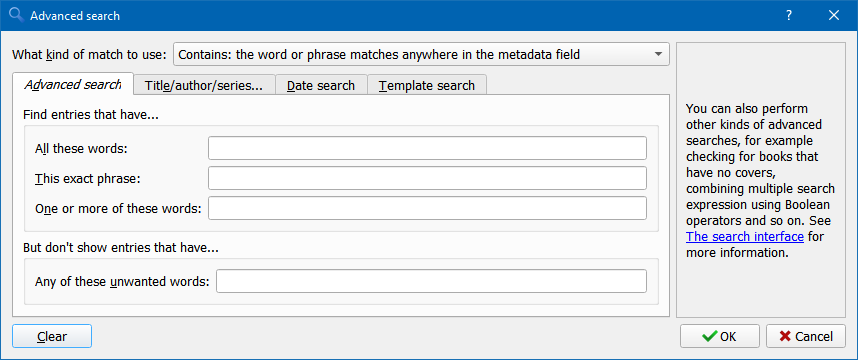
Finestra di ricerca avanzata
Salvare le ricerche
calibre allows you to save a frequently used search under a special name and then reuse that search with a single click. To do this, create your search either by typing it in the Search bar or using the Tag browser. Then type the name you would like to give to the search in the Saved Searches box next to the Search bar. Click the plus icon next to the saved searches box to save the search.
Now you can access your saved search in the Tag browser under Saved searches. A single click will allow you to reuse any arbitrarily complex search easily, without needing to re-create it.
Ricerca nei contenuti di tutti i libri
 calibre può facoltativamente indicizzare i contenuti dei libri della biblioteca, in modo permettere la ricerca istantanea di parole dentro ciascuno dei libri. Per usare questa funzionalità clicca sul pulsante FT (Full Text) al margine sinistro della barra di ricerca.
Then, enable indexing for the current library. Once indexing is complete you can search all the text in the full library. When you add new books to the library, they will be automatically indexed in the background. This search allows you to quickly find all books that contain a word or combination of words. You can even search for words that occur near other words, as shown in the examples in the search popup window. Note that this search tool will find only one occurrence of the search query in a particular book, not list every occurrence, for that it is best to search inside the book using the calibre E-book viewer.
You can re-index an individual book by right clicking on the Book details panel in calibre and choosing Re-index this book for full text searching.
Biblioteche virtuali
A Virtual library is a way to pretend that your calibre library has only a few books instead of its full collection. This is an excellent way to partition your large collection of books into smaller, manageable chunks. To learn how to create and use Virtual libraries, see the tutorial: Biblioteche Virtuali.
Marcatura temporanea dei libri
You can temporarily mark arbitrary sets of books. Marked books will have a pin on them and can be found with the search marked:true. To mark a book press Ctrl+M or go to Preferences → Toolbars & menus and add the Mark books button to the main toolbar.
Potete contrassegnare i libri con una specifica etichetta di testo effettuando un click destro sul pulsante Contrassegna libri e selezionando Contrassegna libri con etichetta di testo. I libri contrassegnati con un’etichetta di testo possono essere trovati successivamente utilizzando la ricerca marked:"=the-text-you-entered".
Estrazione dei metadati dai nomi dei file
Normalmente, calibre legge i metadati dall’interno del file del libro. Tuttavia, può essere invece configurato per leggere i metadati dal nome del file, per mezzo di Preferenze → Importazione/esportazione → Aggiungere libri → Leggi i metadati dal contenuto del file.
You can also control how metadata is read from the filename using regular expressions (see Tutto sull’utilizzo delle espressioni regolari in calibre). In the Adding books section of the configuration dialog, you can specify a regular expression that calibre will use to try and guess metadata from the names of e-book files that you add to the library. The default regular expression is:
title - author
that is, it assumes that all characters up to the first - are the title of
the book and subsequent characters are the author of the book. For example, the
filename:
Foundation and Earth - Isaac Asimov.txt
Sarà interpretato avere il titolo: Fondazione e Terra e autore: Isaac Asimov
Suggerimento
Se il nome del file non contiene il trattino, l’espressione regolare di cui sopra fallirà.
Dettagli del libro
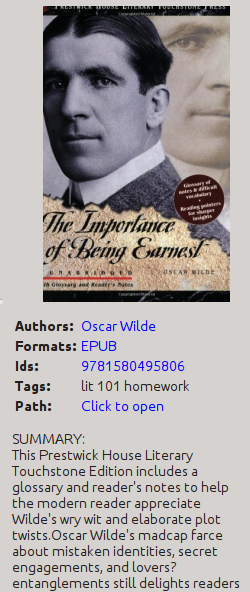
The Book details display shows the cover and all the metadata for the currently selected book. It can be hidden via the Layout button in the lower right corner of the main calibre window. The author names shown in the Book details panel are click-able, they will by default take you to the Wikipedia page for the author. This can be customized by right clicking on the author name and selecting Manage this author.
Similarly, if you download metadata for the book, the Book details panel will automatically show you links pointing to the web pages for the book on Amazon, WorldCat, etc. from where the metadata was downloaded.
You can right click on individual e-book formats in the Book details panel to delete them, compare them to their original versions, save them to disk, open them with an external program, etc.
You can change the cover of the book by simply drag and dropping an image onto the Book details panel. If you wish to edit the cover image in an external program, simply right click on it and choose Open with.
You can also add e-book files to the current book by drag and dropping the files onto the Book details panel.
Double clicking the Book details panel will open it up in a separate popup window.
Finally, you can customize exactly what information is displayed in the Book details panel via Preferences → Interface → Look & feel → Book details.
Navigatore dei Tag
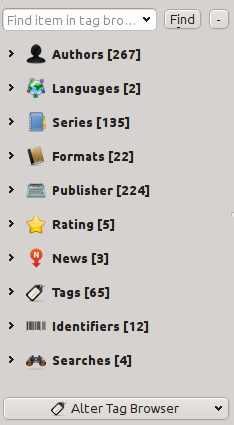
The Tag browser allows you to easily browse your collection by Author/Tags/Series/etc. If you click on any item in the Tag browser, for example the author name Isaac Asimov, then the list of books to the right is restricted to showing books by that author. You can click on category names as well. For example, clicking on «Series» will show you all books in any series.
The first click on an item will restrict the list of books to those that contain or match the item. Continuing the above example, clicking on Isaac Asimov will show books by that author. Clicking again on the item will change what is shown, depending on whether the item has children (see sub-categories and hierarchical items below). Continuing the Isaac Asimov example, clicking again on Isaac Asimov will restrict the list of books to those not by Isaac Asimov. A third click will remove the restriction, showing all books. If you hold down the Ctrl or Shift keys and click on multiple items, then restrictions based on multiple items are created. For example you could hold Ctrl and click on the tags History and Europe for finding books on European history. The Tag browser works by constructing search expressions that are automatically entered into the Search bar. Looking at what the Tag browser generates is a good way to learn how to construct basic search expressions.
Items in the Tag browser have their icons partially colored. The amount of color depends on the average rating of the books in that category. So for example if the books by Isaac Asimov have an average of four stars, the icon for Isaac Asimov in the Tag browser will be 4/5th colored. You can hover your mouse over the icon to see the average rating.
The outer-level items in the Tag browser, such as Authors and Series, are called categories. You can create your own categories, called User categories, which are useful for organizing items. For example, you can use the User categories editor (click the Configure button at the lower-left of the Tag browser and choose Manage authors, tags, etc → User categories) to create a User category called Favorite Authors, then put the items for your favorites into the category. User categories can have sub-categories. For example, the User category Favorites.Authors is a sub-category of Favorites. You might also have Favorites.Series, in which case there will be two sub-categories under Favorites. Sub-categories can be created by right-clicking on a User category, choosing Add sub-category to…, and entering the sub-category name; or by using the User categories editor by entering names like the Favorites example above.
- You can search User categories in the same way as built-in categories, by clicking on them. There are four different searches cycled through by clicking:
«everything matching an item in the category» indicated by a single green plus sign.
«everything matching an item in the category or its sub-categories» indicated by two green plus signs.
«everything not matching an item in the category» shown by a single red minus sign.
«everything not matching an item in the category or its sub-categories» shown by two red minus signs.
It is also possible to create hierarchies inside some of the text categories such as tags, series, and custom columns. These hierarchies show with the small triangle, permitting the sub-items to be hidden. To use hierarchies of items in a category, you must first go to Preferences → Interface → Look & feel and enter the category name(s) into the «Categories with hierarchical items» field. Once this is done, items in that category that contain periods will be shown using the small triangle. For example, assume you create a custom column called «Genre» and indicate that it contains hierarchical items. Once done, items such as Mystery.Thriller and Mystery.English will display as Mystery with the small triangle next to it. Clicking on the triangle will show Thriller and English as sub-items. See Managing subgroups of books, for example «genre» for more information.
Hierarchical items (items with children) use the same four “click-on” searches as User categories. Items that do not have children use two of the searches: «everything matching» and «everything not matching».
You can drag and drop items in the Tag browser onto User categories to add them to that category. If the source is a User category, holding the Shift key while dragging will move the item to the new category. You can also drag and drop books from the book list onto items in the Tag browser; dropping a book on an item causes that item to be automatically applied to the dropped books. For example, dragging a book onto Isaac Asimov will set the author of that book to Isaac Asimov. Dropping it onto the tag History will add the tag History to the book’s tags.
You can easily find any item in the Tag browser by clicking the search button at the lower-right corner. In addition, you can right click on any item and choose one of several operations. Some examples are to hide it, rename it, or open a «Manage x» dialog that allows you to manage items of that kind. For example, the Manage authors dialog allows you to rename authors and control how their names are sorted.
You can control how items are sorted in the Tag browser via the Configure button at the lower-left of the Tag browser. You can choose to sort by name, average rating or popularity (popularity is the number of books with an item in your library; for example, the popularity of Isaac Asimov is the number of books in your library by Isaac Asimov).
You can use your own icons for categories and values in categories. To change the icon for a category, right-click on the category (the outer-level item) and choose Change (category name) category icon. A dialog will open where you can pick an image to be used as the icon. To restore the icon to its default choose Restore (category name) default icon.
To choose icons for values in categories, right-click on a value then choose Manage icon for (value name). You will see a list of choices:
Choose an icon for this value but not its children. A dialog will open where you choose an icon for the value. Children of that value will not inherit that icon.
Choose an icon for this value and its children. A dialog will open where you choose an icon for the value. Any children that don’t have their own specified icon will inherit this icon.
Use the existing icon for this value but not its children. This option is offered if the value already has an icon that is inherited by the value’s children. Selecting it will make the icon apply to the value but not its children.
Use the existing icon for this value and its children. This option is offered if the value already has an icon that is not inherited by the value’s children. Selecting it will make the icon apply to the value and its children.
Use the default icon for this value. This option is offered if the item has an icon. It removes the icon from the value and any children inheriting the icon. The default icon is what is specified below.
Reset all value icons to the default icon. This option removes all item value icons for the category. It does not remove a template if one exists. There is no undo.
Use/edit a template to choose the default value icon. This option permits you to provide a calibre template that returns the name of an icon file to be used as a default icon. The template can use the following variables:
category: the lookup name of the category, for exampleauthors,series,#mycolumn.value: the value of the item within the category.count: the number of books with this value. If the value is part of a hierarchy then the count includes the children.avg_rating: the average rating for books with this value. If the value is part of a hierarchy then the average includes the children.
Book metadata such as title is not available. Template database functions such as book_count and book_values will work, but the performance might not be acceptable. The following template functions will work in the GUI but won’t work in the content server: connected_device_name, connected_device_uuid, current_virtual_library_name, is_marked, and virtual_libraries.
In the GUI, Python templates have full access to the calibre database. In the content server, Python templates have access to new API (see API documentation for the database interface) but not the old API (LibraryDatabase).
For example, this template specifies that any value in the clicked-on category beginning with History will have an icon named
flower.png:program: if substr($value, 0, 7) == 'History' then 'flower.png' fi
If a template returns the empty string (
'') then the category icon will be used. If the template returns a file name that doesn’t exist then no icon is displayed.Use the category icon as the default. This option specifies that the icon used for the category should be used for any value that doesn’t otherwise have an icon. Selecting this option removes any template icon specification.
The icon is chosen using the following hierarchy:
The icon specified for the value, if it exists.
The icon specified for a parent node found by walking up the tree, if one exists.
The icon from a template, if a template exists and it returns a non-empty string.
The default category icon, which always exists.
Icons are per-user, not per-library, stored in the calibre configuration folder. Icons for item values are stored in the tb_icons subfolder. Icons used by templates are in the template_icons subfolder of tb_icons.
Griglia delle copertine
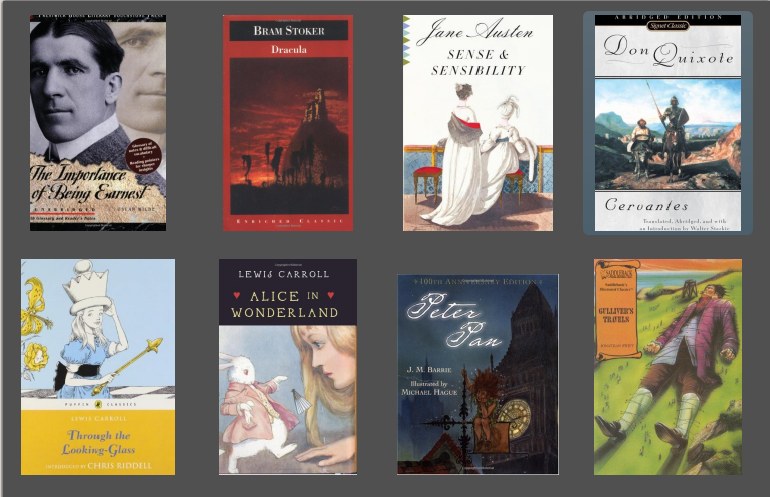
You can have calibre display a grid of book covers instead of a list of books, if you prefer to browse your collection by covers instead. The Cover grid is activated by clicking the Layout button in the bottom right corner of the main calibre window. You can customize the cover sizes and the background of the Cover grid via Preferences → Interface → Look & feel → Cover grid. You can even have calibre display any specified field under the covers, such as title or authors or rating or a custom column of your own devising.
Bookshelf view
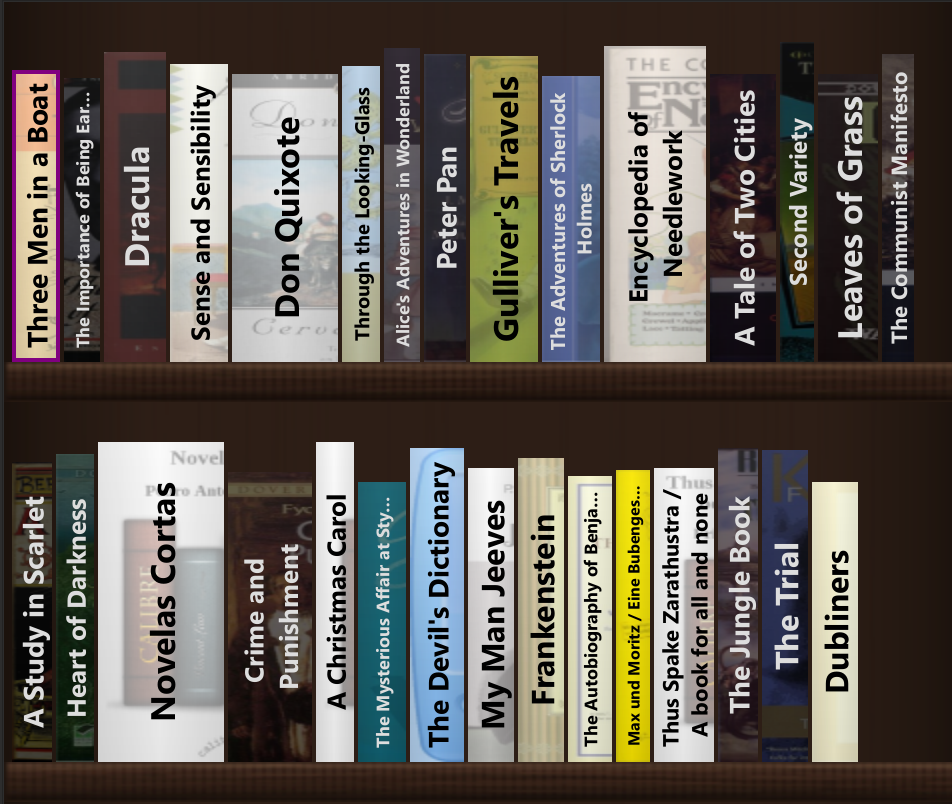
You can have calibre display your book collection in shelves, optionally grouped by authors/date/rating etc. The Bookshelf view is activated by clicking the Layout button in the bottom right corner of the main calibre window. You can customize everything about the view from the background, to the text on the spines, the fonts, et cetera via Preferences → Interface → Look & feel → Bookshelf.
Navigatore delle copertine
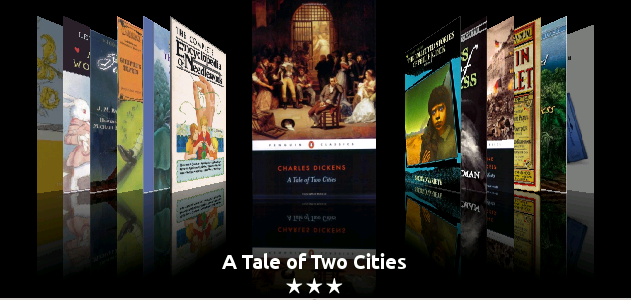
In addition to the Cover grid described above, you can also have calibre display covers in a single row. This is activated via the Layout button in the lower right corner of the main window. In Preferences → Interface → Look & feel → Cover browser you can change the number of covers displayed, and even have the Cover browser display itself in a separate popup window.
Aggiunta di note ad autori, serie, ecc.
You can add notes for an author/series/tag/publisher/etc. to your calibre library. To do so right click on the author name in the Tag browser on the left or the Book details panel on the right and choose Create note or Edit note.
A simple popup window will allow you to enter your notes using basic formatting and supporting links and images. Once a note for an author is created, it can be viewed easily from the Book details panel by clicking the little pencil icon next to the author name.
You can search through all the notes in your library using the Browse notes tool by pressing Ctrl+Shift+N or adding it to the toolbar via Preferences → Toolbars & menus.
Quickview
Sometimes you want to select a book and quickly get a list of books with the same value in some category (authors, tags, publisher, series, etc.) as the currently selected book, but without changing the current view of the library. You can do this with Quickview. Quickview opens either a second window or a panel in the book list showing the list of books matching the value of interest. For example, assume you want to see a list of all the books with one or more of the authors of the currently-selected book. Click in the author cell you are interested in and press the “Q” key or click the Quickview icon in the Layout section of the calibre window. A window or panel will open with all the authors for that book on the left, and all the books by the selected author on the right.
- Some example Quickview usages: quickly seeing what other books:
have some tag(s) applied to the currently selected book,
sono nelle stesse serie come il libro corrente
have the same values in a custom column as the current book
sono scritti da uno degli stessi autori del libro corrente
share values in a custom column
There are two choices for where the Quickview information appears:
It can open «undocked»: on top of the calibre window and will stay open until you explicitly close it.
It can open «docked»: as a panel in the book list section of the calibre main window.
You can move the window from docked to undocked as desired using the «Dock/Undock» button.
The Quickview panel can be left open permanently, in which case it follows movements on the book list. For example, if you click in the calibre library view on a category column (tags, series, publisher, authors, etc.) for a book, the Quickview window contents will change to show you in the left-hand side panel the values in that category for the selected book (e.g., the tags for that book). The first item in that list will be selected, and Quickview will show you on the right-hand side panel all the books in your library that use that value. Click on a different value in the left-hand panel to see the books with that different value.
Double-click on a book in the Quickview window to select that book in the library view. This will also change the items display in the QuickView window (the left-hand panel) to show the items in the newly-selected book.
Shift- or Ctrl- double-click on a book in the Quickview window to open the edit metadata dialog on that book in the calibre window. The edited book will be Quickview’ed when you close the edit metadata dialog.
You can see if a column can be Quickview’ed by hovering your mouse over the column heading and looking at the tooltip for that heading. You can also know by right-clicking on the column heading to see if the «Quickview» option is shown in the menu, in which case choosing that Quickview option is equivalent to pressing “Q” in the current cell.
Options (in Preferences → Look & feel → Quickview):
Respect (or not) the current Virtual library. If checked then Quickview shows only books in the current Virtual library. Default: respect Virtual libraries
Change the Quickview window contents when the column is changed on the book list using the cursor keys. Default: don’t follow changes made with cursor keys
Change the column being «quickview’ed» when a cell in the Quickview window is double-clicked. Otherwise the book is changed but the column being examined is not. Default: change the column
Change the column being «quickview’ed» to the current column when the return key is pressed in the Quickview panel. Otherwise the book is changed but the column being examined is not. Default: change the column
Scegliere quali colonne vengono visualizzate nella finestra/pannello Quickview.
Lavori

The Jobs panel shows the number of currently running jobs. Jobs are tasks that run in a separate process. They include converting e-books and talking to your reader device. You can click on the jobs panel to access the list of jobs. Once a job has completed you can see a detailed log from that job by double-clicking it in the list. This is useful to debug jobs that may not have completed successfully.
Scorciatoie da tastiera
calibre has several keyboard shortcuts to save you time and mouse movement. These shortcuts are active in the book list view (when you’re not editing the details of a particular book), and most of them affect the title you have selected. The calibre E-book viewer has its own shortcuts which can be customised in the viewer Preferences.
Nota
Nota: le scorciatoie da tastiera di calibre non richiedono un tasto modificatore (Command, Option, Control, etc.), a meno che non sia specificamente indicato. Sarà necessario premere solo il tasto della lettera, ad esempio E per modificare.
Scorciatoia da tastiera |
Azione |
|---|---|
F2 (Invio in macOS) |
Edit the metadata of the currently selected field in the book list. |
A |
Aggiungi libri |
Shift+A |
Aggiungere formati ai libri selezionati |
C |
Convertire i libri selezionati |
D |
Invia al dispositivo |
Del |
Rimuovi i libri selezionati |
E |
Modifica i metadati dei libri selezionati |
G |
Ottieni libri |
I |
Mostra i dettagli del libro |
K |
Modifica indice |
M |
Unisci i record selezionati |
Alt+M |
Unisci i record selezionati, mantenendo gli originali |
O |
Apri cartella contenente |
P |
Pulisci libri |
S |
Salva su disco |
T |
Modifica libro |
V |
Leggi |
Shift+V |
Visualizza l’ultimo libro letto |
Ctrl+Alt+A |
Ask AI about the currently selected books |
Alt+V/Cmd+V in macOS |
Leggi un formato specifico |
Alt+Shift+J |
Mostra/nascondi l’elenco dei lavori |
Alt+Shift+B |
Mostra/nascondi il Navigatore delle copertine |
Alt+Shift+D |
Mostra/nascondi il pannello Dettagli libro |
Alt+Shift+T |
Mostra/nascondi il Navigatore dei Tag |
Alt+Shift+G |
Mostra/nascondi la Griglia delle copertine |
Alt+Shift+H |
Toggle Bookshelf |
Alt+A |
Mostra libri dello stesso autore del libro corrente |
Alt+T |
Mostra libri con gli stessi tag del libro corrente |
Alt+P |
Mostra libri dello stesso editore del libro corrente |
Alt+Shift+S |
Mostra libri della stessa serie del libro corrente |
/, Ctrl+F |
Posiziona il cursore nella Barra di Ricerca |
Shift+Ctrl+F |
Apri la finestra di Ricerca Avanzata |
Shift+Alt+F |
Mostra/nascondi la Barra di Ricerca |
Esc |
Cancella la ricerca corrente |
Shift+Esc |
Attiva l’elenco dei libri |
Ctrl+Esc |
Abbandona la Biblioteca virtuale |
Alt+Esc |
Cancella la restrizione aggiuntiva |
Ctrl+* |
Crea una Biblioteca Virtuale temporanea basata sulla ricerca corrente |
Ctrl+Tab |
Seleziona la scheda di Biblioteca Virtuale successiva |
Ctrl+Shift+Tab |
Seleziona la scheda di Biblioteca Virtuale precedente |
N oppure F3 |
Trova il libro successivo che corrisponde alla ricerca corrente (funziona solo se l’evidenziazione dei risultati è attivata nelle preferenze di ricerca) |
Shift+N oppure Shift+F3 |
Trova il libro precedente che corrisponde alla ricerca corrente (funziona solo se l’evidenziazione dei risultati è attivata nelle preferenze di ricerca) |
Ctrl+D |
Scarica metadati e copertine |
Ctrl+R |
Riavvia calibre |
Ctrl+Shift+R |
Riavvia calibre in modalità debug |
Shift+Ctrl+E |
Aggiungi libri vuoti a calibre |
Ctrl+M |
Marca/rimuovi marcatura dai libri selezionati |
Ctrl+/ o Ctrl+Alt+F |
Apri la finestra di ricerca nei contenuti di tutti i libri della biblioteca |
Q |
Apri il pannello Quickview per visualizzare i libri con serie/tag/ecc. collegati |
Shift+Q |
Sposta il focus sul pannello Quickview |
Shift+S |
Esegui una ricerca nel pannello Quickview |
F5 |
Riapplica l’ordinamento corrente |
Ctrl+Q |
Esci da calibre |
X |
Attiva/disattiva lo scorrimento automatico dell’elenco dei libri |
Ctrl+Alt+Shift+F |
Restrict the displayed books to only those books that are in a category currently displayed in the Tag browser |
B |
Browse annotations (highlights and bookmarks) made in the calibre E-book viewer for all books in the library |
Ctrl+Maiusc+N |
Browse notes associated with authors/series/tags/etc. |
Alt+Shift+L |
Toggle the layout between wide and narrow views |
Ctrl+Alt+P |
Switch to previous library, if any |
Ctrl+Alt+Shift+P |
Switch to previous virtual library, if any |