 Alterar idioma
Trechos
O editor Calibre de ebook suporta trechos. Um trecho é um pedaço de texto que é reutilizado com frequência ou contém algum texto redundante. O editor permite que você insira um trecho com apenas algumas combinações de teclas. Por exemplo, suponha que você insira frequentemente etiquetas de hiperligação ao editar ficheiros HTML: poderá digitar simplesmente <a no editor e premir Control+J. O editor irá expandi-lo para:
<a href="filename"></a>
Não apenas isto, a palavra filename será selecionada, com o cursor sobre ela, assim você pode facilmente digitar o verdadeiro nome do arquivos, usando o recurso astucioso do editor Auto-completar. Assim que você terminar de digitar o nome do arquivo, pressione Control+J novamente e o cursor se moverá para a posição entre as tags <a>, assim você poderá facilmente digitar o texto para o link.
O sistema de trechos do editor é muito sofisticado, há uma pequena quantidade de trechos embutidos e você pode criar seus próprios trechos para se adequar ao seu estilo de edição.
A seguinte discussão sobre os trechos embutidos devem ajudar a ilustrar o poder do sistema de trechos.
Nota
You can also use snippets in the text entry fields in the Search & replace
panel, however, placeholders (using Control+J to jump around) will not
work.
Trechos integrados
Os trechos embutidos estão descritos logo abaixo. Note que você pode substitui-los criando seus próprios trechos com o mesmo texto de ativação.
Inserindo texto de preenchimento [Lorem]
The first built-in snippet, and the simplest is used to insert filler text into
a document. The filler text is taken from De finibus bonorum et malorum a philosophical
work by Cicero (translated to English). To use it simply type Lorem in an
HTML file and press Control+J. It will be replaced by a couple of paragraphs of
filler.
A definição deste trecho é bem simples, o texto de ativação é definido como Lorem e o modelo é definido simplesmente como o texto literal a ser inserido. Você pode facilmente personaliza-lo para usar sua forma favorita de texto de preenchimento.
Inserindo uma tag HTML de fechamento automático [<>]
Agora olhe um simples exemplo do poderoso conceito de placeholders. Digamos que você queira inserir a tag de fechamento automático <hr/>. Apenas digite <>, e pressione Control+J, o editor expandirá o trecho para:
<|/>
Aqui, o símbolo | representa a atual posição do cursor. Você pode então pressionar hr e pressionar Control+J para mover o cursor para o final da tag. Este trecho é definido como:
Trigger: <>
Template: <$1/>$2
Placeholders são simplesmente o símbolo dólar ($) seguido por um número. Quando o trecho é expandido ao pressionar Control+J o cursor é posicionado no primeiro placeholder (aquele com o menor número). Quando você pressionar Control+J novamente, o cursor move-se para o próximo placeholder (aquel com o próximo número superior).
A inserir uma etiqueta de hiperligação HTML [<a]
Todas as tags HTML de link compartilham uma estrutura comum. Elas tem um atributo href e algum texto entre as tags de abertura e fechamento. Um trecho para tornar a digitação delas mais eficiente nos introduzirá a mais características dos placeholders. Para usar esse trecho, simplesmente digite <a e pressione Control+J. O editor vai expandir isso para:
<a href="filename|"></a>
Não só isso, a palavra «filename» vai ser selecionada, com o cursor localizado sobre esta, assim você pode facilmente digitar no nome do arquivo, usando o recurso de estilo do editor Auto-completar. E uma vez que você acabou de digitar o nome do arquivo, pressione Control+J novamente e o cursor vai pular para a posição entre as tags <a> assim você pode facilmente digitar o texto para o link. Depois de você acabar de digitar o texto, pressione Control+J novamente para pular para o ponto depois da tag de fechamento. Esse fragmento é definido como:
Trigger: <a
Template: <a href="${1:filename}">${2*}</a>$3
There are a couple of new features here. First the $1 placeholder has
become more complex. It now includes some default text (the word
filename). If a placeholder contains default text, the default text is
substituted for the placeholder when the snippet is expanded. Also when you
jump to a placeholder with default text using Control+J, the default text is
selected. In this way, you can use default text to act as a reminder to you to
fill in important parts of the template. You can specify default text for a
placeholder by using the syntax: ${<number>:default text}.
The other new feature is that the second placeholder has an asterisk after it
(${2*}). This means that any text that was selected before expanding the
template is substituted for the placeholder. To see this in action, select some
text in the editor, press Control+J, type <a and press Control+J again, the template
will be expanded to:
<a href="filename">whatever text you selected</a>
Inserting an HTML image tag [<i]
This is very similar to inserting an HTML link, as we saw above. It allows you
to quickly input an <img src="filename" alt="description" /> tag and jump
between the src and alt attributes:
Trigger: <i
Template: <img src="${1:filename}" alt="${2*:description}" />$3
Inserir uma etiqueta HTML aleatória [<<]
This allows you to insert an arbitrary full HTML tag (or wrap previously
selected text in the tag). To use it, simply type << and press Control+J.
If you want to wrap selected text, first select the text, press Control+J then
type << and press Control+J again.
The editor will expand it to:
<|></>
Digite o nome da etiqueta, por exemplo: span e pressione Control+J, isto irá resultar em:
<span>|</span>
You will note that the closing tag has been automatically filled with span.
This is achieved with yet another feature of placeholders, mirroring.
Mirroring simply means that if you specify the same placeholder more than
once in a template, the second and all later positions will be automatically
filled in with whatever you type in the first position, when you press Control+J.
The definition for this snippet is:
Trigger: <<
Template: <$1>${2*}</$1>$3
As you can see, the first placeholder ($1) has been specified twice, the second time in the closing tag, which will simply copy whatever you type in the opening tag.
A inserir uma etiqueta HTML aleatória com o atributo de classe [<c]
This is very similar to the insert arbitrary tag example above, except that it assumes that you want to specify a class for the tag:
Trigger: <c
Template: <$1 class="${2:classname}">${3*}</$1>$4
This will allow you to first type the tag name, press Control+J, type the class
name, press Control+J type the contents of the tag and press Control+J one last time to
jump out of the tag. The closing tag will be auto-filled.
Criar os seus próprios trechos
Snippets really shine because you can create your own to suit your editing style. To create your own snippets go to Edit → Preferences → Editor settings → Manage snippets in the editor. This will pop-up an easy to use dialog to help you create your own snippets. Simply click the Add snippet button and you will see a dialog that looks like:
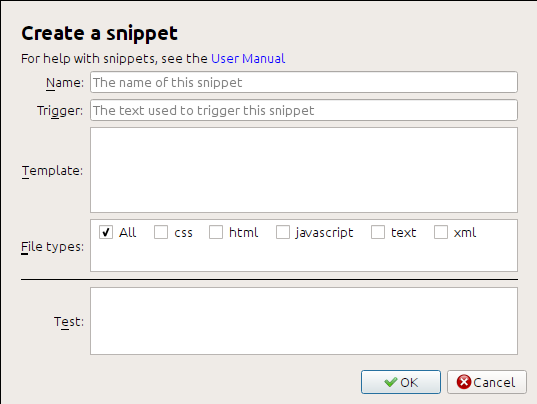
First give your snippet a name, something descriptive, to help identify the
snippet in the future. Then specify the trigger. A trigger is simply the text
that you have to type in the editor before pressing Control+J in order to expand the
snippet.
Then specify the snippet template. You should start with one of the examples above and modify it to suit your needs. Finally, specify which file types you want the snippet to be active for. This way you can have multiple snippets with the same trigger text that work differently in different file types.
O próximo passo é testar o seu novo trecho criado. Use a caixa Teste na parte inferior. Digite o texto de ativação e pressione Control+J para expandir o trecho e mover-se entre os placeholders.