 Dil değiştir
E-kitap dönüşümü
calibre’nin kullanımı çok kolay olacak şekilde tasarlanmış bir dönüştürme sistemi vardır. Normalde calibre’ye bir kitap eklersiniz, dönüştür’e tıklarsınız ve calibre girdiye mümkün olduğu kadar yakın çıktı üretmek için çok çabalar. Ancak calibre çok sayıda giriş formatını kabul eder ve bunların hepsi e-kitaplara dönüştürme için diğerleri kadar uygun değildir. Bu tür giriş formatları durumunda veya dönüştürme sistemi üzerinde daha fazla kontrol istiyorsanız, calibre’nin dönüştürme sürecine ince ayar yapmak için birçok seçeneği vardır. Ancak calibre’nin dönüştürme sisteminin tam gelişmiş bir e-kitap düzenleyicinin yerini alamayacağını unutmayın. E-kitapları düzenlemek için, önce onları calibre kullanarak EPUB veya AZW3’e dönüştürmenizi ve ardından onları mükemmel bir şekle sokmak için Kitabı düzenle özelliğini kullanmanızı öneririm. Daha sonra düzenlenen e-kitabı calibre’deki diğer formatlara dönüştürmek için girdi olarak kullanabilirsiniz.
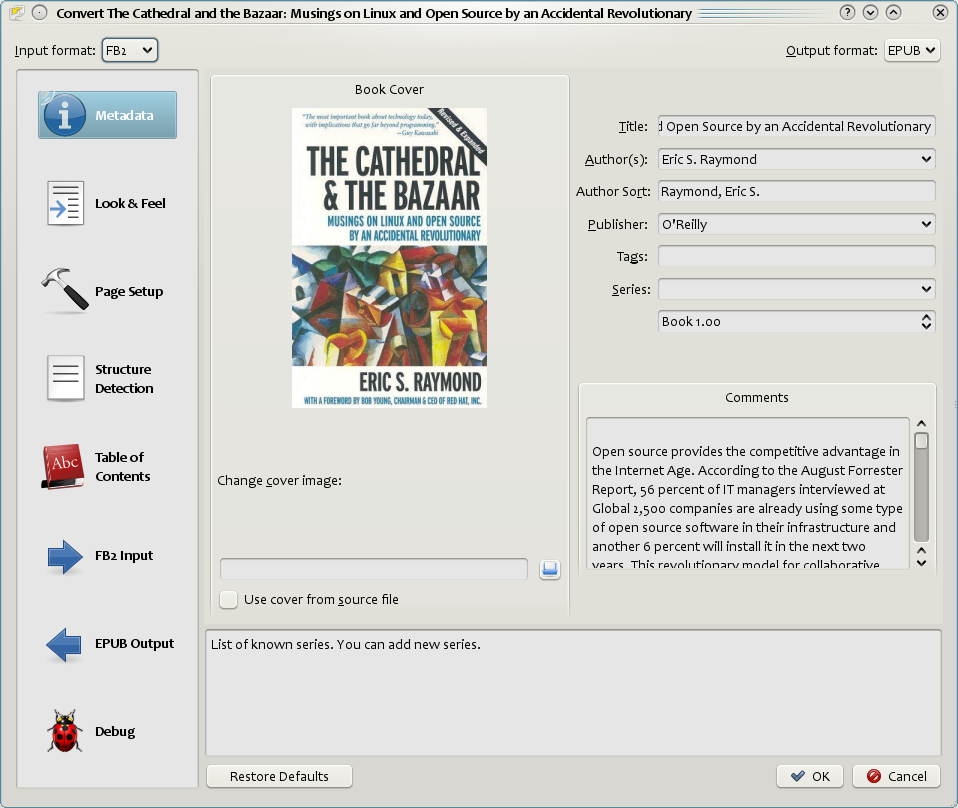
Bu belge çoğunlukla aşağıda resmi olan dönüştürme penceresinde bulunan dönüştürme ayarlarına değinecektir. Tüm bu ayarlar ayrıca ebook-convert belgesinde belgelenen dönüştürme komut satırı arayüzü ile de kullanılabilirdir. Calibre’de, tüm ayarlar için yardım metnini fareyi ayar üzerinde tutarak edinebilirsiniz, ilgili ayarı anlatan bir araç ipucu çıkacaktır.
Giriş
Dönüşüm sistemi hakkında anlaşılması gereken ilk şey, bunun düz bir hat şeklinde tasarlandığıdır. Sistemin şematik görünüşü şöyledir:
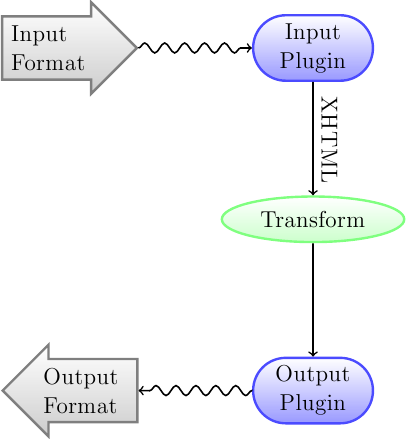
The input format is first converted to XHTML by the appropriate Input plugin. This HTML is then transformed. In the last step, the processed XHTML is converted to the specified output format by the appropriate Output plugin. The results of the conversion can vary greatly, based on the input format. Some formats convert much better than others. A list of the best source formats for conversion is available here.
XHTML çıktısına etki eden dönüşümler, tüm işin gerçekleştiği yerdir. Örneğin kitap meta verilerini kitabın başına bir sayfa olarak eklemek, bölüm başlıklarını tespit etmek ve otomatik olarak bir İçindekiler Tablosu oluşturmak, yazı tipi boyutlarını orantılı olarak ayarlamak vb. gibi çeşitli dönüşümler vardır. Tüm dönüşümlerin, giriş dosyasının kendisi üzerinde değil, Giriş eklentisi tarafından XHTML çıkışı üzerinde etkili olduğunu unutmamak önemlidir. Yani, örneğin, calibre’den bir RTF dosyasını EPUB’a dönüştürmesini isterseniz, bu dosya önce dahili olarak XHTML’ye dönüştürülecek, çeşitli dönüşümler XHTML’ye uygulanacak ve ardından Çıktı eklentisi EPUB dosyasını oluşturarak otomatik olarak oluşturacaktır. tüm meta veriler, İçindekiler Tablosu vb.
 hata ayıklama seçeneğini kullanarak bu işlemi çalışırken görebilirsiniz. Hata ayıklama çıktısı için klasörün yolunu belirtmeniz yeterlidir. Dönüştürme sırasında calibre, dönüştürme hattının çeşitli aşamaları tarafından oluşturulan XHTML’yi farklı alt klasörlere yerleştirir. Dört alt klasör şunlardır:
Dizin |
Açıklama |
|---|---|
girdi |
Bu, Giriş eklentisinin HTML çıktısını içerir. Giriş eklentisindeki hataları ayıklamak için bunu kullanın. |
çözümlenmiş |
Giriş eklentisinden gelen çıktının ön işlenmesi ve XHTML’ye dönüştürülmesinin sonucu. Yapı tespitinde hata ayıklamak için kullanın. |
yapı |
CSS düzleme ve yazı tipi boyutu dönüştürmeden önce, yapı sonrası algılama. Yazı tipi ve CSS dönüşümlerindeki hataları ayıklamak için kullanın. |
işlenmiş |
E-kitap Çıktı eklentisine aktarılmadan hemen önce. Çıkış eklentisinde hata ayıklamak için kullanın. |
Calibre’nin dönüştürmesini yapmadan önce giriş belgesini biraz düzenlemek isterseniz, yapılacak en iyi şey input alt klasöründeki dosyaları düzenlemek, sonra onu sıkıştırıp ZIP dosyasını giriş olarak kullanmaktır. sonraki dönüşümler için format. Bunu yapmak için Meta bilgileri düzenle iletişim kutusunu kullanarak ZIP dosyasını kitabın formatı olarak ekleyin ve ardından dönüştürme iletişim kutusunun sol üst köşesinde giriş formatı olarak ZIP’i seçin.
Bu belge esas olarak ara XHTML üzerinde çalışan çeşitli dönüşümleri ve bunların nasıl kontrol edileceğini ele alacaktır. Sonunda her giriş/çıkış formatına özel bazı ipuçları bulunmaktadır.
Görünüm
Bu seçenek grubu, dönüştürülen e-kitabın görünüm ve hissinin çeşitli yönlerini kontrol eder.
Fontlar
One of the nicest features of the e-reading experience is the ability to easily adjust font sizes to suit individual needs and lighting conditions. calibre has sophisticated algorithms to ensure that all the books it outputs have consistent font sizes, no matter what font sizes are specified in the input document.
Bir dökümanın baz yazı tipi boyutu, o dökümandaki en sık kullanılan yazı tipi boyutu ya da diğer bir ifadeyle dökümandaki içeriğin büyük kısmında kullanılan boyuttur. Bir Baz yazı tipi boyutu belirlediğinizde, Calibre otomatik olarak dökümandaki bütün yazı tipi boyutlarını bu değere oransal olarak yeniden ayarlar, böylece en çok kullanılan yazı tipi boyutu belirlenen boyut olur ve diğer yazı tipi büyüklükleri de buna uygun olarak belirlenir. Örneğin daha büyük bir baz font boyutu belirleyerek, dökümandaki tüm yazı tipi boyutlarının büyümesi (Ya da daha küçük baz yazı tipi seçildiğinde tüm yazı tipi boyutlarının küçülmesi) sağlanabilir. En iyi sonuca ulaşabilmek için bir baz yazı tipi büyüklüğü belirlediğinizde yazı tipi boyutu anahtar değerinin de belirlenmesi yerinde olacaktır.
Normally, calibre will automatically choose a base font size appropriate to the output profile you have chosen (see Sayfa yapısı). However, you can override this here in case the default is not suitable for you.
Yazı tipi boyutu anahtarı opsiyonu baz yazı tipi dışındaki yazı tiplerinin nasıl boyutlandırılacağının kontrol edilmesini sağlar. Bu opsiyon temelde yazı tipi boyutlarının birbirinden virgülle ayrıldığı bir listedir. Anahtar değeri Calibre’ye bir yazı tipinin baz yazı tipine oranla kaç “Adım” büyük ya da küçük olacağını belirtir. Normalde bir dökümanda sınırlı sayıda yazı tipi boyutu kullanılmış olmalıdır. Örneğin “normal metinler için bir boyut, farklı derecedeki başlıklar için birkaç boyut ve dipnot vb. kullanımlar için daha birkaç boyut” gibi. Yazı tipi boyutu anahtarı Calibre’ye, girdi dökümandaki farklı yazı tipi boyutlarını farklı “kategoriler” altında gruplandırma olanağı sağlar.
Bir örnek üzerinden gidecek olursak; Kaynak dökümanımız 8pt. baz yazı tipi boyutuna sahip olsun. Bu durumda dökümandaki metnin büyük kısmı 8pt olacaktır, başlıklar biraz daha büyük (Mesela 10 ve 12 pt) ve dipnotlar da 6pt gibi daha küçük bir boyutta olsun. Eğer bu örnek için aşağıdaki ayarları kullanırsak:
Base font size : 12pt
Font size key  : 7, 8, 10, 12, 14, 16, 18, 20
Çıktı 12pt baz yazı tipi boyutuna sahipken başlıklar 14 ve 16 pt, dipnotlar ise 8pt olacaktır. Şimdi varsayalım ki büyük başlıkların ve dipnotların boyutunu biraz daha büyüterek bunları öne çıkarmak istiyoruz. Bunun için yazı tipi anahtarının değeri şu şekilde güncellenir:
New font size key : 7, 9, 12, 14, 18, 20, 22
Şimdi büyük başlıklar 18pt olurken dipnotlar 9pt olarak boyutlandırılacak. Hangisinin sizin için en uygun olduğunu anlamak için bu değerleri yazı tipi boyutlandırma sihirbazını kullanarak değiştirebilirsiniz. Bu sihirbaza Yazı tipi boyutu anahtarı bölümünün hemen yanındaki küçük buton ile ulaşabilirsiniz.
Girdi belgesindeki yazı tipi boyutlarını korumak isterseniz, tüm yazı tipi yeniden ölçekleme işlemi buradan kapatılabilir.
A related setting is Line height. Line height controls the vertical height of lines. By default, (a line height of 0), no manipulation of line heights is performed. If you specify a non-default value, line heights will be set in all locations that don’t specify their own line heights. However, this is something of a blunt weapon and should be used sparingly. If you want to adjust the line heights for some section of the input, it’s better to use the Extra CSS.
In this section you can also tell calibre to embed any referenced fonts into the book. This will allow the fonts to work on reader devices even if they are not available on the device.
Metin
Text can be either justified or not. Justified text has extra spaces between words to give a smooth right margin. Some people prefer justified text, others do not. Normally, calibre will preserve the justification in the original document. If you want to override it you can use the Text justification option in this section.
You can also tell calibre to Smarten punctuation which will replace plain quotes, dashes and ellipses with their typographically correct alternatives. Note that this algorithm is not perfect so it is worth reviewing the results. The reverse, namely, Unsmarted punctuation is also available.
Finally, there is Input character encoding. Older documents sometimes don’t specify their character encoding. When converted, this can result in non-English characters or special characters like smart quotes being corrupted. calibre tries to auto-detect the character encoding of the source document, but it does not always succeed. You can force it to assume a particular character encoding by using this setting. cp1252 is a common encoding for documents produced using Windows software. You should also read İngiliz alfabesi dışında karakterler, veya akıllı tırnak içeren dosyamı nasıl dönüştürürüm? for more on encoding issues.
Yerleşim
Normalde XHTML’de paragraflar aralarında bir satır boşluk olacak şekilde ve takip eden metin girintisi bulunmadan gerçeklenir. Calibre’nin bunu kontrol etmek için bir takım seçenekleri vardır. Paragraflar arası boşlukları kaldır tüm paragrafların iç paragraf boşluğu olmamasını garantiler. Ayrıca paragrafın başlangıcını işaretlemek için metin girintisini 1.5em olarak ayarlar (değiştirilebilir). :guilabel: Boş satır ekle tam tersini yapar, her paragraf arası bir boş satır olduğundan emin olur. Bu iki seçenek de çok kapsamlıdır, boşlukların kaldırılması, veya tüm paragraflara eklenmesi (teknik olarak <p> ve <div> etiketleri). Bunun sebebi seçeneği ayarladıktan sonra yapacağını söylediği şeyi yaptığından emin olmanızı sağlamaktır, girdi dosyası ne kadar dağınık olsa da. Bir istisna girdi dosyasının iç paragraflar için boşluksuz satır başı yaptığı durumdur.
If you want to remove the spacing between all paragraphs, except a select few, don’t use these options. Instead add the following CSS code to Extra CSS:
p, div { margin: 0pt; border: 0pt; text-indent: 1.5em }
.spacious { margin-bottom: 1em; text-indent: 0pt; }
Then, in your source document, mark the paragraphs that need spacing with class=”spacious”.
If your input document is not in HTML, use the Debug option, described in the Introduction to get HTML
(use the input sub-folder).
Another useful option is Linearize tables. Some badly designed documents use tables to control the layout of text on the page. When converted these documents often have text that runs off the page and other artifacts. This option will extract the content from the tables and present it in a linear fashion. Note that this option linearizes all tables, so only use it if you are sure the input document does not use tables for legitimate purposes, like presenting tabular information.
Stil
The Extra CSS option allows you to specify arbitrary CSS that will be applied to all HTML files in the input. This CSS is applied with very high priority and so should override most CSS present in the input document itself. You can use this setting to fine tune the presentation/layout of your document. For example, if you want all paragraphs of class endnote to be right aligned, just add:
.endnote { text-align: right }
ya da tüm paragraflardaki girintilemeyi değiştirmek için:
p { text-indent: 5mm; }
Fazladan CSS çok güçlü bir seçenektir, ama tam anlamıyla kullanabilmek için CSS nasıl çalışır iyice anlamış olmalısınız. Girdi belgenizde hangi CSS’lerin mevcut olduğunu öğrenmek için aşağıda belirtilen hata ayıklama boru hattı seçeneğini kullanabilirsiniz.
A simpler option is to use Filter style information. This allows you to remove all CSS properties of the specified types from the document. For example, you can use it to remove all colors or fonts.
Stilleri dönüştür
This is the most powerful styling related facility. You can use it to define rules that change styles based on various conditions. For example you can use it to change all green colors to blue, or remove all bold styling from the text or color all headings a certain color, etc.
Transform HTML
Similar to transform styles, but allows you to make changes to the HTML content of the book. You can replace one tag with another, add classes or other attributes to tags based on their content, etc.
Sayfa yapısı
The Page setup options are for controlling screen layout, like margins and screen sizes. There are options to setup page margins, which will be used by the output plugin, if the selected output format supports page margins. In addition, you should choose an Input profile and an output profile. Both sets of profiles basically deal with how to interpret measurements in the input/output documents, screen sizes and default font rescaling keys.
If you know that the file you are converting was intended to be used on a particular device/software platform, choose the corresponding input profile, otherwise just choose the default input profile. If you know the files you are producing are meant for a particular device type, choose the corresponding output profile. Otherwise, choose one of the Generic output profiles. If you are converting to MOBI or AZW3 then you will almost always want to choose one of the Kindle output profiles. Otherwise, your best bet for modern E-book reading devices is to choose the Generic e-ink HD output profile.
The output profile also controls the screen size. This will cause, for example, images to be auto-resized to be fit to the screen in some output formats. So choose a profile of a device that has a screen size similar to your device.
Sezgisel İşleme
Heuristic processing provides a variety of functions which can be used to try and detect and correct common problems in poorly formatted input documents. Use these functions if your input document suffers from poor formatting. Because these functions rely on common patterns, be aware that in some cases an option may lead to worse results, so use with care. As an example, several of these options will remove all non-breaking-space entities, or may include false positive matches relating to the function.
- Sezgisel işlemeyi etkinleştir
This option activates calibre’s Heuristic processing stage of the conversion pipeline. This must be enabled in order for various sub-functions to be applied
- Satırları kaydırma
Bu seçeneği etkinleştirmek calibre’nin bir belgede bulunan boşluksuz satır başlarını noktalama işaretleri ipuçları ve satır uzunluğu kullanarak algılayıp düzeltmeye çalışmasını sağlar. calibre önce boşluksuz satır başlarının mevcut olup olmadığını algılamaya çalışacak, yok gibi görünüyorsa da calibre satır kaydırmak yapmayacaktır. Satır kaydırma yapmama etmeni calibre’yi satır kaydırma yapmamaya ‘zorlamak’ istiyorsanız düşürülebilir.
- Satır-kaydırmama etmeni
This option controls the algorithm calibre uses to remove hard line breaks. For example, if the value of this option is 0.4, that means calibre will remove hard line breaks from the end of lines whose lengths are less than the length of 40% of all lines in the document. If your document only has a few line breaks which need correction, then this value should be reduced to somewhere between 0.1 and 0.2.
- Biçimsiz bölüm başlıkları ve alt başlıkları algıla ve işaretle
If your document does not have chapter headings and titles formatted differently from the rest of the text, calibre can use this option to attempt to detect them and surround them with heading tags. <h2> tags are used for chapter headings; <h3> tags are used for any titles that are detected.
This function will not create a TOC, but in many cases it will cause calibre’s default chapter detection settings to correctly detect chapters and build a TOC. Adjust the XPath under Structure detection if a TOC is not automatically created. If there are no other headings used in the document then setting “//h:h2” under Structure detection would be the easiest way to create a TOC for the document.
Eklenmiş başlıklar biçimlendirilmiş değiller, biçimleme eklemek için Görünüm ve Doku dönüştürme ayarları altındaki Ek CSS seçeneğini kullanın. Örneğin, başlık etiketlerini ortalamak için, şunu kullanın:
h2, h3 { text-align: center }
- <h1> veya <h2> etiket serisini yeniden numaralandır
Bazı dağıtımcılar bölüm başlıklarını birden çok <h1> veya <h2> etiketlerini sırayla kullanarak biçimlendirirler. calibre’nin varsayılan dönüştürme ayarları bu gibi konu başlıklarının iki parçaya ayrılmasına sebep olur. Bu seçenek ayrılmayı önlemek için başlık etiketlerini yeniden numaralandırır.
- Paragraflar arası boş satırları sil
This option will cause calibre to analyze blank lines included within the document. If every paragraph is interleaved with a blank line, then calibre will remove all those blank paragraphs. Sequences of multiple blank lines will be considered scene breaks and retained as a single paragraph. This option differs from the Remove paragraph spacing option under Look and Feel in that it actually modifies the HTML content, while the other option modifies the document styles. This option can also remove paragraphs which were inserted using calibre’s Insert blank line option.
- Sahne aralarının tutarlı biçimlendirildiğinden emin ol
Bu seçenekle, calibre, sık rastlanan sahne arası işaretçilerini algılamaya ve merkezde hizalandıklarından emin olmaya çalışır. ‘Yumuşak’ sahne arası işaretçilerinin, ör. sadece ek bir boşlukla belirtilen sahne aralarının, sayfa aralarıyla karışmayacak şekilde biçimlendiğinden emin olunur.
- Sahne aralarını değiştir
Bu seçenek yapılandırılmışsa, calibre kullanıcı tarafından belirtilen metinle bulduğu sahne arası işaretçilerini değiştirir. Lütfen bazı süsleyici karakterlerin tüm okuma aygıtlarında desteklenmiyor olabileceğini not edin.
In general you should avoid using HTML tags, calibre will discard any tags and use pre-defined markup. <hr /> tags, i.e. horizontal rules, and <img> tags are exceptions. Horizontal rules can optionally be specified with styles, if you choose to add your own style be sure to include the ‘width’ setting, otherwise the style information will be discarded. Image tags can used, but calibre does not provide the ability to add the image during conversion, this must be done after the fact using the ‘Edit book’ feature.
- Example image tag (place the image within an ‘Images’ folder inside the EPUB after conversion):
<img style=”width:10%” src=”../Images/scenebreak.png” />
- Biçemi olan örnek yatay kural:
<hr style=”width:20%;padding-top: 1px;border-top: 2px ridge black;border-bottom: 2px groove black;”/>
- Gereksiz kısa çizgileri sil
bu seçenek etkinken calibre belgedeki tüm tireli içeriği çözümler. Çözümleme için belgenin kendisi sözlük olarak kullanılır. Bu, calibre’nin herhangi bir dilde herhangi bir kelimedeki tireleri doğru şekilde kaldırmasına izin verir, uydurma ve belirsiz bilimsel kelimeler dahil. Birincil eksikliği belgede yalnızca bir kere geçen kelimelerin değiştirilmeyecek olmasıdır. Çözümleme iki aşamada olur, ilk aşama satır sonlarını inceler. Satırlar yalnızce kelime belgede tireli veya tiresiz mevcutsa kaydırılır. İkinci aşama belgedeki tüm tireli kelimeleri inceler, kelime belgede başka bir yerde eşleşme olmadan mevcutsa tireler kaldırılır.
- Yaygın kelime ve kalıpları yatık yap
Etkinleştirildiğinde, calibre yaygın kelime ve kalıpları arayıp yatık yazı ifade edenleri yatık hale getirir. Örnek verecek olursak, ~kelime~ gibi yaygın metinler, veya genel olarak yatık yazılması gereken deyimler, örn. latin kalıplardan ‘etc.’ veya ‘et cetera’.
- Birim girintilerini CSS girintileriyle değiştir
Some documents use a convention of defining text indents using non-breaking space entities. When this option is enabled calibre will attempt to detect this sort of formatting and convert them to a 3% text indent using CSS.
Bul & Değiştir
These options are useful primarily for conversion of PDF documents or OCR conversions, though they can also be used to fix many document specific problems. As an example, some conversions can leave behind page headers and footers in the text. These options use regular expressions to try and detect headers, footers, or other arbitrary text and remove or replace them. Remember that they operate on the intermediate XHTML produced by the conversion pipeline. There is a wizard to help you customize the regular expressions for your document. Click the magic wand beside the expression box, and click the ‘Test’ button after composing your search expression. Successful matches will be highlighted in Yellow.
The search works by using a Python regular expression. All matched text is simply removed from the document or replaced using the replacement pattern. The replacement pattern is optional, if left blank then text matching the search pattern will be deleted from the document. You can learn more about regular expressions and their syntax at Calibre’de kurallı ifadelerin kullanımına dair her şey.
Structure detection
Yapı algılama, yapılar tanımlanmadığında calibre’nin girdi belgesinde yapısal elemanları algılamak için elinden geleni yapması işini içerir. Örneğin bölümler, sayfa sonları, başlıklar, altbilgi, vs. Tahmin edeceğiniz gibi, bu işlem kitaptan kitaba farklılık gösterir. Neyse ki calibre bunu kontrol etmek için çok güçlü seçeneklere sahiptir. Bu güçle beraber karmaşıklık gelir, ama bu karmaşıklığı öğrenmek için biraz zaman ayırırsanız, çabanıza deydiğini göreceksiniz.
Bölümler ve sayfa sonları
calibre has two sets of options for chapter detection and inserting page breaks. This can sometimes be slightly confusing, as by default, calibre will insert page breaks before detected chapters as well as the locations detected by the page breaks option. The reason for this is that there are often locations where page breaks should be inserted that are not chapter boundaries. Also, detected chapters can be optionally inserted into the auto generated Table of Contents.
calibre uses XPath, a powerful language to allow the user to specify chapter boundaries/page breaks. XPath can seem a little daunting to use at first, fortunately, there is a XPath tutorial in the User Manual. Remember that Structure detection operates on the intermediate XHTML produced by the conversion pipeline. Use the debug option described in the Giriş to figure out the appropriate settings for your book. There is also a button for a XPath wizard to help with the generation of simple XPath expressions.
By default, calibre uses the following expression for detecting chapters:
//*[((name()='h1' or name()='h2') and re:test(., 'chapter|book|section|part\s+', 'i')) or @class = 'chapter']
Bu ifade nispeten karmaşık, çünkü bir takım yaygın durumları aynı anda işlemeye çalışıyor. Anlamı ise calibre’nin bölümlerin başını ya içinde (chapter, book, section veya part) kelimelerinden herhangi birini veya class=”chapter” özniteliğini içeren <h1> veya <h2> etiketleri olarak varsayacağıdır.
İlgili bir seçenek de Chapter işareti, calibre’nin bir bölüm algıladığında ne yapacağını kontrol etmenizi sağlayan seçeneği. Ön tanımlı olarak, bölümden önce bir satır sonu ekleyecektir. Bunun yerine veya satır sonundan sonra kurallı bir satır ekleyebilir. Başka bir şey de yaptıramazsınız.
Sayfa sonlarını algılamak için ön tanımlı ayar:
//*[name()='h1' or name()='h2']
bu da calibre’nin ön tanımlı olarak her <h1> ve <h2> etiketinden önce sayfa sonu ekleyeceği demek oluyor.
Not
Varsayılan ifadeler dönüştürdüğünüz girdi biçimine göre değişebilir.
Muhtelif
Bu bölümde bir kaç seçenek daha var.
- Metadata’yı kitabın başına bir sayfa olarak ekle
One of the great things about calibre is that it allows you to maintain very complete metadata about all of your books, for example, a rating, tags, comments, etc. This option will create a single page with all this metadata and insert it into the converted e-book, typically just after the cover. Think of it as a way to create your own customised book jacket.
- İlk resmi kaldır
Bazen, dönüştürdüğünüz kaynak belge kapağı ayrı bir kapak olarak değil, kitabın bir parçası olarak bulundurur. Calibre’de ayrıca bir kapak belirtirseniz, dönüştürülen kitabın iki kapak sayfası olur. Bu seçenek basitçe belgedeki ilk resmi kaldırır, dönüştürülen kitabın tek bir kapağı, calibre tarafından belirtilen kapağı olmasını sağlar.
İçindekiler
When the input document has a Table of Contents in its metadata, calibre will just use that. However, a number of older formats either do not support a metadata based Table of Contents, or individual documents do not have one. In these cases, the options in this section can help you automatically generate a Table of Contents in the converted e-book, based on the actual content in the input document.
Not
Using these options can be a little challenging to get exactly right. If you prefer creating/editing the Table of Contents by hand, convert to the EPUB or AZW3 formats and select the checkbox at the bottom of the Table of Contents section of the conversion dialog that says Manually fine-tune the Table of Contents after conversion. This will launch the ToC Editor tool after the conversion. It allows you to create entries in the Table of Contents by simply clicking the place in the book where you want the entry to point. You can also use the ToC Editor by itself, without doing a conversion. Go to Preferences → Interface → Toolbars and add the ToC Editor to the main toolbar. Then just select the book you want to edit and click the ToC Editor button.
İlk seçenek Otomatik oluşturulmuş İçindekileri kullanmaya zorla. Bunu işaretleyerek calibre’nin girdi belgesinde bulunan herhangi bir İçindekiler bölümü yerine otomatik üretileni kullanmaya zorlamasını sağlayabilirsiniz.
Otomatik üretilen İçindekiler bölümünün çalışma şekli, calibre’nin algılanan tüm bölümleri üretilen içindekiler bölümüne eklemeye çalışması iledir. Bölüm algılamayı nasıl özelleştirebileceğinizi yukarıdaki Structure detection kısmı ile öğrenebilirsiniz. Algılanan bölümlerin üretilen içindekiler bölümünde yer almasını istemiyorsanız, Algılanan bölümleri ekleme seçeneğini işaretleyin.
If less than the Chapter threshold number of chapters were detected, calibre will then add any hyperlinks it finds in the input document to the Table of Contents. This often works well: many input documents include a hyperlinked Table of Contents right at the start. The Number of links option can be used to control this behavior. If set to zero, no links are added. If set to a number greater than zero, at most that number of links is added.
calibre otomatik olarak kopya girdileri İçindekiler bölümünden çıkarır. Fakat istenmeyen başka girdiler de varsa, TOC Filtresi seçeneği ile filtreleyebilirsiniz. Bu, üretilen içindekilerdeki girdi başlıklarıyla eşleşecek bir düzenli ifadedir. Bulunan her eşleşme kaldırılacaktır. Örneğin, tüm “Sonraki” veya “Önceki” girdi başlıklarını kaldırmak için şunu kullanabilirsiniz:
Next|Previous
Seviye 1,2,3 TOC`seçenekleri gelişmiş çok seviyeli bir İçindekiler oluşturmanıza izin verir. Bunlar dönüştürme hattınca üretilen ara XHTML’de eşleşen XPath ifadeleridir. Bu XHTML’ye nasıl erişeceğinizi öğrenmek için :ref:`conversion-introduction a göz atın. Her seçeneğin yanında temel XPath ifadeleri oluşturmanıza yardım edecek bir sihirbaz açan düğmeler bulunur. Şu basit örnek bu seçenekleri nasıl kullanacağınızı gösterir.
Suppose you have an input document that results in XHTML that looks like this:
<html xmlns="http://www.w3.org/1999/xhtml">
    <head>
        <title>Sample document</title>
    </head>
    <body>
        <h1>Chapter 1</h1>
        ...
        <h2>Section 1.1</h2>
        ...
        <h2>Section 1.2</h2>
        ...
        <h1>Chapter 2</h1>
        ...
        <h2>Section 2.1</h2>
        ...
    </body>
</html>
Seçenekleri şu şekilde ayarlıyoruz:
Level 1 TOC : //h:h1
Level 2 TOC : //h:h2
Bu işlem aşağıdaki gibi görünen, otomatik üretilmiş iki seviyeli bir İçindekilere sebep olur:
Chapter 1
    Section 1.1
    Section 1.2
Chapter 2
    Section 2.1
Uyarı
Not all output formats support a multi level Table of Contents. You should first try with EPUB output. If that works, then try your format of choice.
HTML girdi belgelerini dönüştürürken resimler bölüm başlığı olarak kullanılıyor
Suppose you want to use an image as your chapter title, but still want calibre to be able to automatically generate a Table of Contents for you from the chapter titles. Use the following HTML markup to achieve this:
<html>
    <body>
        <h2>Chapter 1</h2>
        <p>chapter 1 text...</p>
        <h2 title="Chapter 2"><img src="chapter2.jpg" /></h2>
        <p>chapter 2 text...</p>
    </body>
</html>
Seviye 1 TOC ayarını //h:h2 yapın. İkinci bölüm için, calibre başlığı etiketin metni olmadığından <h2> etiketindeki title özniteliğinden alır.
İçindekiler bölümündeki girdilere metin temin etmek için etiket öznitelikleri kullanılıyor
Kısmen uzun bölüm başlıklarınız varsa ve İçindekiler bölümünde kısaltılmış hallerini istiyorsanız, bu iş için başlık özniteliğini kullanabilirsiniz, örneğin:
<html>
    <body>
        <h2 title="Chapter 1">Chapter 1: Some very long title</h2>
        <p>chapter 1 text...</p>
        <h2 title="Chapter 2">Chapter 2: Some other very long title</h2>
        <p>chapter 2 text...</p>
    </body>
</html>
Seviye 1 TOC ayarını //h:h2/@title yapın. calibre etiket içindeki metni kullanmak yerine, başlığı <h2> etiketlerindeki title değerinden alacaktır. XPath ifadesinde sondaki /@title a dikkat edin, bu biçimi kullanarak calibre’ye metni istediğiniz öznitelikten almasını söyleyebilirsiniz.
How options are set/saved for conversion
Calibre’de dönüştürme işlemlerinin ayarlanabileceği iki yer vardır. Birincisi Seçenekler->Dönüştürme. Bu seçenekler dönüştürme için varsayılan ayarlardır. Her kitap dönüştürmek istediğinizde, ön tanımlı olarak burada bulunan ayarlar kullanılır.
You can also change settings in the conversion dialog for each book conversion. When you convert a book, calibre remembers the settings you used for that book, so that if you convert it again, the saved settings for the individual book will take precedence over the defaults set in Preferences. You can restore the individual settings to defaults by using the Restore defaults button in the individual book conversion dialog. You can remove the saved settings for a group of books by selecting all the books and then clicking the Edit metadata button to bring up the bulk metadata edit dialog, near the bottom of the dialog is an option to remove stored conversion settings.
When you bulk convert a set of books, settings are taken in the following order (last one wins):
Seçenekler->Dönüştürme menüsünde ayarlanan varsayılanlardan
From the saved conversion settings for each book being converted (if any). This can be turned off by the option in the top left corner of the Bulk conversion dialog.
Toplu dönüştürme iletişim penceresindeki ayarlardan
Note that the final settings for each book in a Bulk conversion will be saved and re-used if the book is converted again. Since the highest priority in Bulk Conversion is given to the settings in the Bulk conversion dialog, these will override any book specific settings. So you should only bulk convert books together that need similar settings. The exceptions are metadata and input format specific settings. Since the Bulk conversion dialog does not have settings for these two categories, they will be taken from book specific settings (if any) or the defaults.
Not
Herhangi bir dönüştürmede kullanılan ayarları görmek için aşağı sağ köşedeki dönen simgeye tıklayıp dönüştürme işine çift tıklayabilirsiniz. Bu işlem kullanılan ayarları üst kısma yakın bir yerde gösteren dönüştürme kaydını getirecektir.
Biçime özel ipuçları
Here you will find tips specific to the conversion of particular formats. Options specific to particular format, whether input or output are available in the conversion dialog under their own section, for example TXT input or EPUB output.
Microsoft Word belgelerini dönüştür
calibre can automatically convert .docx files created by Microsoft Word 2007 and
newer. Just add the file to calibre and click convert.
Not
There is a demo .docx file that demonstrates the capabilities of the calibre conversion engine. Just download it and convert it to EPUB or AZW3 to see what calibre can do.
calibre will automatically generate a Table of Contents based on headings if you mark
your headings with the Heading 1, Heading 2, etc. styles in Microsoft Word. Open
the output e-book in the calibre E-book viewer and click the Table of Contents button
to view the generated Table of Contents.
Eski .doc dosyaları
For older .doc files, you can save the document as HTML with Microsoft Word and then convert the resulting HTML file with calibre. When saving as HTML, be sure to use the “Save as Web Page, Filtered” option as this will produce clean HTML that will convert well. Note that Word produces really messy HTML, converting it can take a long time, so be patient. If you have a newer version of Word available, you can directly save it as .docx as well.
Another alternative is to use the free LibreOffice. Open your .doc file in LibreOffice and save it as .docx, which can be directly converted in calibre.
TXT belgelerini dönüştür
TXT belgelerinin kalın, yatık yazı vs. gibi iyi tanımlanmış biçimleme şekilleri ya da paragraflar, başlıklar, kısımlar gibi belge yapıları yoktur, ama çoğunlukça kullanılan bir takım genellemeler kullanılmaktadır. Varsayılan olarak calibre doğru biçimleme ve işaretlemeleri bu genellemelere bakarak otomatik yapmaya çalışır.
TXT girdisi paragrafların nasıl algılanacağı ayrımına varmak için bir takım seçeneği destekler.
- Paragraph style: Auto
Paragrafların nasıl tanımlandığını otomatik olarak anlamak için metin dosyalarını analiz eder. Bu seçeneke çoğunlukla iyi çalışır, beklenmedik sonuçlarla karşılaşırsanız elle ayarlanan seçeneklerden birini deneyin.
- Paragraph style: Block
Bir ya da fazla boş satırın paragraf sınırı olduğunu varsayar:
This is the first. This is the second paragraph.- Paragraph style: Single
Her satırın bir paragraf olduğunu varsayar:
This is the first. This is the second. This is the third.- Paragraph style: Print
Her paragrafın bir girintiyle başladığını varsayar (bir tab veya 2+ boşluk). Paragraflar sonraki satır girintiyle başladığında sona erer:
This is the first. This is the second. This is the third.- Paragraph style: Unformatted
Belgenin bir biçimi olmadığı, ama alt satır sonu kullandığı varsayılır. Noktalama işaretleri ve ortalama satır uzunluğu kullanılarak paragraflar tekrar oluşturulmaya çalışılır.
- Formatting style: Auto
Kullanılan biçimlendirme işaretçileri türü algılanmaya çalışılır. İşaretçi kullanılmamışsa sezgisel biçimleme uygulanır.
- Formatting style: Heuristic
Analyzes the document for common chapter headings, scene breaks, and italicized words and applies the appropriate HTML markup during conversion.
- Formatting style: Markdown
calibre also supports running TXT input though a transformation preprocessor known as Markdown. Markdown allows for basic formatting to be added to TXT documents, such as bold, italics, section headings, tables, lists, a Table of Contents, etc. Marking chapter headings with a leading # and setting the chapter XPath detection expression to “//h:h1” is the easiest way to have a proper table of contents generated from a TXT document. You can learn more about the Markdown syntax at daringfireball.
- Formatting style: None
Applies no special formatting to the text, the document is converted to HTML with no other changes.
PDF belgelerini dönüştür
PDF documents are one of the worst formats to convert from. They are a fixed page size and text placement format. Meaning, it is very difficult to determine where one paragraph ends and another begins. calibre will try to unwrap paragraphs using a configurable, Line un-wrapping factor. This is a scale used to determine the length at which a line should be unwrapped. Valid values are a decimal between 0 and 1. The default is 0.45, just under the median line length. Lower this value to include more text in the unwrapping. Increase to include less. You can adjust this value in the conversion settings under PDF Input.
Also, they often have headers and footers as part of the document that will become included with the text. Use the Search and replace panel to remove headers and footers to mitigate this issue. If the headers and footers are not removed from the text it can throw off the paragraph unwrapping. To learn how to use the header and footer removal options, read Calibre’de kurallı ifadelerin kullanımına dair her şey.
PDF girdisinin bazı kısıtlamaları:
Karmaşık, çok-sütunlu, ve resim temelli belgeler desteklenmez.
Belgeden vektör resim ve tablo çıkarma işlemi de desteklenmez.
Bazı PDF’ler ll veya ff veya fi vs. temsil etmek için özel kabartmalar kullanırlar. Bunların dönüştürülmesinin çalışıp çalışmayacağı PDF içinde nasıl temsil edildiklerine bağlıdır.
Bağlantılar ve İçindekiler desteklenmiyor
PDFs that use embedded non-Unicode fonts to represent non-English characters will result in garbled output for those characters
Bazı PDF’ler arkasında OCRed metin bulunan o sayfanın fotoğrafından yapılmışlardır. Böyle durumlarda calibre PDF’i görüntülediğinizde göreceğinizden çok farklı sonuç verecek olan OCRed metni kullanır
Sağdan sola yazılan diller ve matematik karakter dizisi gibi karmaşık metin görüntülemek için kullanılan PDF’ler düzgün dönüştürülmeyecektir
Tekrar üstünden geçelim PDF gerçekten, ama gerçekten kötü bir girdi formatıdır. İlla PDF kullanmanız gerekiyorsa, girdi PDF’ine bağlı olarak idare eder ile kullanılamaz arasında bir çıktı için hazırlıklı olun.
Comic book collections
A comic book collection is a .cbc file. A .cbc file is a ZIP file that contains other CBZ/CBR files. In addition the .cbc file must contain a simple text file called comics.txt, encoded in UTF-8. The comics.txt file must contain a list of the comics files inside the .cbc file, in the form filename:title, as shown below:
one.cbz:Chapter One
two.cbz:Chapter Two
three.cbz:Chapter Three
Böylece .cbc dosyası şunu içerecektir:
comics.txt
one.cbz
two.cbz
three.cbz
calibre will automatically convert this .cbc file into an e-book with a Table of Contents pointing to each entry in comics.txt.
EPUB gelişmiş biçimleme tanıtımı
Various advanced formatting for EPUB files is demonstrated in this demo file. The file was created from hand coded HTML using calibre and is meant to be used as a template for your own EPUB creation efforts.
The source HTML it was created from is available demo.zip. The settings used to create the EPUB from the ZIP file are:
ebook-convert demo.zip .epub -vv --authors "Kovid Goyal" --language en --level1-toc '//*[@class="title"]' --disable-font-rescaling --page-breaks-before / --no-default-epub-cover
Bu dosya EPUB’ın potansiyelini araştırdığından, calibre’nin yerleşik okuyucusu dışındaki bir çok okuyucuda burdaki gelişmiş biçimlemeler çalışmayacaktır.
ODT belgelerini dönüştür
calibre ODT (OpenDocument Metni) dosyalarını doğrudan dönüştürebilir. Belgenizi biçimlendirmek için biçemler kullanmalı ve doğrudan biçimleme kullanmaktan kaçınmalısınız. Belgenize resim eklerken, resimleri paragrafa bağlamalısınız, bir sayfaya bağlanmış resimlerin hepsi dönüştürmenin başında yer alacaktır.
To enable automatic detection of chapters, you need to mark them with the built-in styles called Heading 1,
Heading 2, …, Heading 6 (Heading 1 equates to the HTML tag <h1>,
Heading 2 to <h2>, etc).
When you convert in calibre you can enter which style you used into the Detect chapters at box.
Example:
If you mark Chapters with style Heading 2, you have to set the ‘Detect chapters at’ box to
//h:h2For a nested TOC with Sections marked with Heading 2 and the Chapters marked with Heading 3 you need to enter
//h:h2|//h:h3. On the Convert - TOC page set the Level 1 TOC box to//h:h2and the Level 2 TOC box to//h:h3.
Well-known document properties (Title, Keywords, Description, Creator) are recognized and calibre will use the first image (not too small, and with good aspect-ratio) as the cover image.
Ayrıca ODT belgenizde Evet olarak ayarladığınızda (Dosya->Özellikler->Özel Özellikler) etkinleşen özel bir özellik olan opf.metadata (‘Evet veya Hayır’ biçimli) gelişmiş özellik dönüştürme kipi bulunmaktadır. Bu özellik calibre tarafından algılanırsa, aşağıdaki özellikler tanınır (opf.authors belgeyi oluşturanı ezer):
opf.titlesort
opf.authors
opf.authorsort
opf.publisher
opf.pubdate
opf.isbn
opf.language
opf.series
opf.seriesindex
Buna ek olarak, ODT’de kapak resmi olmasını istediğiniz resmi opf.cover olarak isimlendirebilirsiniz (sağ tık, Resim->Seçenekler->Ad). Bu isimde bir resim bulunmazsa, ‘zeki’ kipi kullanılır. Bazı çıktı biçimlerinde kapak algılama iki kapakla sonlanabileceğinden, işlem paragrafı belgeden çıkaracaktır (yalnızca tek içerik kapak ise!). Ama bu yalnızca adlandırılan resimle çalışır!
Kapak algılamayı kapatmak için opf.nocover (‘Evet veya Hayır’ türünde) gelişmiş kipte Evet olarak ayarlayabilirsiniz.
PDF’e dönüştürme
The first, most important, setting to decide on when converting to PDF is the page size. By default, calibre uses a page size of “U.S. Letter”. You can change this to another standard page size or a completely custom size in the PDF Output section of the conversion dialog. If you are generating a PDF to be used on a specific device, you can turn on the option to use the page size from the output profile instead. So if your output profile is set to Kindle, calibre will create a PDF with page size suitable for viewing on the small Kindle screen.
Yazdırılabilir İçindekiler
Ayrıca PDF sonuna her kısmın sayfa numaralarını içeren y azdırılabilir bir İçindekiler ekleyebilirsiniz. PDF’i sayfaya yazdırmaya niyetiniz varsa çok faydalıdır. PDF’i elektronik cihazda kullanacaksanız, PDF Özeti bu işlevselliği sağlar ve ön tanımlı olarak üretilir.
You can customize the look of the generated Table of contents by using the Extra CSS conversion setting under the Look & feel part of the conversion dialog. The default CSS used is listed below, simply copy it and make whatever changes you like.
.calibre-pdf-toc table { width: 100%% }

.calibre-pdf-toc table tr td:last-of-type { text-align: right }

.calibre-pdf-toc .level-0 {
    font-size: larger;
}

.calibre-pdf-toc .level-1 td:first-of-type { padding-left: 1.4em }
.calibre-pdf-toc .level-2 td:first-of-type { padding-left: 2.8em }
Custom page margins for individual HTML files
If you are converting an EPUB or AZW3 file with multiple individual HTML files inside it and you want to change the page margins for a particular HTML file you can add the following style block to the HTML file using the calibre E-book editor:
<style>
@page {
    margin-left: 10pt;
    margin-right: 10pt;
    margin-top: 10pt;
    margin-bottom: 10pt;
}
</style>
Then, in the PDF output section of the conversion dialog, turn on the
option to Use page margins from the document being converted.
Now all pages generated from this HTML file will have 10pt margins.