电子书转换
calibre 拥有一个易于使用的格式转换系统。一般情况下,您只需将一本图书添加到 calibre 中,单击“转换书籍”,calibre 就会自动尝试生成符合或近似于原始输入的输出文件。然而,尽管 calibre 可接受多种格式的文件进行转换,但并非所有格式都可以自动且无瑕地转换为其它电子书格式。对于转换过程中出现问题的文件格式,抑或是您只是想对图书转换过程进行自定义调整,calibre 提供多个选项来自定义图书转换过程。但请注意,calibre 的图书转换系统并不能替代功能完备的电子书编辑器。要编辑电子书,我建议先使用 calibre 把它们转换为 epub 或 azw3 格式,然后使用“编辑书籍”功能进行编辑,再使用编辑后的电子书作为源文件转换成其它格式。
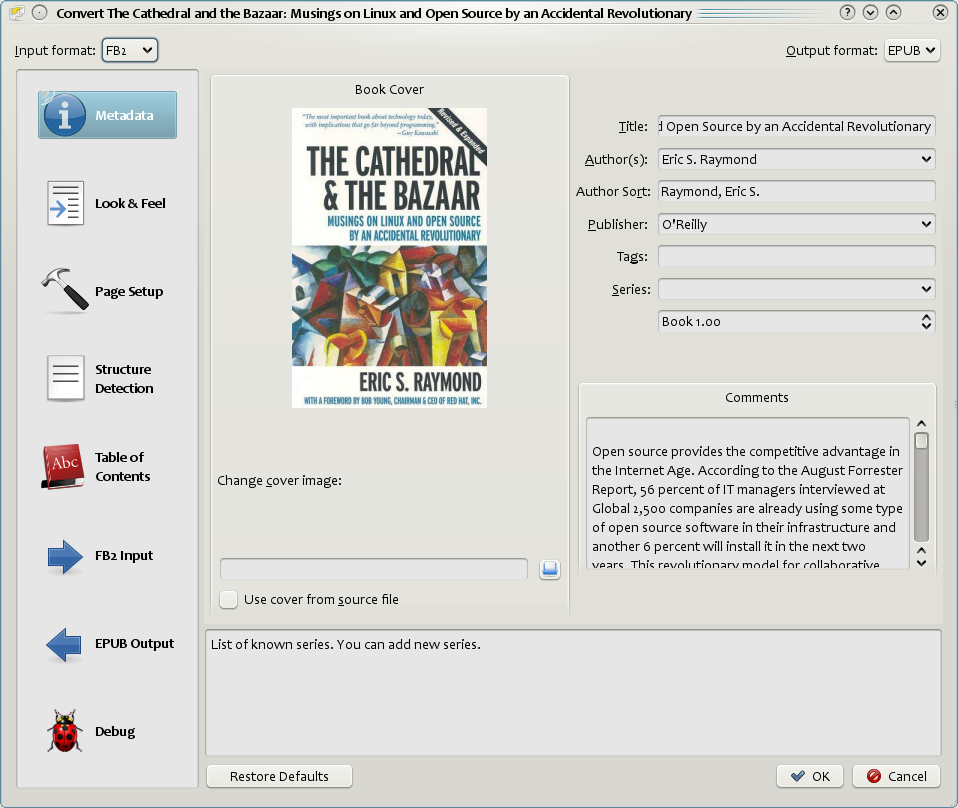
本文档将主要考虑能在转换对话框中找到的转换设置,如下图所示。 所有这些设置也可以通过命令行界面进行转换,文档在 generated/zh-CN/ebook-convert 中。 在 Calibre 中,您可以通过将鼠标悬停在任何单独的设置上来获取帮助,然后会出现一个工具提示来描述该设置。

介绍
对转换系统,首先要了解的是它被设计为管道。从示意图上看,它看起来像这样:

输入首先被恰当的*Input 插件*转换到 XHTML 。 HTML 接着被*转换*。在最后一步,已处理的XHTML通过适当的*Output 插件*转换为指定的输出格式。根据输入格式的不同,转换的结果可能会有很大的差异。 有些格式的转换效果要好于其他格式。 `这里<best-source-formats>`提供了最佳的转换源格式列表。
所有工作都发生在作用于HTML输出的转换上。有各种转换,例如,在书籍开头插入书籍元数据作为页面、检测章节标题并自动创建目录、按比例调整字体大小等。重要的是要记住,所有的转换都作用于*Input插件*的XHTML输出,而不是作用于输入文件本身。因此,例如,如果您要求calibre将RTF文件转换为EPUB,它将首先在内部转换为XHTML,各种转换将应用于XHTML,然后*Output插件*将创建EPUB文件,自动生成所有元数据、目录等。
您可以通过使用调试选项  查看此过程的实际情况。只需指定调试输出文件夹的路径即可。在转换过程中,calibre会将转换通道各个阶段生成的HTML放置在不同的子文件夹中。四个子文件夹是:
文件名 |
描述 |
|---|---|
输入 |
其中包含输入插件输出的HTML。使用此来调试输入插件。 |
已解析 |
对输入插件的输出进行预处理并将其转换为 XHTML 的结果。用于调试结构检测。 |
结构 |
结构检测后,CSS 扁平化和字体大小转换之前。用于调试字体大小转换和 CSS 变换。 |
已处理 |
在电子书传递给输出插件之前。用于调试输出插件。 |
如果您想在进行Calibre转换之前对输入文档进行一点编辑,最好的做法是编辑“输入”子文件夹中的文件,然后将其压缩,并使用Zip文件作为后续转换的输入格式。为此,请使用“编辑Meta信息”对话框将Zip文件添加为书籍的格式,然后在转换对话框的左上角选择Zip作为输入格式。
本文档主要介绍对中间 XHTML 进行的各种转换以及如何控制它们。最后会针对每种输入/输出格式提供一些技巧。
界面外观
这组选项控制转换后电子书的外观和风格的各个方面。
字体
电子阅读体验最棒的特点之一是能够轻松调整字体大小以适应个人需求和照明条件。calibre有复杂的算法来确保它输出的所有书籍都有一致的字体大小,无论输入文档中指定了什么字体大小。
文档的基本字体大小是该文档中最常见的字体大小,即该文档中大部分文本的大小。当您指定“基本字体大小”时,Calibre会自动按比例重新缩放文档中的所有字体大小,以便最常见的字体大小成为指定的基本字体大小,并适当地重新缩放其他字体大小。通过选择更大的基本字体大小,您可以使文档中的字体更大,反之亦然。当您设置基本字体大小时,为了获得最佳效果,您还应该设置字体大小键。
通常,Calibre 会根据你选择的输出配置文件(参见 页面设置)自动选择一个合适的基础字体大小。然而,如果默认值不适合你,你可以在此处进行独立设置。
“字体大小键”选项允许您控制如何重新缩放非基本字体大小。字体重新缩放算法使用字体大小键工作,该键只是一个逗号分隔的字体大小列表。字体大小键告诉口径,给定字体大小与基本字体大小相比应该增大或减小多少个“台阶”。其想法是文档中的字体大小应该有限。例如,正文文本有一种尺寸,不同级别的标题有几种尺寸,超/子脚本和脚注有几种尺寸。字体大小键允许Calibre将输入文档中的字体大小划分为与不同逻辑字体大小相对应的单独“箱”。
让我们举个例子来说明。假设我们正在转换的源文档是由视力极佳的人生成的,基本字体大小为8pt。这意味着文档中的大部分文本大小为8pt,而标题稍大(比如10和12pt),脚注稍小,为6pt。现在,如果我们使用以下设置:
Base font size : 12pt
Font size key  : 7, 8, 10, 12, 14, 16, 18, 20
输出文档的基础字体大小为 12pt,标题为 14pt 和 16pt,脚注为 8pt。现在假设我们想让最大的标题字体更突出,并让脚注也稍微大一点。为了实现这一点,字体大小关键值应更改为:
New font size key : 7, 9, 12, 14, 18, 20, 22
最大的标题现在将变为18pt,而脚注将变为9pt。您可以使用字体重新缩放向导来尝试使用这些设置,并找出最适合您的设置,单击“字体大小键”设置旁边的小按钮即可访问该向导。
如果您希望保留输入文档中的字体大小,您可以在此处禁用转换中的所有字号缩放。
一个相关的设置是“行高度”。行高度控制线的垂直高度。默认情况下(线高度为0),不执行行高度操作。如果指定非默认值,则将在所有未指定自己的行高度的位置设置行高度。然而,这是一种钝器,应该谨慎使用。如果你想调整输入的某些部分的行高,最好使用:ref:`Extra CSS <extra-css>”。
在此部分,你还可以告诉 Calibre 将所有引用的字体嵌入到电子书中。这样一来,即使阅读设备上没有这些字体,它们也能正常显示。
文本
文本可以是合理的,也可以是不合理的。对齐的文本在单词之间有额外的空格,以提供平滑的右边距。有些人更喜欢合理的文本,而另一些人则不喜欢。通常,Calibre会保留原始文档中的理由。如果你想覆盖它,你可以使用本节中的“文本对齐”选项。
您还可以将calibre改为“智能标点符号”,这将用排版正确的替代品替换纯引号、破折号和省略号。请注意,此算法并不完美,因此值得查看结果。反过来,也可以使用“非智能标点符号”。
最后是“输入字符编码”。旧文档有时不指定其字符编码。转换时,这可能会导致非英语字符或智能引号等特殊字符损坏。calibre尝试自动检测源文档的字符编码,但并不总是成功。您可以使用此设置强制它采用特定的字符编码`cp1252`是使用Windows软件生成的文档的常见编码。您还应该阅读:ref:char-encoding-faq 以了解有关编码问题的更多信息。
布局
通常,XHTML中的段落之间会有一个空行,并且没有前导文本缩进。calibre有几个选项可以控制这一点`删除段落之间的间距,强制确保所有段落没有段落间间距。它还将文本缩进设置为1.5em(可以更改),以标记每个段落的开头`插入空白行则相反,保证每对段落之间只有一行空白。这两个选项都非常全面,可以删除空格,也可以为所有段落(技术上为<p>和<div>标签)插入空格。这样,无论输入文件有多乱,您都可以设置该选项并确保其按广告执行。一个例外是,当输入文件使用硬换行符来实现段落间间距时。
如果您想**删除段间空行**(少数选定段落除外),请**不要使用这些选项**。相反,请将以下 CSS 代码添加到:ref:Extra CSS<extra-css>:
p, div { margin: 0pt; border: 0pt; text-indent: 1.5em }
.spacious { margin-bottom: 1em; text-indent: 0pt; }
然后,在你的源文档中,将标记需要间距的段落标记为 class="spacious"。如果你的输入文档不是 HTML 格式,可以使用“调试”选项(详见“介绍”部分)来获取 HTML 文件(使用 :file:input 子文件夹)。
另一个有用的选项是“线性化表”。一些设计糟糕的文档使用表格来控制页面上文本的布局。转换后,这些文档通常会有溢出页面的文本和其他工件。此选项将从表中提取内容并以线性方式呈现。请注意,此选项将*所有*表线性化,因此只有在您确定输入文档没有将表用于合法目的(如显示表格信息)时才使用它。
样式
“Extra CSS”选项允许您指定将应用于输入中所有HTML文件的任意CSS。此CSS具有很高的优先级,因此应该覆盖**输入文档**本身中存在的大多数CSS。您可以使用此设置微调文档的演示文稿/布局。例如,如果你想让`endnote`类的所有段落都对齐,只需添加:
.endnote { text-align: right }
或者,如果您想更改所有段落的缩进:
p { text-indent: 5mm; }
:guilabel:`额外的CSS`是一个非常强大的选项,但需要掌握CSS工作原理才能充分发挥其潜力。您可以使用上文介绍的调试管道功能来查看输入文档中包含哪些CSS样式。
更简单的选择是使用 过滤样式信息。该功能允许您从文档中移除指定类型的所有CSS属性。例如,您可以用它来移除所有颜色或字体设置
改变样式
这是最强大的样式控制功能。您可以通过它定义基于不同条件的样式修改规则,例如:将所有绿色改为蓝色、移除文本中的所有加粗样式,或是为所有标题统一设置特定颜色等。
转换HTML
与转换样式功能类似,但允许您直接修改书籍的HTML内容结构。您可以通过该功能实现以下操作:替换标签类型、根据标签内容动态添加类名或其他属性等。
页面设置
“页面设置”选项用于控制屏幕布局,如边距和屏幕大小。如果所选输出格式支持页边距,则有设置页边距的选项,输出插件将使用这些选项。此外,您应该选择输入配置文件和输出配置文件。这两组配置文件基本上都涉及如何解释输入/输出文档中的测量值、屏幕大小和默认字体缩放键。
如果您知道要转换的文件是要在特定设备/软件平台上使用的,请选择相应的输入配置文件,否则只需选择默认输入配置文件。如果您知道您正在生成的文件是针对特定设备类型的,请选择相应的输出配置文件。否则,请选择一个通用输出配置文件。如果你正在转换为MOBI或AZW3,那么你几乎总是想选择一个Kindle输出配置文件。否则,您对现代电子书阅读设备的最佳选择是选择“通用电子墨水HD”输出配置文件。
输出配置文件还会控制屏幕尺寸参数。例如在某些输出格式中,该设置将自动调整图片尺寸以适应屏幕显示。因此建议选择与您设备屏幕尺寸相近的预设配置文件。
智能处理
启发式处理提供了各种功能,可用于尝试检测和纠正格式不佳的输入文档中的常见问题。如果您的输入文档格式不佳,请使用这些功能。由于这些函数依赖于常见模式,请注意,在某些情况下,选项可能会导致更糟糕的结果,因此请谨慎使用。例如,其中几个选项将删除所有不间断空格实体,或者可能包括与函数相关的误报匹配。
- 启用智能处理
此选项将启用 calibre 转换流程中的 智能处理。必须启用该功能,才能应用各项子功能。
- 段落内不换行
启用此选项将导致calibre尝试使用标点符号线索和行长来检测和纠正文档中存在的硬换行。calibre将首先尝试检测是否存在硬线断裂,如果它们似乎不存在,calibre不会尝试解开线。如果你想“强制”口径打开线,可以降低线打开系数。
- 不换行系数
此选项控制用于删除硬换行符的算法口径。例如,如果此选项的值为0.4,则意味着calibre将从长度小于文档中所有行的40%的行的末尾删除硬换行符。如果你的文档只有几个需要更正的换行符,那么这个值应该减少到0.1到0.2之间。
- 检测并标记未格式化的章节标题和子标题
若您的文档中章节标题与正文格式未作区分,calibre可通过此选项智能识别并自动添加标题标签:使用<h2>标签标记章节标题,<h3>标签标记次级标题。
此函数不会创建目录,但在许多情况下,它会导致calibre的默认章节检测设置正确检测章节并构建目录。如果未自动创建目录,请调整“结构检测”下的XPath。如果文档中没有使用其他标题,那么在结构检测下设置“//h:h2”将是为文档创建目录的最简单方法。
系统插入的标题默认无样式格式,如需设置样式,请通过界面外观转换设置中的 :guilabel:`额外的CSS`选项进行配置。例如,若需实现标题居中效果,可使用以下样式代码:
h2, h3 { text-align: center }
- 重新编号<h1>或<h2>标签序列
有些出版商在设置章节标题格式时,会连续使用多个<h1>或<h2>标签。calibre 的默认转换设置会导致这类标题被拆分成两部分。此选项将对标题标签重新编号,以防止标题被拆分。
- 删除段落间的空行
此选项将使calibre分析文档中包含的空白行。如果每一段都有一个空行,那么calibre将删除所有这些空行。多个空行序列将被视为场景分割,并保留为单个段落。此选项与“外观”下的“删除段落间距”选项不同,因为它实际上修改了HTML内容,而另一个选项修改了文档样式。此选项还可以删除使用calibre的“插入空白行”选项插入的段落。
- 确保分节使用一致的格式
使用此选项,calibre将尝试检测常见的场景中断标记,并确保它们居中对齐。”“软”场景打断标记,即仅由额外空白定义的场景打断,被设置样式以确保它们不会与分页符一起显示。
- 替换软分节符
若启用此选项,calibre会将检测到的场景分隔符替换为用户指定的文本。请注意:部分装饰性字符可能无法在所有阅读设备上正常显示。
一般来说,你应该避免使用HTML标签,calibre会丢弃任何标签并使用预定义的标记。<hr />标签,即水平规则,<img>标签是例外。水平规则可以选择与样式一起指定,如果您选择添加自己的样式,请确保包含“宽度”设置,否则样式信息将被丢弃。可以使用图像标签,但calibre不提供在转换过程中添加图像的功能,这必须在事后使用“编辑书籍”功能完成。
- 示例image标签(转换后请将图片放入 EPUB 内部的 “Images” 文件夹中):
<img style="width:10%" src="../Images/scenebreak.png" />
- 示例水平分隔线(含样式):
<hr style="width:20%;padding-top: 1px;border-top: 2px ridge black;border-bottom: 2px groove black;"/>
- 删除不必要的连字符
启用此选项后,calibre将分析文档中的所有连字符内容。文档本身被用作分析词典。这使得calibre能够准确地删除任何语言文档中任何单词的连字符,以及虚构和模糊的科学单词。主要缺点是文档中只出现一次的单词不会被更改。分析分两次进行,第一次分析线尾。只有当单词在文档中存在连字符或不存在连字符时,才会展开行。第二步分析整个文档中的所有连字符单词,如果单词在文档的其他地方不匹配,则删除连字符。
- 把特定名词和特定规则的内容变为斜体
启用此选项后,calibre 会查找表示斜体的常用词汇和模式,并将其设置为斜体。例如常见的文本约定(如~word~),或者通常应设为斜体的短语(如拉丁语短语 “etc.” 或 “et cetera”)。
- 用CSS缩进代替空格键缩进
有些文档采用使用非断空格实体来定义文本缩进的约定。启用此选项后,calibre 会尝试检测此类格式,并使用 CSS 将其转换为 3% 的文本缩进。
搜索并替换
这些选项主要用于PDF文档的转换或OCR转换,尽管它们也可用于解决许多特定于文档的问题。例如,一些转换可能会在文本中留下页眉和页脚。这些选项使用正则表达式来尝试检测页眉、页脚或其他任意文本,并删除或替换它们。请记住,它们对转换管道生成的中间XHTML进行操作。有一个向导可以帮助您自定义文档的正则表达式。单击表达式框旁边的魔杖,在编写搜索表达式后单击“测试”按钮。成功的比赛将以黄色突出显示。
搜索是通过使用Python正则表达式来实现的。所有匹配的文本都会从文档中删除或使用替换模式替换。替换模式是可选的,如果留空,则将从文档中删除与搜索模式匹配的文本。您可以在`regexptutorial`了解更多关于正则表达式及其语法的信息。
结构检测
结构检测涉及calibre在输入文档中未正确指定结构元素时,尽最大努力检测这些元素。例如,章节、分页符、页眉、页脚等。可以想象,这一过程因书而异。幸运的是,calibre有非常强大的选项来控制这一点。权力带来复杂性,但如果你花时间学习复杂性,你会发现这是值得的。
章节与分页控制
calibre有两组选项用于“章节检测”和“插入分页符”。这有时会有点令人困惑,因为默认情况下,calibre会在检测到的章节之前插入分页符,以及分页符选项检测到的位置。这样做的原因是,通常应该插入分页符的位置不是章节边界。此外,检测到的章节可以选择性地插入到自动生成的目录中。
calibre使用*XPath*,这是一种强大的语言,允许用户指定章节边界/分页符。XPath一开始似乎有点让人望而生畏,幸运的是,用户手册中有一个 XPath tutorial 。请记住,结构检测是在转换管道通道生成的中间XHTML上进行的。使用 介绍 中描述的调试选项,为您的书找出合适的设置。还有一个XPath向导按钮,用于帮助生成简单的XPath表达式。
默认情况下,calibre使用以下正则表达式检测章节:
//*[((name()='h1' or name()='h2') and re:test(., 'chapter|book|section|part\s+', 'i')) or @class = 'chapter']
这个表达式相当复杂,因为它试图同时处理许多常见情况。它的意思是,calibre将假设章节以"<h1>"或"<h2>"标签开头,这些标签中包含任何单词“(章、书、节或部分)”,或者具有“class=“chapter”属性。
一个相关选项是 章节标记,它能让你控制 calibre 在检测到章节时的操作。默认情况下,calibre 会在章节前插入分页符。你可以选择插入一条分隔线来替代分页符,或者在分页符之外再添加分隔线。你也可以设置为不执行任何操作。
检测分页符的默认设置如下:
//*[name()='h1' or name()='h2']
这意味着 calibre 默认会在所有`<h1>`和 `<h2>`标签前自动插入分页符。
备注
默认表达式可能会根据你正在转换的输入格式而变化。
杂项
本部分还有几个额外选项。
- 在书籍开头插入元数据作为页面
calibre 的强大功能之一在于支持为书籍维护完整的元数据体系,包括评分、标签、注释等信息。本选项可将所有元数据整合生成专属书目页,并自动插入转换后的电子书中,(通常位于封面之后),相当于为您打造个性化的书籍护封。
- 删除首张图片
有时,您正在转换的源文档将封面作为书籍的一部分,而不是单独的封面。如果你也在Calibre中指定了封面,那么转换后的书将有两个封面。此选项将简单地从源文档中删除第一张图像,从而确保转换后的书籍只有一个封面,即Calibre中指定的封面。
目录
当输入文档的元数据中有目录时,calibre将仅使用该目录。然而,许多旧格式要么不支持基于元数据的目录,要么单个文档没有目录。在这些情况下,本节中的选项可以帮助您根据输入文档中的实际内容,在转换后的电子书中自动生成目录。
备注
使用这些选项可能有点难以做到完全正确。如果您更喜欢手动创建/编辑目录,请转换为EPUB或AZW3格式,并选中转换对话框目录部分底部的复选框,该复选框显示“转换后手动微调目录”。这将在转换后启动目录编辑器工具。它允许您在目录中创建条目,只需在书中单击条目指向的位置即可。您还可以单独使用目录编辑器,而无需进行转换。转到“首选项”->“界面”->“工具栏”,并将“目录编辑器”添加到主工具栏。然后,只需选择要编辑的书,然后单击“目录编辑器”按钮。
首个选项 强制使用自动生成的目录。勾选此选项后,calibre 将自动覆盖输入文档元数据中的原有目录,替换为系统生成的目录。
创建自动生成的目录的默认方式是,calibre将首先尝试将任何检测到的章节添加到生成的目录中。您可以在上面的:ref:structure-detection 部分学习如何自定义章节的检测。如果您不想在生成的目录中包含检测到的章节,请选中“不添加检测到的章”选项。
创建自动生成的目录的默认方式是,calibre将首先尝试将任何检测到的章节添加到生成的目录中。您可以在上面的“结构检测”部分学习如何自定义章节的检测。如果您不想在生成的目录中包含检测到的章节,请选中“不添加检测到的章”选项。
calibre将自动从生成的目录中过滤重复项。但是,如果有一些其他不需要的条目,您可以使用“目录过滤器”选项对其进行过滤。这是一个正则表达式,将与生成的目录中的条目标题相匹配。只要找到匹配项,它就会被删除。例如,要删除所有标题为“下一个”或“上一个”的条目,请使用:
Next|Previous
Level 1,2,3 TOC`选项允许您创建复杂的多级目录。它们是XPath表达式,与转换管道生成的中间XHTML中的标签相匹配。有关如何访问此XHTML,请参阅:ref:`conversion-introduction。还要阅读 XPath教程,了解如何构造xpath表达式。每个选项旁边都有一个按钮,用于启动向导以帮助创建基本的XPath表达式。以下简单示例说明了如何使用这些选项。
假设您的原始文档经转换后生成如下结构的XHTML代码:
<html xmlns="http://www.w3.org/1999/xhtml">
    <head>
        <title>Sample document</title>
    </head>
    <body>
        <h1>Chapter 1</h1>
        ...
        <h2>Section 1.1</h2>
        ...
        <h2>Section 1.2</h2>
        ...
        <h1>Chapter 2</h1>
        ...
        <h2>Section 2.1</h2>
        ...
    </body>
</html>
然后,我们将选项设置如下:
Level 1 TOC : //h:h1
Level 2 TOC : //h:h2
这将输出一个自动生成的两级目录,如下所示:
Chapter 1
    Section 1.1
    Section 1.2
Chapter 2
    Section 2.1
警告
并非所有输出格式都支持多级目录。你应首先尝试使用 EPUB 格式输出。如果该格式可行,再尝试你选择的其他格式。
在转换HTML输入文档时,将图片用作章节标题
如果你希望使用图片作为章节标题,同时仍想让 calibre 能够根据章节标题自动为你生成目录,可以使用以下 HTML 标记来实现:
<html>
    <body>
        <h2>Chapter 1</h2>
        <p>chapter 1 text...</p>
        <h2 title="Chapter 2"><img src="chapter2.jpg" /></h2>
        <p>chapter 2 text...</p>
    </body>
</html>
将 一级目录`设置为`//h:h2``。对于章节二,由于 "<h2>"标签内无文本内容,calibre 将自动提取该标签的``title``属性值作为章节标题。
利用标签属性为目录条目提供文本内容
如果你有特别长的章节标题,并且希望在目录中显示其简化版本,可以使用 title 属性来实现,例如:
<html>
    <body>
        <h2 title="Chapter 1">Chapter 1: Some very long title</h2>
        <p>chapter 1 text...</p>
        <h2 title="Chapter 2">Chapter 2: Some other very long title</h2>
        <p>chapter 2 text...</p>
    </body>
</html>
将 一级目录 设置为 //h:h2/@title。这样,calibre 将从 <h2>标签的``title``属性值中获取标题内容,而不是使用标签内部的文本。请注意 XPath 表达式末尾的 /@title ,你可以使用这种格式告诉 calibre 从你喜欢的任何属性中获取文本。
转换选项的设置与保存方式
在 calibre 中,有两个地方可以设置转换选项。第一处位于“首选项 -> 转换”。这些设置是转换选项的默认值。每当您尝试转换一本新书时,此处设置的选项都将作为默认设置使用
您还可以在转换对话框中更改每本书转换的设置。当你转换一本书时,calibre会记住你为那本书使用的设置,这样如果你再次转换它,为每本书保存的设置将优先于“首选项”中设置的默认值。您可以使用个人书籍转换对话框中的“恢复默认值”按钮将个人设置恢复为默认值。您可以通过选择所有书籍,然后单击“编辑元数据”按钮打开批量元数据编辑对话框来删除一组书籍的已保存设置,对话框底部附近有一个删除已存储转换设置的选项。
当您批量转换一组书籍时,设置将按以下顺序采用(以最后一条为准):
源自“首选项 -> 转换”中设置的默认值
源自待转换书籍各自保存的转换设置(如果有)。这可以通过“批量转换”对话框左上角的选项来关闭
源自“批量转换”对话框中所做的设置
请注意,批量转换中每本书的最终设置将被保存,如果书籍再次转换,将重新使用。由于批量转换中的最高优先级赋予了批量转换对话框中的设置,因此这些设置将覆盖任何特定于书籍的设置。因此,您应该只批量转换需要类似设置的书籍。例外情况是元数据和输入格式特定的设置。由于“批量转换”对话框没有这两个类别的设置,因此将从特定于书籍的设置(如果有的话)或默认设置中获取。
备注
您可以点击右下角的旋转图标,然后双击相应的转换任务,查看任何转换过程中实际使用的设置。这将弹出转换日志,实际使用的设置就包含在日志顶部附近。
特定格式提示
在这里,您将找到针对特定格式转换的提示。无论输入还是输出,特定于某种格式的选项都可以在转换对话框的独立章节中找到,例如“TXT 输入”或“EPUB 输出”。
转换Microsoft Word文档
Calibre 可以自动转换由 Microsoft Word 2007 及更高版本创建的``.docx`` 文件。只需将文件添加到 calibre 并点击转换即可。
备注
这里有一个 demo .docx 文件,用于展示 calibre 转换引擎的功能。只需下载并将其转换为 EPUB 或 AZW3 格式,即可亲眼见证 calibre 的强大能力。
如果您在 Microsoft Word 中将标题标记为“标题 1”、“标题 2”等样式,calibre 将根据这些标题自动生成目录。在 calibre 电子书阅读器中打开输出的电子书,点击 目录 按钮即可查看生成的目录。
旧版 .doc 文件
对于较旧的.doc文件,您可以使用Microsoft Word将文档另存为HTML,然后使用calibre转换生成的HTML文件。保存为HTML时,请务必使用“另存为网页,已过滤”选项,因为这将生成转换良好的干净HTML。请注意,Word生成的HTML非常混乱,转换它可能需要很长时间,所以请耐心等待。如果您有较新版本的Word可用,也可以直接将其另存为.docx。
另一种选择是使用免费的 LibreOffice。在 LibreOffice 中打开您的 .doc 文件并将其另存为 .docx,之后即可在 calibre 中直接进行转换。
转换文本文档
TXT文档没有明确的方式来指定格式,如粗体、斜体等,或文档结构,如段落、标题、章节等,但有各种常用的约定。默认情况下,calibre会尝试根据这些约定自动检测正确的格式和标记。
TXT 输入支持多种选项,用于区分如何检测段落。
- 段落样式: Auto
分析文本文件并尝试自动确定段落的定义方式。该选项通常运行良好,如果结果不尽如人意,请尝试使用某种手动选项。
- 段落样式: Block
假设一个或多个空行即为段落分界线:
This is the first. This is the second paragraph.- 段落样式: Single
假设每一行都是一个独立的段落:
This is the first. This is the second. This is the third.- 段落样式: Print
假设每个段落都以缩进开头(制表符或 2 个以上的空格)。当遇到下一个以缩进开头的行时,当前段落结束:
This is the first. This is the second. This is the third.- 段落样式: Unformatted
假设文档没有任何格式设置,但使用了硬换行符。系统将通过标点符号和平均行长度来尝试重新构建段落。
- 格式化样式:自动
尝试检测正在使用的格式标记类型。如果未检测到任何标记,则将应用“智能处理”。
- 格式化样式:智能
分析文档中的常见章节标题、分节符以及斜体词汇,并在转换过程中应用相应的 HTML 标记。
- 格式化样式: Markdown
calibre还支持通过名为Markdown的转换预处理器运行TXT输入。Markdown允许将基本格式添加到TXT文档中,如粗体、斜体、节标题、表格、列表、目录等。用前导#标记章节标题并将章节XPath检测表达式设置为“//h:h1”是从TXT文档生成正确目录的最简单方法。你可以在`daringfireball上了解更多关于Markdown语法的信息<https://daringfireball.net/projects/markdown/syntax>`_.
- 格式化样式:无
不对文本应用任何特殊格式,文档在不进行其他更改的情况下直接转换为 HTML。
转换PDF文档
PDF文档是最难转换的格式之一。它们是固定的页面大小和文本放置格式。也就是说,很难确定一个段落在哪里结束,另一个段落从哪里开始。calibre将尝试使用可配置的“行解包因子”来解包段落。这是一个用于确定线应展开的长度的标尺。有效值是介于0和1之间的十进制数。默认值为0.45,刚好在中线长度下方。降低此值可在展开中包含更多文本。增加以包含更少。您可以在“PDF输入”下的转换设置中调整此值。
此外,它们通常有页眉和页脚作为文档的一部分,这些页眉和页脚将包含在文本中。使用“搜索和替换”面板删除页眉和页脚以缓解此问题。如果没有从文本中删除页眉和页脚,则可以取消段落展开。要了解如何使用页眉和页脚删除选项,请阅读:ref:regexptutorial。
PDF输入限制:
该功能不支持复杂的、多栏布局以及基于图片的文档。
此外,该功能也不支持提取文档中的矢量图形和表格。
某些 PDF 使用特殊字符(合字)来表示 ll、ff 或 fi 等字母组合。这些字符能否成功转换,取决于它们在 PDF 内部的具体表示方式。
链接和目录不支持
如果 PDF 使用嵌入式非 Unicode 字体来表示非英语字符,会导致这些字符在输出结果中显示为乱码。
某些 PDF 页面是由扫描的页面经过 OCR 处理的文本构成的。在这种情况下,calibre 会使用这些 OCR 文本,但它们可能与您在查看 PDF 文件时所见的内容大相径庭
用于显示复杂文本(如从右向左书写的语言和数学排版)的 PDF 无法正确转换
再次重申:PDF 是一种极其糟糕的输入格式。如果您绝对必须使用 PDF,那么请做好心理准备,输出效果可能从“尚可”到“完全不可用”不等,这完全取决于输入的 PDF 文件本身。
漫画集
漫画集是一种 .cbc 文件。.cbc 文件实际上是一个包含其他 CBZ/CBR 文件的 ZIP 压缩包。此外,.cbc 文件内必须包含一个名为 comics.txt 的纯文本文件(使用 UTF-8 编码)。comics.txt 必须包含该 .cbc 文件内所有漫画文件的列表,格式为“文件名:标题”,如下所示:
one.cbz:Chapter One
two.cbz:Chapter Two
three.cbz:Chapter Three
随后, .cbc 文件将包含以下内容:
comics.txt
one.cbz
two.cbz
three.cbz
calibre 会自动将此 .cbc 文件转换为一本电子书,并根据 comics.txt 中的每个条目生成相应的目录。
EPUB 高级格式演示
此 :download_file:`演示文件 <demos/demo.epub>`展示了 EPUB 文件的各种高级格式设置技巧。该文件是通过 calibre 从手写 HTML 代码创建的,旨在作为您自行制作 EPUB 文件的模板。
用于创建该文件的 HTML 源码可在 demo.zip 中获取。从该 ZIP 文件创建 EPUB 时所使用的设置如下:
ebook-convert demo.zip .epub -vv --authors "Kovid Goyal" --language en --level1-toc '//*[@class="title"]' --disable-font-rescaling --page-breaks-before / --no-default-epub-cover
请注意,由于该文件探索了 EPUB 的各种潜力,大部分高级格式设置在性能弱于 calibre 内置电子书阅读器的设备上将无法正常显示。
转换 ODT 文档
calibre 可以直接转换 ODT(OpenDocument Text)文件。您应当使用“样式”来格式化文档,并尽量减少直接格式化的使用。在文档中插入图片时,您需要将其锚定到“段落”;若将图片锚定到“页面”,转换后图片都会堆积在书的最前面。
要启用章节的自动侦测,您需要使用名为“标题 1”、“标题2”、…`标题6`的内置样式标记它们(“标题1”相当于HTML标签"<h1>",“标题2”相当于"<h2>",以此类推)。当你在Calibre中转换时,你可以在“检测章节”框中输入你使用的样式。例子:
如果您使用“样式”中的 标题 2`来标记章节,则必须将“检测章节于”框设置为 //``h:h2`
对于包含“节”和“章”的嵌套目录,若“节”标记为 标题 2、“章”标记为 标题 3,您需要在“检测章节于”框中输入`` //h:h2|//h:h3``。随后在“转换 - 目录”页面中,将 一级目录 框设置为
//h:h2,并将 :guilabel:二级目录 框设置为//h:h3。
系统可以识别常见的文档属性(标题、关键词、描述、作者),并且 calibre 会将文档中的第一张图片(面积不能太小,且具有良好的宽高比)用作封面图片。
此外还有一种高级属性转换模式。您可以在 ODT 文档中(文件 -> 属性 -> 自定义属性)添加一个名为``opf.metadata`` 的自定义属性(类型为“是/否”),并将其设为“是”来激活该模式。如果 calibre 检测到此属性,它将识别以下自定义属性(其中 opf.authors 会覆盖文档的原始作者信息):
opf.titlesort
opf.authors
opf.authorsort
opf.publisher
opf.pubdate
opf.isbn
opf.language
opf.series
opf.seriesindex
除此之外,您还可以通过在ODT中将图片命名为“opf.cover”(右键单击,图片->选项->名称)来指定用作封面的图片。如果找不到具有此名称的图片,则使用“smart”方法。由于封面检测可能会导致某些输出格式出现双封面,因此该过程将从文档中删除该段落(仅当唯一内容是封面时!)。但这只适用于命名的图片!
在高级模式下,您可以通过在 ODT 文档中将自定义属性``opf.nocover`` (类型为“是/否”)设置为“是”来禁用封面检测。
转换为PDF
转换为PDF时要决定的第一个也是最重要的设置是页面大小。默认情况下,calibre使用“U.S.Letter”的页面大小。您可以在转换对话框的“PDF输出”部分将其更改为另一个标准页面大小或完全自定义的大小。如果您正在生成要在特定设备上使用的PDF,则可以打开选项,使用“输出配置文件”中的页面大小。因此,如果您的输出配置文件设置为Kindle,calibre将创建一个页面大小适合在Kindle小屏幕上查看的PDF。
可打印目录
您还可以在 PDF 的末尾插入一份“可打印目录”,其中会列出每个章节对应的页码。如果您打算将 PDF 打印成纸质文档,这个功能会非常有用。如果您是在电子设备上使用 PDF,那么“PDF大纲”(书签)已经提供了类似的功能,并且该功能在默认情况下是开启的。
您可以通过转换对话框中“界面外观”部分下的“额外的CSS”设置来通过自定义生成目录的外观。下面列出了默认使用的 CSS,您只需将其复制并根据需要进行修改即可。
.calibre-pdf-toc table { width: 100%% }

.calibre-pdf-toc table tr td:last-of-type { text-align: right }

.calibre-pdf-toc .level-0 {
    font-size: larger;
}

.calibre-pdf-toc .level-1 td:first-of-type { padding-left: 1.4em }
.calibre-pdf-toc .level-2 td:first-of-type { padding-left: 2.8em }
针对单个 HTML 文件的自定义页面边距
如果您正在转换一个包含多个独立 HTML 文件的 EPUB 或 AZW3 文件,并且想要更改其中某个特定 HTML 文件的页面边距,可以使用 calibre 电子书编辑器在该 HTML 文件中添加以下样式块:
<style>
@page {
    margin-left: 10pt;
    margin-right: 10pt;
    margin-top: 10pt;
    margin-bottom: 10pt;
}
</style>
然后,在转换对话框的“PDF 输出”部分,勾选 :guilabel:`使用输入文档的页边距`选项。这样一来,所有由该 HTML 文件生成的页面都将拥有 10pt 的边距。
