Editando e-books
calibre has an integrated e-book editor that can be used to edit books in the EPUB, KEPUB (Kobo) and AZW3 (Kindle) formats. The editor shows you the HTML and CSS that is used internally inside the book files, with a live preview that updates as you make changes. It also contains various automated tools to perform common cleanup and fixing tasks.
Você pode utilizar o editor clicando com botão direito em qualquer ebook no Calibre e selecionar Editar Ebook.
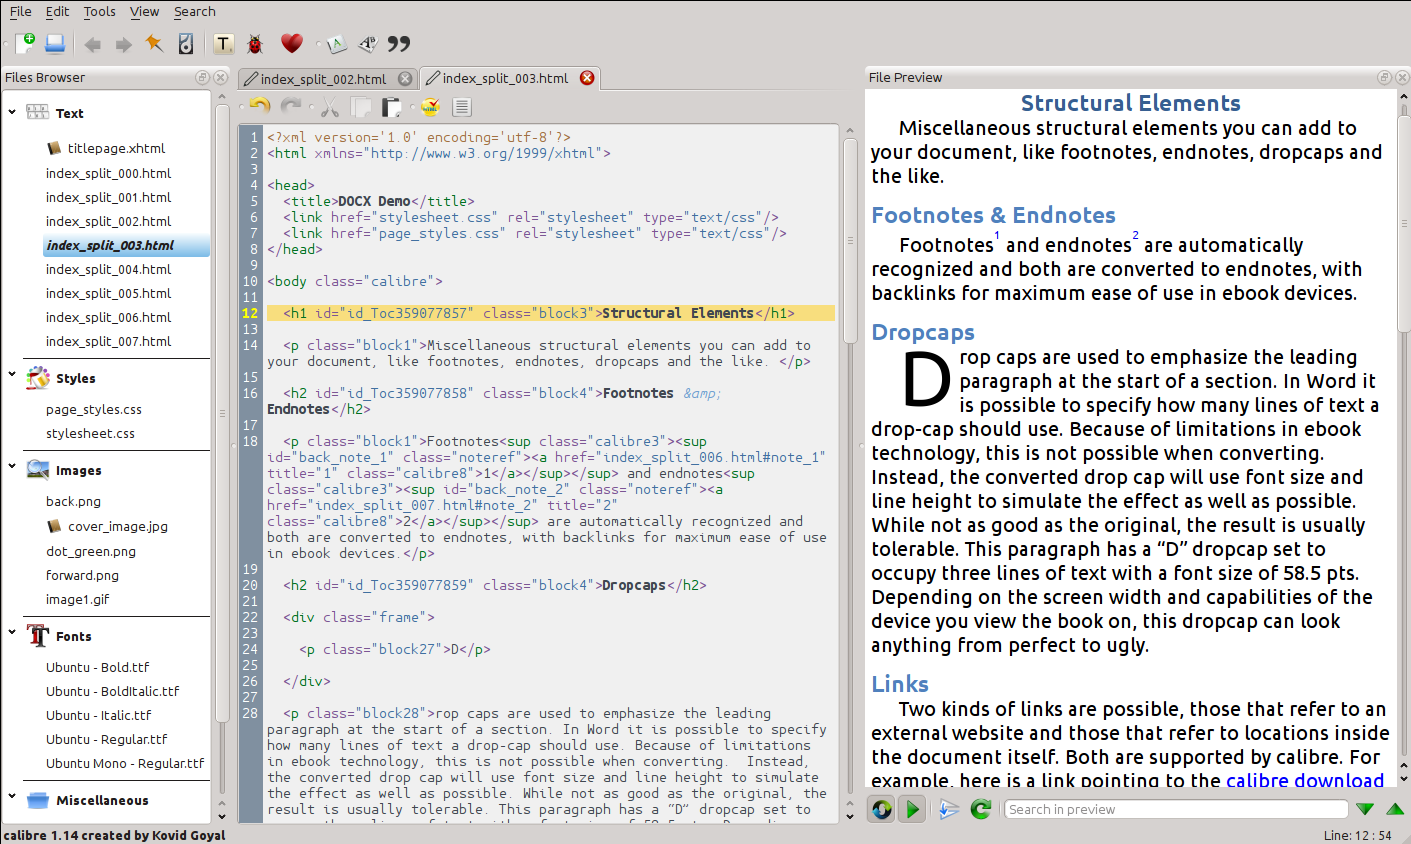
Fluxo de trabalho básico
Nota
Está disponível um vídeo contendo uma visita guiada ao editor de ebooks do Calibre aqui.
When you first open a book with the Edit book tool, you will be presented with a list of files on the left. These are the individual HTML files, stylesheets, images, etc. that make up the content of the book. Simply double click on a file to start editing it. Note that if you want to do anything more sophisticated than making a few small tweaks, you will need to know HTML Tutorial and CSS Tutorial.
Conforme vai fazendo alterações ao HTML ou ao CSS no editor, as mudanças serão pré-visualizadas, no momento, no painel de pré-visualização à direita. Quando estiver satisfeito com o modo como se apresentam as mudanças que efetuou, clique no botão Guardar ou use Ficheiro → Guardar para guardar as suas alterações no ebook.
One useful feature is Checkpoints. Before you embark on some ambitious set of edits, you can create a checkpoint. The checkpoint will preserve the current state of your book, then if in the future you decide you don’t like the changes you have made to you can go back to the state when you created the checkpoint. To create a checkpoint, use Edit → Create checkpoint. Checkpoints will also be automatically created for you whenever you run any automated tool like global search and replace. The checkpointing functionality is in addition to the normal undo/redo mechanism when editing individual files. Checkpoints are needed for when changes are spread over multiple files in the book.
That is the basic work flow for editing books – Open a file, make changes, preview and save. The rest of this manual will discuss the various tools and features present to allow you to perform specific tasks efficiently.
O navegador de ficheiros

The File browser gives you an overview of the various files inside the book you are editing. The files are arranged by category, with text (HTML) files at the top, followed by stylesheet (CSS) files, images and so on. Simply double click on a file to start editing it. Editing is supported for HTML, CSS and image files. The order of text files is the same order that they would be displayed in, if you were reading the book. All other files are arranged alphabetically.
Ao pairar o rato sobre uma entrada, pode ver o seu tamanho e, também, no fundo do ecrã, o caminho completo para o ficheiro dentro do livro. Note que os ficheiros dentro de ebooks estão compactados, pelo que o tamanho do livro finalizado não é a soma dos tamanhos dos ficheiros individuais.
Muitos ficheiros têm, no livro, significado especial. Estes tipicamente têm um ícone junto aos seus nomes, indicando esse significado especial. Por exemplo, na figura à esquerda, pode ver que os ficheiros cover_image.jpg e titlepage.xhtml têm um ícone de uma capa junto a eles, que indica que são a capa e a página de título do livro. De igual modo, o ficheiro content.opf tem um ícone de metadados junto a ele, indicando que os meta-dados do livro estão presentes e o ficheiro toc.ncx tem um ícone T a seguir a ele indicando que é o Índice.
Você pode executar diversas ações em arquivos individualmente, clicando com o botão direito neles.
Renomear arquivos
Pode renomear um ficheiro individual clicando com o botão direito do rato e selecionando Renomear. Renomear um ficheiro atualiza automaticamente todos as hiperligações e referências a ele existentes no livro. Assim, tudo o que tem de fazer é fornecer o novo nome, e o Calibre toma conta do resto
Pode também renomear vários ficheiros de uma vez só. Tal é útil se pretender que os ficheiros apresentem um qualquer tipo de padrão simples no nome. Por exemplo, pode querer renomear todos os ficheiros HTML de modo a ter nomes como Capitulo-1.html, Capitulo-2.html e assim sucessivamente. Selecione os ficheiros a que pretende aplicar esta renomeação múltipla mantendo carregada a tecla Shift ou Ctrl enquanto clica nos ficheiros. De seguida, clique com o botão direito e selecione Renomear em lote. Indique um prefixo e o número com que pretende começar a numeração automática, clique OK, e está feito. O diálogo de renomeação em lote permite-lhe ainda renomear ficheiros pela ordem em que aparecem no livro em vez de ser pela ordem em que os escolheu, o que é útil, por exemplo, para renomear todas as figuras pela ordem em que aparecem.
Finally, you can bulk change the file extension for all selected files. Select multiple files, as above, and right click and choose Change the file extension for the selected files.
Mesclar arquivos
Às vezes pode pretender combinar dois ficheiros HTML ou dois ficheiros CSS. Pode eventualmente ser útil ter tudo apenas num só ficheiro. No entanto, tenha cuidado, pois colocar uma grande quantidade de conteúdos num só ficheiro terá impacto na performance do sistema ao visualizar o livro num leitor de ebooks.
To merge multiple files together, select them by holding the Ctrl key and clicking on them (make sure you only select files of one type, either all HTML files or all CSS files and so on). Then right click and select merge. That’s all, calibre will merge the files, automatically taking care of migrating all links and references to the merged files. Note that merging files can sometimes cause text styling to change, since the individual files could have used different stylesheets.
You can also select text files and then drag and drop the text files onto another text file to merge the dropped text files into the target text file.
Alterando a Ordem de arquivo de texto
You can re-arrange the order in which text (HTML) files are opened when reading the book by simply dragging and dropping them in the File browser or clicking on the file to move and then pressing the Ctrl+Shift modifiers with the Up, Down, Home or End keys. For the technically inclined, this is called re-ordering the book spine.
Note that you have to drop the items between other items, not on top of them, this can be a little fiddly until you get used to it. Dropping on top of another file will cause the files to be merged.
Marcando a capa
Os ebooks tipicamente têm uma imagem de capa. Esta imagem é indicada no Navegador de ficheiros pelo ícone de um livro castanho junto ao nome da imagem. Se pretender designar outra imagem como sendo a capa, pode fazê-lo clicando com o botão direito sobre o ficheiro e escolher Marcar como capa.
Além disso, os arquivos EPUB têm o conceito de uma titlepage. Uma página de capa é um ficheiro HTML que atua como a página de título / capa do livro. Você pode marcar um ficheiro HTML como sendo a página de título ao editar EPUBs clicando com o botão direito do rato. Cuidado para que o ficheiro marcado contenha apenas as informações da capa. Se contiver outro conteúdo, como o primeiro capítulo, esse conteúdo será perdido caso o utilizador converta posteriormente o ficheiro EPUB no Calibre para outro formato. Isto ocorre porque, ao converter, o Calibre pressupõe que a página de capa marcada contenha apenas a capa e nenhum outro conteúdo.
Deletando arquivos
You can delete files by either right clicking on them or by selecting them and pressing the Delete key. Deleting a file removes all references to the file from the OPF file, saving you that chore. However, references in other places are not removed, you can use the Check Book tool to easily find and remove/replace them.
Exportar arquivos
You can export a file from inside the book to somewhere else on your computer. This is useful if you want to work on the file in isolation, with specialised tools. To do this, simply right click on the file and choose Export.
Once you are done working on the exported file, you can re-import it into the book, by right clicking on the file again and choosing Replace with file… which will allow you to replace the file in the book with the previously exported file.
You can also copy files between multiple editor instances. Select the files you want to copy in the File browser, then right click and choose, Copy selected files to another editor instance. Then, in the other editor instance, right click in the File browser and choose Paste file from other editor instance.
Adicionar novas imagens / fonts / etc, ou a criar novos arquivos em branco
Pode adicionar uma nova imagem, tipo de letra, folha de estilo, etc. a partir do seu computador para o livro clicando Ficheiro → Novo ficheiro. Tal permite importar um ficheiro quando clica no botão Importar ficheiros de recursos, ou criar um novo ficheiro HTML ou folha de estilo vazios, bastando para tal simplesmente indicar um nome de ficheiro na caixa para o novo ficheiro.
Pode também importar múltiplos ficheiros de uma só vez para dentro do livro usando Ficheiro->Importar ficheiros para dentro do livro.
Substituindo arquivos
You can easily replace existing files in the book, by right clicking on the file and choosing replace. This will automatically update all links and references, in case the replacement file has a different name than the file being replaced.
Ligar eficientemente folhas de estilo a ficheiros HTML
As a convenience, you can select multiple HTML files in the File browser, right click and choose Link stylesheets to have calibre automatically insert the <link> tags for those stylesheets into all the selected HTML files.
Buscar & Substituir
Edit book has a very powerful search and replace interface that allows you to search and replace text in the current file, across all files and even in a marked region of the current file. You can search using a normal search or using regular expressions. To learn how to use regular expressions for advanced searching, see Tudo sobre como usar expressões regulares no calibre.

Start the search and replace via the Search → Find/replace menu entry (you must be editing an HTML or CSS file).
Type the text you want to find into the Find box and its replacement into the Replace box. You can the click the appropriate buttons to Find the next match, replace the current match and replace all matches.
Using the drop downs at the bottom of the box, you can have the search operate over the current file, all text files, all style files or all files. You can also choose the search mode to be a normal (string) search or a regular expression search.
You can count all the matches for a search expression via Search → Count all. The count will run over whatever files/regions you have selected in the dropdown box.
You can also go to a specific line in the currently open editor via Search → Go to line.
Nota
Remember, to harness the full power of search and replace, you will need to use regular expressions. See Tudo sobre como usar expressões regulares no calibre.
Buscas salvas
Pode guardar expressões de pesquisa/substituição frequentemente utilizadas (incluindo expressões de modo de função) e reutilizá-las várias vezes. Para guardar uma pesquisa basta clicar com o botão direito do rato na caixa Localizar e selecionar Guardar pesquisa atual.
You can bring up the saved searches via Search → Saved searches. This will present you with a list of search and replace expressions that you can apply. You can even select multiple entries in the list by holding down the Ctrl key while clicking so as to run multiple search and replace expressions in a single operation.
Modo de função
Function mode allows you to write arbitrarily powerful Python functions that are run on every Find/replace. You can do pretty much any text manipulation you like in function mode. For more information, see Modo de função para Procurar & Substituir no Editor.
Ferramentas automatizadas
Edit book has various tools to help with common tasks. These are accessed via the Tools menu.
Editando a Tabela de Conteúdos
Existe uma ferramenta dedicada para facilitar a edição do índice. Invoque-a com Ferramentas → Índice → Editar índice.
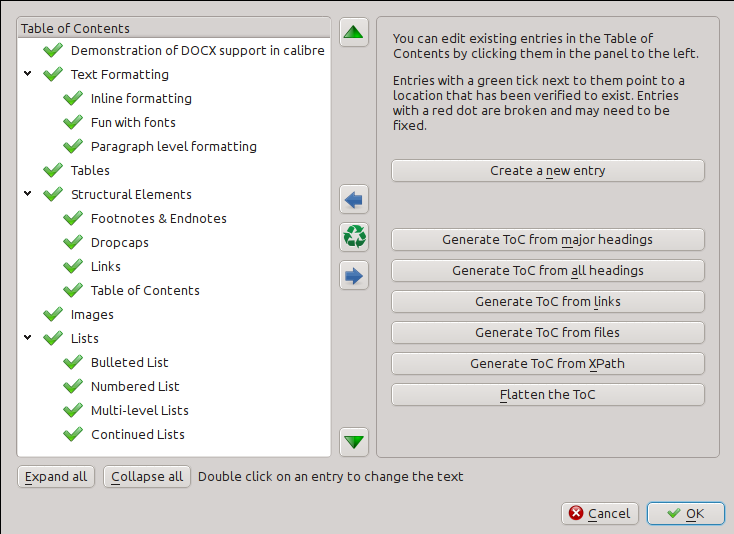
The Edit Table of Contents tool shows you the current Table of Contents (if any) on the left. Simply double click on any entry to change its text. You can also re-arrange entries by drag and drop or by using the buttons to the right.
For books that do not have a pre-existing Table of Contents, the tool gives you various options to auto-generate a Table of Contents from the text. You can generate from the headings in the document, from links, from individual files and so on.
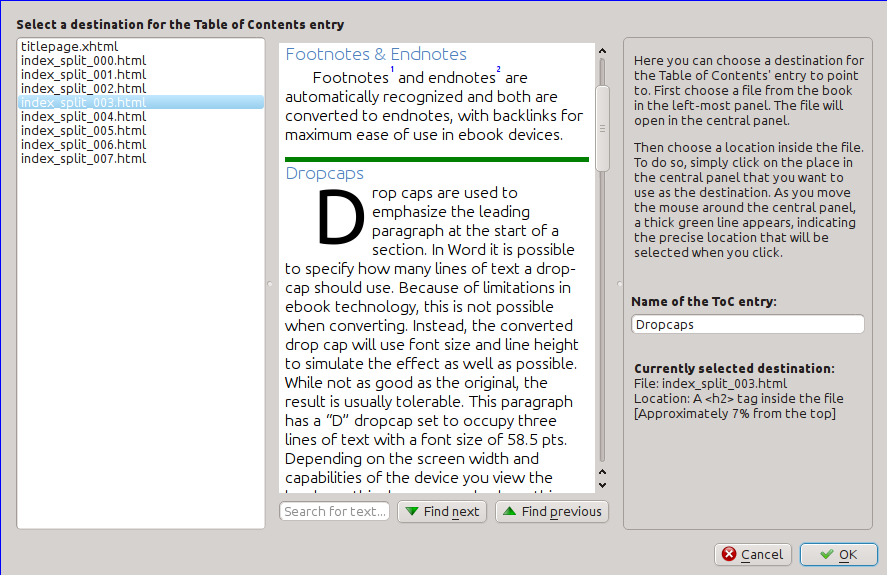
You can edit individual entries by clicking on them and then clicking the Change the location this entry points to button. This will open up a mini-preview of the book, simply move the mouse cursor over the book view panel, and click where you want the entry to point to. A thick green line will show you the location. Click OK once you are happy with the location.
A verificar o livro
The Check book tool searches your book for problems that could prevent it working as intended on actual reader devices. Activate it via Tools → Check book.

Any problems found are reported in a nice, easy to use list. Clicking any entry in the list shows you some help about that error as well as giving you the option to auto-fix that error, if the error can be fixed automatically. You can also double click the error to open the location of the error in an editor, so you can fix it yourself.
Algumas das verificações executadas:
Malformed HTML markup. Any HTML markup that does not parse as well-formed XML is reported. Correcting it will ensure that your markup works as intended in all contexts. calibre can also auto-fix these errors, but auto-fixing can sometimes have unexpected effects, so use with care. As always, a checkpoint is created before auto-fixing so you can easily revert all changes. Auto-fixing works by parsing the markup using the HTML5 algorithm, which is highly fault tolerant and then converting to well formed XML.
Estilos CSS malformados ou desconhecidos. Qualquer CSS que não seja válido ou que tenha propriedades não definidas na norma CSS 2.1 (e mais alguns do CSS 3) são relatados. O CSS é verificado em todas as folhas de estilo, atributos de estilo em linha e <style> etiquetas em ficheiros HTML.
Hiperligações quebradas. São relatadas ligações que apontem para ficheiros dentro do livro e que estejam em falta.
Ficheiros não referenciados. São relatados ficheiros no livro que não são referenciados por qualquer outro ficheiro ou que não constem da espinha.
Vários problemas comuns em ficheiros OPF tais como lombada ou itens de manifesto duplicados, problemas com idrefs ou metaetiquetas de capa, secções obrigatórias em falta e assim por diante.
Verificações diversas de compatibilidade para problemas conhecidos que podem provocar o mau funcionamento do livro em dispositivos de leitura.
Adicionando uma capa
You can easily add a cover to the book via Tools → Add cover. This allows you to either choose an existing image in the book as the cover or import a new image into the book and make it the cover. When editing EPUB files, the HTML wrapper for the cover is automatically generated. If an existing cover in the book is found, it is replaced. The tool also automatically takes care of correctly marking the cover files as covers in the OPF.
Incorporando fontes referenciadas
Accessed via Tools → Embed reference fonts, this tool finds all fonts referenced in the book and if they are not already embedded, searches your computer for them and embeds them into the book, if found. Please make sure that you have the necessary copyrights for embedding commercially licensed fonts, before doing this.
Efetuando subconjunto de fontes embutidas
Accessed via Tools → Subset embedded fonts, this tool reduces all the fonts in the book to only contain glyphs for the text actually present in the book. This commonly reduces the size of the font files by ~ 50%. However, be aware that once the fonts are subset, if you add new text whose characters are not previously present in the subset font, the font will not work for the new text. So do this only as the last step in your workflow.
Pontuação inteligente
Convert plain text dashes, ellipsis, quotes, multiple hyphens, etc. into their typographically correct equivalents. Note that the algorithm can sometimes generate incorrect results, especially when single quotes at the start of contractions are involved. Accessed via Tools → Smarten punctuation.
Transformar as propriedades CSS
Cria regras que transformam o estilo do livro. Por exemplo, criar uma regra para converter todo o texto vermelho para verde ou duplicar o tamanho do tipo de letra em todo o livro ou ainda colocar em itálico o texto de uma certa família de tipos de letra, etc.
Criar regras é simples, pois seguem um formato de linguagem natural que se parece com:
Se a propriedade cor for vermelho alterar para verde
Se a propriedade font-size for qualquer valor multiplicar o valor por 2
Acedido via Ferramentas → Transformar estilos.
Removendo regras CSS não usadas
Remove todas as regras CSS não usadas das folhas de estilo e das marcas <style>. Alguns livros criados a partir de modelos de produção podem conter um grande número de regras CSS extra que não se aplicam a qualquer conteúdo existente. Estas regras extra podem atrasar leitores que necessitem de as processar a todas. É acedido via Ferramentas → Remover CSS não usado.
Corrigir HTML
Esta ferramenta converte HTML que não pode ser analisado como XML em XML bem formado. É muito comum nos e-books existir XML mal-formado, pelo que esta ferramenta simplesmente automatiza o processo de reparação desse HTML. A ferramenta funciona analisando o HTML usando o algoritmo HTML5 (o algoritmo usado em todos os browsers modernos) e depois convertendo o resultado para XML. Esteja ciente de que a reparação automática pode, por vezes, ter resultados contraintuitivos. Se preferir, pode usar a ferramenta Verificação de livro, discutida acima, para encontrar e corrigir manualmente problemas no HTML. Aceder através de Ferramentas → Reparar HTML.
Embelezando arquivos
This tool is used to auto-format all HTML and CSS files so that they “look pretty”. The code is auto-indented so that it lines up nicely, blank lines are inserted where appropriate and so on. Note that beautifying also auto-fixes broken HTML/CSS. Therefore, if you don’t want any auto-fixing to be performed, first use the Check Book tool to correct all problems and only then run beautify. Accessed via Tools → Beautify all files.
Nota
In HTML any text can have significant whitespace, via the CSS white-space directive. Therefore, beautification could potentially change the rendering of the HTML. To avoid this as far as possible, the beautify algorithm only beautifies block level tags that contain other block level tags. So, for example, text inside a <p> tag will not have its whitespace changed. But a <body> tag that contains only other <p> and <div> tags will be beautified. This can sometimes mean that a particular file will not be affected by beautify as it has no suitable block level tags. In such cases you can try different beautification tools, that are less careful, for example: HTML Tidy.
Inserir índice em linha
Normalmente em ebooks, o índice está separado do texto principal e é acedido, no dispositivo de leitura de ebooks, através de um botão/menu especial de índice. Também pode fazer com que o Calibre gere automaticamente um índice incorporado que se torna parte do texto do livro. Será gerado com base no índice atualmente definido.
If you use this tool multiple times, each invocation will cause the previously created inline Table of Contents to be replaced. The tool can be accessed via Tools → Table of Contents → Insert inline Table of Contents.
Definir a semântica
This tool is used to set semantics in EPUB files. Semantics are simply, links in the OPF file that identify certain locations in the book as having special meaning. You can use them to identify the foreword, dedication, cover, table of contents, etc. Simply choose the type of semantic information you want to specify and then select the location in the book the link should point to. This tool can be accessed via Tools → Set semantics.
Filtrando informações do estilo
This tool can be used to easily remove specified CSS style properties from the
entire book. You can tell it what properties you want removed, for example,
color, background-color, line-height and it will remove them from
everywhere they occur — stylesheets, <style> tags and inline style
attributes. After removing the style information, a summary of all the changes
made is displayed so you can see exactly what was changed. The tool can be
accessed via Tools → Filter style information.
Atualização das estruturas internas do livro
This tool can be used to upgrade the book’s internals, if possible. For instance it will upgrade EPUB 2 books to EPUB 3 books. The tool can be accessed via Upgrade book internals.
Pontos de verificação
Checkpoints are a way to mark the current state of the book as “special”. You can then go on to do whatever changes you want to the book and if you don’t like the results, return to the checkpointed state. Checkpoints are automatically created every time you run any of the automated tools described in the previous section.
You can create a checkpoint via Edit → Create checkpoint. And go back to a previous checkpoint with Edit → Revert to …
The check pointing functionality is in addition to the normal Undo/redo mechanism when editing individual files. Checkpoints are needed for when changes are spread over multiple files in the book or when you wish to be able to revert a large group of related changes as a whole.
You can see a list of available checkpoints via View → Checkpoints. You can compare the current state of the book to a specified checkpoint using the Comparando e-books tool – by selecting the checkpoint of interest and clicking the Compare button. The Revert to button restores the book to the selected checkpoint, undoing all changes since that checkpoint was created.
O painel de pré-visualização em tempo real
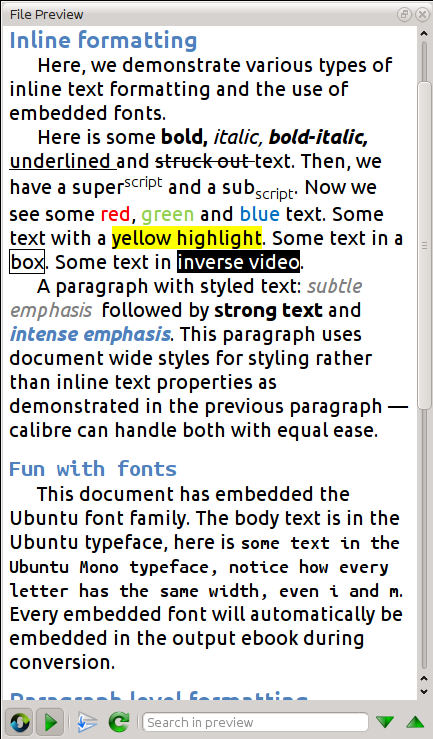
The File preview gives you an overview of the various files inside The live preview panel shows you the changes you are making live (with a second or two of delay). As you edit HTML or CSS files, the preview panel is updated automatically to reflect your changes. As you move the cursor around in the editor, the preview panel will track its location, showing you the corresponding location in the book. Clicking in the preview panel, will cause the cursor in the editor to be positioned over the element you clicked. If you click a link pointing to another file in the book, that file will be opened in the edit and the preview panel, automatically.
You can turn off the automatic syncing of position and live preview of changes – by buttons under the preview panel. The live update of the preview panel only happens when you are not actively typing in the editor, so as not to be distracting or slow you down, waiting for the preview to render.
The preview panel shows you how the text will look when viewed. However, the preview panel is not a substitute for actually testing your book an actual reader device. It is both more, and less capable than an actual reader. It will tolerate errors and sloppy markup much better than most reader devices. It will also not show you page margins, page breaks and embedded fonts that use font name aliasing. Use the preview panel while you are working on the book, but once you are done, review it in an actual reader device or software emulator.
Nota
The preview panel does not support embedded fonts if the name of the font inside the font file does not match the name in the CSS @font-face rule. You can use the Check Book tool to quickly find and fix any such problem fonts.
Dividindo arquivos HTML
One, perhaps non-obvious, use of the preview panel is to split long HTML files.
While viewing the file you want to split, click the Split mode
button under the preview panel  . Then simply move your mouse to the place
where you want to split the file and click. A thick green line will show you
exactly where the split will happen as you move your mouse. Once you have found
the location you want, simply click and the split will be performed.
Splitting the file will automatically update all links and references that pointed into the bottom half of the file and will open the newly split file in an editor.
You can also split a single HTML file at multiple locations automatically, by right clicking inside the file in the editor and choosing Split at multiple locations. This will allow you to easily split a large file at all heading tags or all tags having a certain class and so on.
O Painel CSS em tempo real
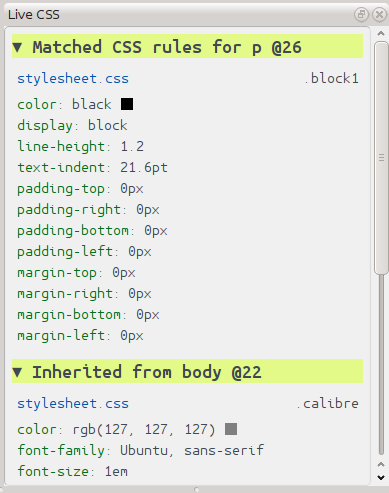
The Live CSS panel shows you all the style rules that apply to the tag you are currently editing. The name of tag, along with its line number in the editor are displayed, followed by a list of matching style rules.
It is a great way to quickly see which style rules apply to any tag. The view also has clickable links (in blue), which take you directly to the location where the style was defined, in case you wish to make any changes to the style rules. Style rules that apply directly to the tag, as well as rules that are inherited from parent tags are shown.
The panel also shows you what the finally calculated styles for the tag are. Properties in the list that are superseded by higher priority rules are shown with a line through them.
You can enable the Live CSS panel via View → Live CSS.
Ferramentas diversas
Há mais algumas ferramentas que podem ser úteis durante a edição do livro.
A vista de índice
The Table of Contents view shows you the current table of contents in the book. Double clicking on any entry opens the place that entry points to in an editor. You can right click to edit the Table of Contents, refresh the view or expand/collapse all items. Access this view via View → Table of Contents.
Verificando a ortografia das palavras no livro
Pode correr um corretor ortográfico através de Ferramentas → Verificar ortografia.
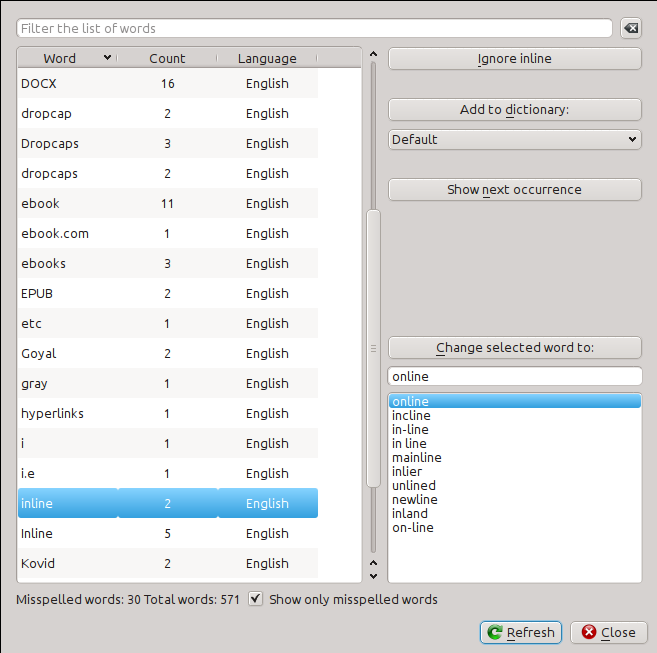
Words are shown with the number of times they occur in the book and the
language the word belongs to. Language information is taken from the books
metadata and from lang attributes in the HTML files. This allows the spell
checker to work well even with books that contain text in multiple languages.
For example, in the following HTML extract, the word color will be checked
using American English and the word colour using British English:
<div lang="en_US">color <span lang="en_GB">colour</span></div>
Nota
You can double click a word to highlight the next occurrence of that word in the editor. This is useful if you wish to manually edit the word, or see what context it is in.
To change a word, simply double click one of the suggested alternative spellings on the right, or type in your own corrected spelling and click the Change selected word to button. This will replace all occurrences of the word in the book. You can also right click on a word in the main word list to change the word conveniently from the right click menu.
You can have the spelling checker ignore a word for the current session by clicking the Ignore button. You can also add a word to the user dictionary by clicking the Add to dictionary button. The spelling checker supports multiple user dictionaries, so you can select the dictionary you want the word added to.
You can also have the spelling checker display all the words in your book, not just the incorrectly spelled ones. This is useful to see what words are most common in your book and to run a simple search and replace on individual words.
Nota
If you make any changes to the book by editing files while the spell check tool is open, you should click the Refresh button in the Spell check tool. If you do not do this and continue to use the Spell check tool, you could lose the changes you have made in the editor.
Nota
To exclude an individual file from being spell checked when running the spell check tool, you can use the Exclude files button or add the following comment just under the opening tag in the file:
<!-- calibre-no-spell-check -->
Adicionando novos dicionários
The spelling checker comes with builtin dictionaries for the English and Spanish languages. You can install your own dictionaries via Preferences → Editor → Manage spelling dictionaries. The spell checker can use dictionaries from the LibreOffice program (in the .oxt format). You can download these dictionaries from The LibreOffice Extensions repository.
Inserindo caracteres especiais
You can insert characters that are difficult to type by using the Edit → Insert special character tool. This shows you all Unicode characters, simply click on the character you want to type. If you hold Ctrl while clicking, the window will close itself after inserting the selected character. This tool can be used to insert special characters into the main text or into any other area of the user interface, such as the Search and replace tool.
Because there are a lot of characters, you can define your own Favorite characters, that will be shown first. Simply right click on a character to mark it as favorite. You can also right click on a character in favorites to remove it from favorites. Finally, you can re-arrange the order of characters in favorites by clicking the Re-arrange favorites button and then drag and dropping the characters in favorites around.
You can also directly type in special characters using the keyboard. To do this, you type the Unicode code for the character (in hexadecimal) and then press the Alt+X key which will convert the previously typed code into the corresponding character. For example, to type ÿ you would type ff and then Alt+X. To type a non-breaking space you would use a0 and then Alt+X, to type the horizontal ellipsis you would use 2026 and Alt+X and so on.
Finally, you can type in special characters by using HTML named entities. For example, typing will be replaced by a non breaking space when you type the semi-colon. The replacement happens only when typing the semi-colon.
Vista de inspeção de código
This view shows you the HTML coding and CSS that applies to the current element of interest. You open it by right clicking a location in the preview panel and choosing Inspect. It allows you to see the HTML coding for that element and more importantly, the CSS styles that apply to it. You can even dynamically edit the styles and see what effect your changes have instantly. Note that editing the styles does not actually make changes to the book contents, it only allows for quick experimentation. The ability to live edit inside the Inspector is under development.
Checando ligações externas
You can use this tool to check all links in your book that point to external websites. The tool will try to visit every externally linked website, and if the visit fails, it will report all broken links in a convenient format for you to fix.
Descarregar recursos externos
You can use this tool to automatically download any images/stylesheets/etc. in the book that are not bundled with the book (i.e. they have URLs pointing to a location on the internet). The tool will find all such resources and automatically download them, add them to the book and replace all references to them to use the downloaded files.
Organizar ficheiros em pastas por tipo
Often when editing EPUB files that you get from somewhere, you will find that the files inside the EPUB are arranged haphazardly, in different sub-folders. This tool allows you to automatically move all files into sub-folders based on their types. Access it via Tools → Arrange into folders. Note that this tool only changes how the files are arranged inside the EPUB, it does not change how they are displayed in the File browser.
Importing files in other e-book formats as EPUB
The editor includes the ability to import files in some other e-book formats directly as a new EPUB, without going through a full conversion. This is particularly useful to directly create EPUB files from your own hand-edited HTML files. You can do this via File → Import an HTML or DOCX file as a new book.
A ferramenta de relatórios
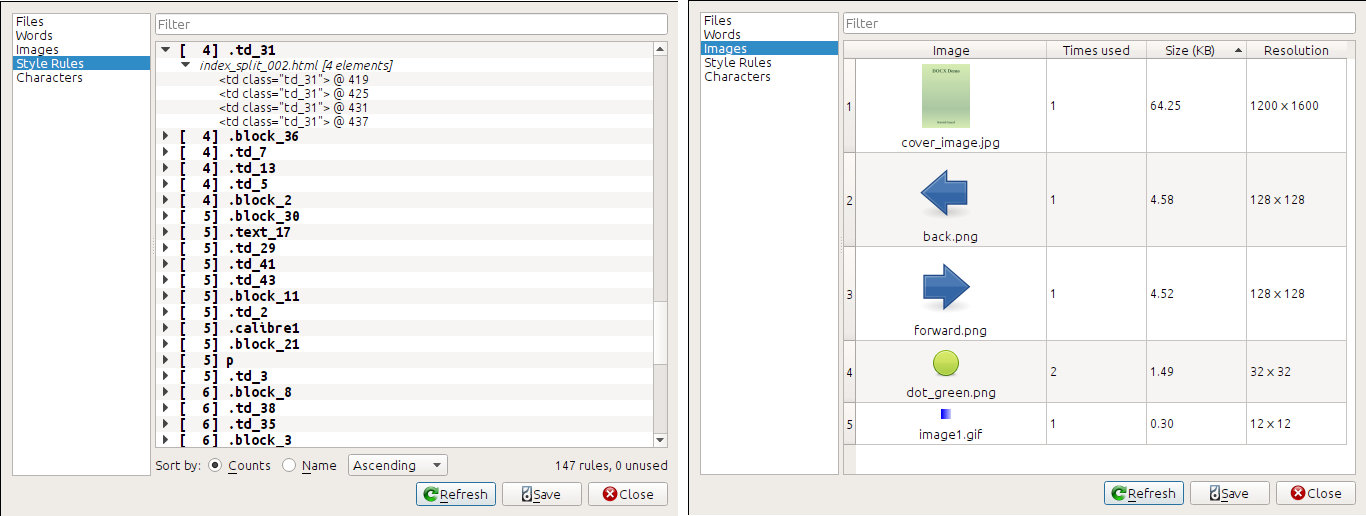
The editor includes a nice Reports tool (via Tools → Reports) that shows summaries of the files, images, links, words, characters and styles used in the book. Every line in the report is hot-linked. Double clicking a line jumps to the place in the book where that item is used or defined (as appropriate). For example, in the Links view, you can double click entries the Source column to jump to where the link is defined and entries in the Target column to jump to where the link points.
Características especiais no editor de código
The calibre HTML editor is very powerful. It has many features that make editing of HTML (and CSS) easier.
Realçar sintaxe
The HTML editor has very sophisticated syntax highlighting. Features include:
The text inside bold, italic and heading tags is made bold/italic
As you move your cursor through the HTML, the matching HTML tags are highlighted, and you can jump to the opening or closing tag with the keyboard shortcuts Ctrl+{ and Ctrl+}. Similarly, you can select the contents of a tag with Ctrl+Alt+T or Ctrl+Shift+T.
Invalid HTML is highlighted with a red underline
Spelling errors in the text inside HTML tags and attributes such as title are highlighted. The spell checking is language aware, based on the value of the
langattribute of the current tag and the overall book language.CSS embedded inside
<style>tags is highlightedSpecial characters that can be hard to distinguish such as non-breaking spaces, different types of hyphens, etc. are highlighted.
Links to other files in
<a>tags,<img>and<link>tags all have the filenames highlighted. If the filename they point to does not exist, the filename is marked with a red underline.
Ajuda de conteúdo sensível
You can right click on an HTML tag name or a CSS property name to get help for that tag or property.
You can also hold down the Ctrl key and click on any filename inside a link tag to open that file in the editor automatically. Similarly, Ctrl clicking a class name will take you to the first style rule that matches the tag and class.
Right clicking a class name in an HTML file will allow you to rename the class, changing all occurrences of the class throughout the book and all its stylesheets.
Auto-completar
When editing an e-book, one of the most tedious tasks is creating links to other files inside the book, or to CSS stylesheets, or images. You have to figure out the correct filename and relative path to the file. The editor has auto-complete to make that easier.
As you type a filename, the editor automatically pops up suggestions. Simply
use the Tab key to select the correct file name. The editor even offers
suggestions for links pointing to an anchor inside another HTML file. After you
type the # character, the editor will show you a list of all anchors in the
target file, with a small snippet of text to help you choose the right anchor.
Note that unlike most other completion systems, the editor’s completion system
uses subsequence matching. This means that you can type just two or three
letters from anywhere in the filename to complete the filename. For example,
say you want the filename ../images/arrow1.png, you can simply type ia1
and press Tab to complete the filename. When searching for matches, the
completion system prioritizes letters that are at the start of a word, or
immediately after a path separator. Once you get used to this system, you will
find it saves you a lot of time and effort.
Trechos
O editor Calibre de ebook suporta trechos. Um trecho é um pedaço de texto que é reutilizado com frequência ou contém algum texto redundante. O editor permite que você insira um trecho com apenas algumas combinações de teclas. Os trechos são uma funcionalidade poderosa, com muitos recursos, como marcadores de espaço entre os quais você pode saltar, espelhamento automático de texto repetido e assim por diante. Para obter mais informações, consulte Trechos.
