 變更語言
變更語言編輯電子書
calibre has an integrated e-book editor that can be used to edit books in the EPUB, KEPUB (Kobo) and AZW3 (Kindle) formats. The editor shows you the HTML and CSS that is used internally inside the book files, with a live preview that updates as you make changes. It also contains various automated tools to perform common cleanup and fixing tasks.
你可以通过在calibre里右键单击任意一本书--选择“编辑书籍”来进入编辑器
基本的工作流程
備註
A video tour of the calibre E-book editor is available here.
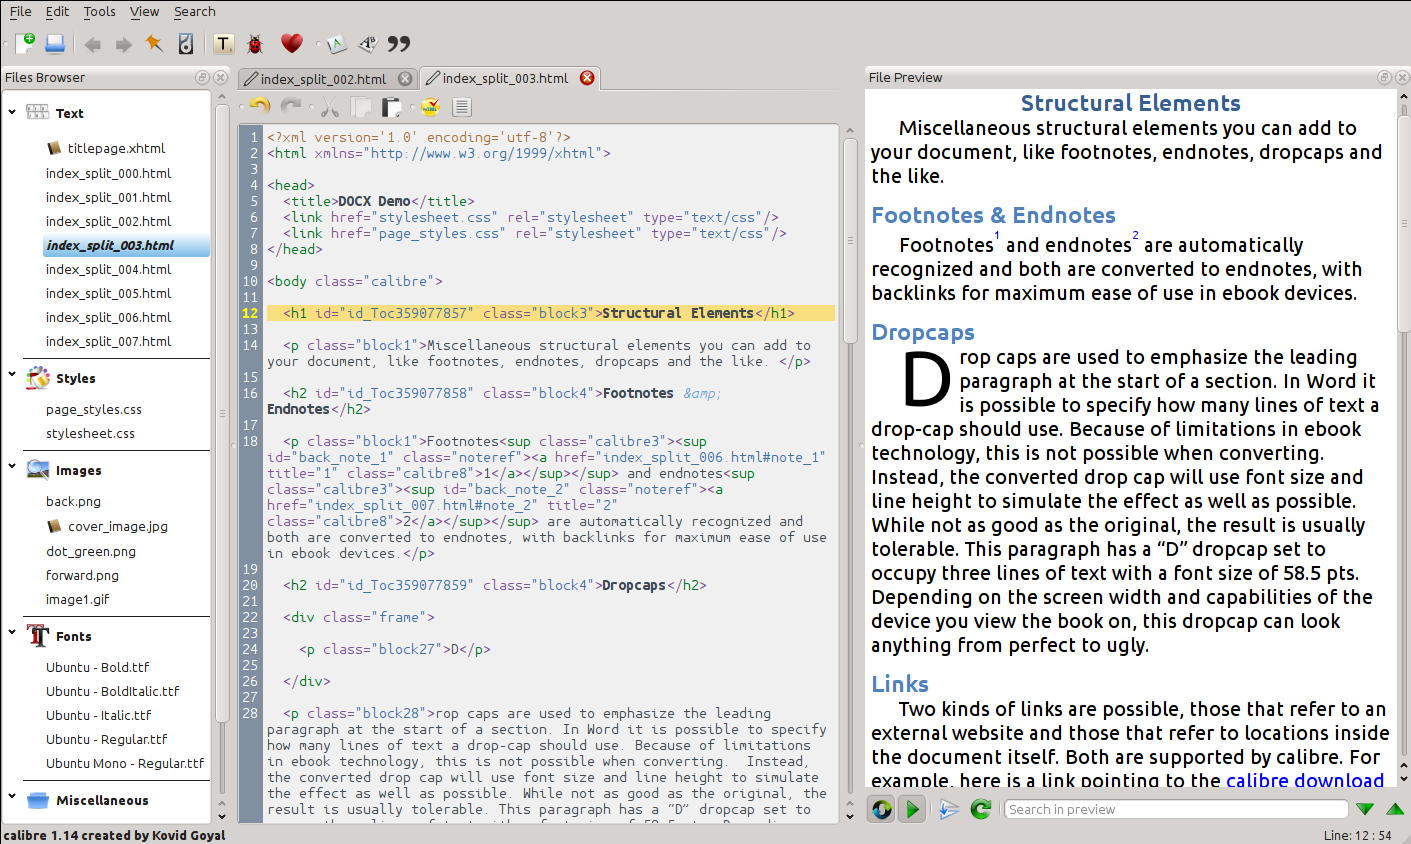
When you first open a book with the Edit book tool, you will be presented with a list of files on the left. These are the individual HTML files, stylesheets, images, etc. that make up the content of the book. Simply double click on a file to start editing it. Note that if you want to do anything more sophisticated than making a few small tweaks, you will need to know HTML Tutorial and CSS Tutorial.
当您在编辑器中更改HTML或CSS时,更改将在右侧的预览面板中实时预览。如果您对所做更改的外观感到满意,请单击:guilabel:`保存`按钮或使用:guilabel:`文件->保存`将更改保存到电子书中。
One useful feature is Checkpoints. Before you embark on some ambitious set of edits, you can create a checkpoint. The checkpoint will preserve the current state of your book, then if in the future you decide you don't like the changes you have made, you can go back to the state when you created the checkpoint. To create a checkpoint, use Edit → Create checkpoint. Checkpoints will also be automatically created for you whenever you run any automated tool like global search and replace. The checkpointing functionality is in addition to the normal undo/redo mechanism when editing individual files. Checkpoints are needed for when changes are spread over multiple files in the book.
这是编辑图书的基本工作流程--打开文件、进行更改、预览和保存。本手册的其余部分将讨论现有的各种工具和功能,使您能够高效地执行特定任务。
文件浏览器
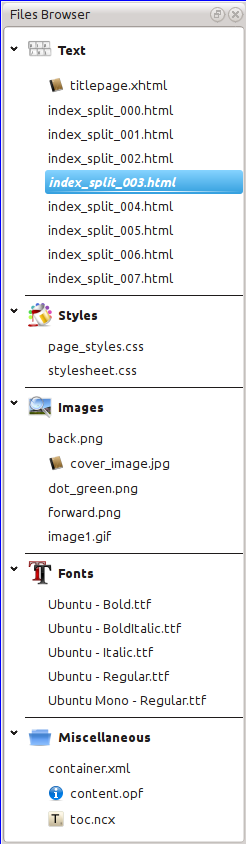
guilabel:`文件浏览器`为您提供正在编辑的书本内各种文件的概览。文件按类别排列,文本(HTML)文件位于顶部,后面是样式表(CSS)文件、图像等。只需双击文件即可开始编辑。HTML、CSS和图像文件支持编辑。如果您正在阅读图书,则文本文件的顺序与它们的显示顺序相同。所有其他文件都按字母顺序排列。
通过将鼠标悬停在条目上,您可以看到它的大小,还可以在屏幕底部看到书中文件的完整路径。请注意,电子书中的文件是压缩的,因此最终图书的大小不是单个文件大小的总和。
在這本書中,許多檔案都有特殊的意義。它們的名稱旁邊通常會有一個圖示,表示特殊含義。例如,在左邊的圖片中,您可以看到檔案:guilabel:`cover_image.jpg`和:guilabel:`title lepage.xhtml`旁邊有封面圖示,這表示它們是圖書封面圖片和標題頁。同樣,:guilabel:`content.opf`檔案旁邊有一個後設資料圖示,表示其中存在圖書後設資料,而:guilabel:`toc.ncx`檔案旁邊有一個T圖示,表示它是目錄。
通过右键单击单个文件,可以对它们执行许多操作。
文件改名中
您可以通过右键单击单个文件并选择:guilabel:`Rename`来重命名该文件。重命名文件会自动更新整本书中对该文件的所有链接和引用。所以你要做的就是提供新的名字,其他的都会由Calibre来处理。
You can also bulk rename many files at once. This is useful if you want the files to have some simple name pattern. For example you might want to rename all the HTML files to have names Chapter-1.html, Chapter-2.html and so on. Select the files you want bulk renamed by holding down the Shift or Ctrl key and clicking the files. Then right click and select Bulk rename. Enter a prefix and what number you would like the automatic numbering to start at, click OK and you are done. The bulk rename dialog also lets you rename files by the order they appear in the book instead of the order you selected them in, useful, for instance to rename all images by the order they appear.
最后,您可以批量更改所有选定文件的文件扩展名。如上选择多个文件,右键选择:guilabel:更改所选文件的文件扩展名。
合并文件
有时,您可能希望将两个HTML文件或两个CSS文件合并在一起。有时将所有内容都放在一个文件中会很有用。不过要小心,在典型的电子书阅读器中查看图书时,将大量内容放入单个文件会导致性能问题。
To merge multiple files together, select them by holding the Ctrl key and clicking on them (make sure you only select files of one type, either all HTML files or all CSS files and so on). Then right click and select merge. That's all, calibre will merge the files, automatically taking care of migrating all links and references to the merged files. Note that merging files can sometimes cause text styling to change, since the individual files could have used different stylesheets.
You can also select text files and then drag and drop the text files onto another text file to merge the dropped text files into the target text file.
更改文本文件顺序
You can re-arrange the order in which text (HTML) files are opened when reading the book by simply dragging and dropping them in the File browser or clicking on the file to move and then pressing the Ctrl+Shift modifiers with the Up, Down, Home or End keys. For the technically inclined, this is called re-ordering the book spine.
Note that you have to drop the items between other items, not on top of them, this can be a little fiddly until you get used to it. Dropping on top of another file will cause the files to be merged.
正在標記封面
电子书通常都有封面图片。此图像在:guilabel:`文件浏览器`中由图像名称旁边的棕色书图标表示。如果要指定其他图像作为封面,可以通过右键单击该文件并选择:guilabel:`标记为封面‘来实现。
In addition, EPUB files have the concept of a titlepage. A title page is a HTML file that acts as the title page/cover for the book. You can mark an HTML file as the titlepage when editing EPUBs by right-clicking. Be careful that the file you mark contains only the cover information. If it contains other content, such as the first chapter, then that content will be lost if the user ever converts the EPUB file in calibre to another format. This is because when converting, calibre assumes that the marked title page contains only the cover and no other content.
移除文件中
您可以通过右键单击文件或选择文件并按Delete键来删除文件。删除文件会从OPF文件中删除对该文件的所有引用,从而省去了这项工作。但是,其他位置的参照不会被删除,您可以使用Check Book工具轻松地查找和删除/替换它们。
正在导出文件
您可以将文件从书内导出到计算机上的其他位置。如果您希望使用专门的工具单独处理文件,这将非常有用。要执行此操作,只需右键单击该文件并选择:guilabel:导出。
处理完导出的文件后,您可以将其重新导入到书中,方法是再次右键单击该文件,然后选择:guilabel:`替换为文件...‘,这将允许您将书籍中的文件替换为以前导出的文件。
您还可以在多个编辑器实例之间复制文件。在:guilabel:文件浏览器`中选择要复制的文件,然后右键单击并选择、:guilabel:`将所选文件复制到另一个编辑器实例。然后,在另一个编辑器实例中,右键单击:guilabel:文件浏览器`并选择:guilabel:`从其他编辑器实例粘贴文件。
增加新的图片/字体等或者创建新空文件
您可以透過按一下:guilabel:檔案->新增檔案 將電腦中的新圖片、字型、樣式表等加入到書本中。這允許您透過按一下 :guilabel:`匯入資源檔案`按鈕匯入檔案,或者只需在新檔案的框中輸入檔案名稱即可建立新的空白HTML檔案或樣式表。
您还可以使用文件->将文件导入书本,一次将多个文件导入书本。
替代文件
通过右键单击文件并选择替换,您可以轻松地替换图书中的现有文件。这将自动更新所有链接和引用,以防替换文件的名称与要替换的文件不同。
有效地将样式表链接到HTML文件
为了方便起见,您可以在文件浏览器中选择多个HTML文件,右键单击并选择链接样式表,以便Calibre自动将这些样式表的 <link> 标记插入到所有选定的HTML文件中。
搜尋及取代
编辑书籍有一个非常强大的搜索和替换界面,允许您搜索和替换当前文件中的文本,跨所有文件,甚至在当前文件的标记区域中搜索和替换文本。您可以使用普通搜索或使用正则表达式进行搜索。要了解如何使用正则表达式进行高级搜索,请参阅:ref:regexptutorial。

通过:guilabel:`搜索->查找/替换`菜单项开始搜索和替换(您必须编辑HTML或CSS文件)。
在“查找”框中键入要查找的文本,并在“替换”框中替换它。您可以单击相应的按钮查找下一个匹配项、替换当前匹配项和替换所有匹配项。
使用框底部的下拉列表,您可以对当前文件、所有文本文件、所有样式文件或所有文件进行搜索。您还可以将搜索模式选择为普通(字符串)搜索或正则表达式搜索。
您可以通过:guilabel:`搜索->全部计数`统计搜索表达式的所有匹配项。计数将遍历您在下拉框中选择的任何文件/区域。
You can also go to a specific line in the currently open editor via Search → Go to line.
備註
Remember, to harness the full power of search and replace, you will need to use regular expressions. See All about using regular expressions in calibre.
已儲存搜尋
You can save frequently used search/replace expressions (including function mode expressions) and reuse them multiple times. To save a search simply right click in the Find box and select Save current search.
You can bring up the saved searches via Search → Saved searches. This will present you with a list of search and replace expressions that you can apply. You can even select multiple entries in the list by holding down the Ctrl key while clicking so as to run multiple search and replace expressions in a single operation.
功能模式
Function mode allows you to write arbitrarily powerful Python functions that are run on every Find/replace. You can do pretty much any text manipulation you like in function mode. For more information, see Function mode for Search & replace in the Editor.
自动化工具
Edit book has various tools to help with common tasks. These are accessed via the Tools menu.
Editing the Table of Contents
There is a dedicated tool to ease editing of the Table of Contents. Launch it with Tools → Table of Contents → Edit Table of Contents.
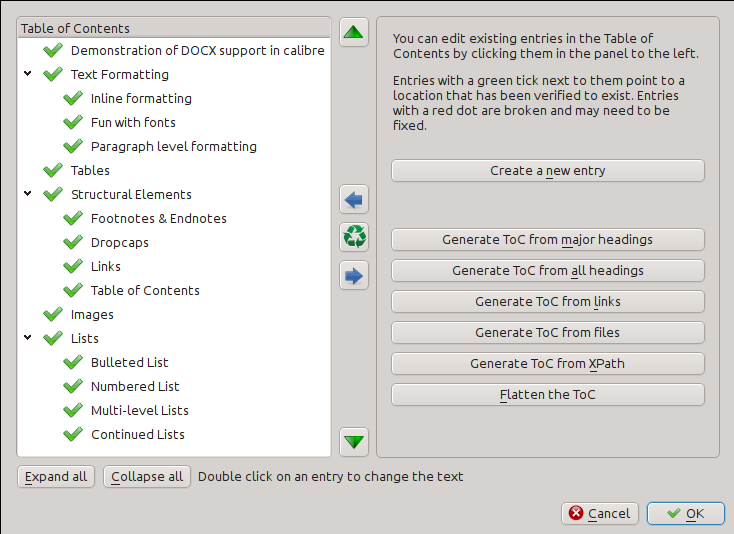
The Edit Table of Contents tool shows you the current Table of Contents (if any) on the left. Simply double click on any entry to change its text. You can also re-arrange entries by drag and drop or by using the buttons to the right.
For books that do not have a pre-existing Table of Contents, the tool gives you various options to auto-generate a Table of Contents from the text. You can generate from the headings in the document, from links, from individual files and so on.
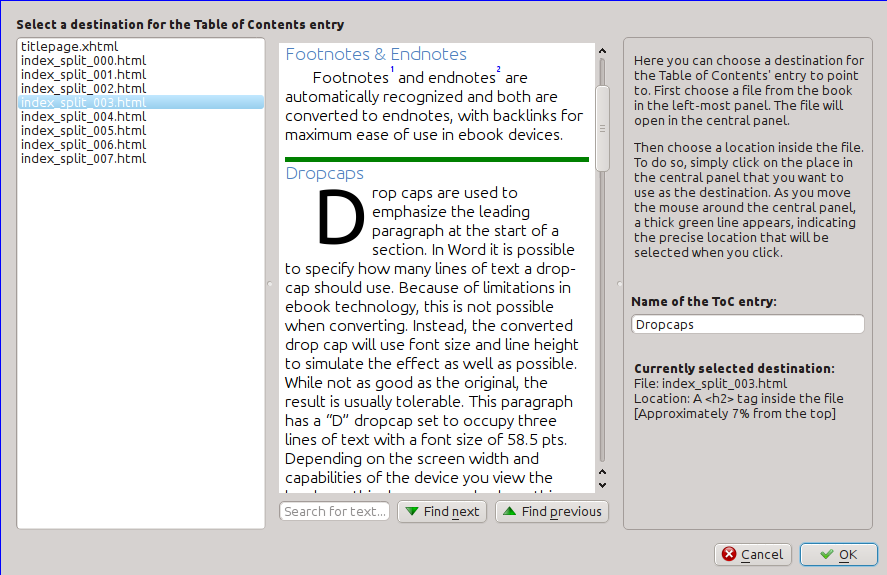
You can edit individual entries by clicking on them and then clicking the Change the location this entry points to button. This will open up a mini-preview of the book, simply move the mouse cursor over the book view panel, and click where you want the entry to point to. A thick green line will show you the location. Click OK once you are happy with the location.
Checking the book
The Check book tool searches your book for problems that could prevent it working as intended on actual reader devices. Activate it via Tools → Check book.
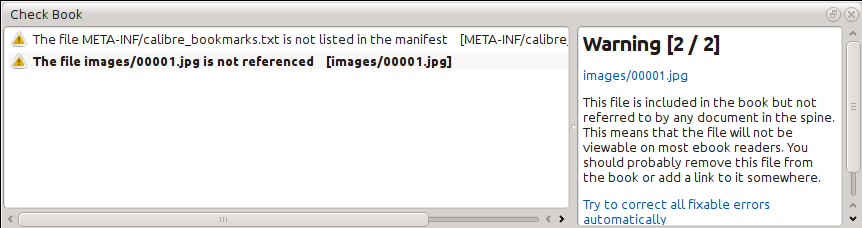
Any problems found are reported in a nice, easy to use list. Clicking any entry in the list shows you some help about that error as well as giving you the option to auto-fix that error, if the error can be fixed automatically. You can also double click the error to open the location of the error in an editor, so you can fix it yourself.
Some of the checks performed are:
Malformed HTML markup. Any HTML markup that does not parse as well-formed XML is reported. Correcting it will ensure that your markup works as intended in all contexts. calibre can also auto-fix these errors, but auto-fixing can sometimes have unexpected effects, so use with care. As always, a checkpoint is created before auto-fixing so you can easily revert all changes. Auto-fixing works by parsing the markup using the HTML5 algorithm, which is highly fault tolerant and then converting to well formed XML.
Malformed or unknown CSS styles. Any CSS that is not valid or that has properties not defined in the CSS 2.1 standard (plus a few from CSS 3) are reported. CSS is checked in all stylesheets, inline style attributes and <style> tags in HTML files.
Broken links. Links that point to files inside the book that are missing are reported.
Unreferenced files. Files in the book that are not referenced by any other file or are not in the spine are reported.
Various common problems in OPF files such as duplicate spine or manifest items, broken idrefs or meta cover tags, missing required sections and so on.
Various compatibility checks for known problems that can cause the book to malfunction on reader devices.
Adding a cover
You can easily add a cover to the book via Tools → Add cover. This allows you to either choose an existing image in the book as the cover or import a new image into the book and make it the cover. When editing EPUB files, the HTML wrapper for the cover is automatically generated. If an existing cover in the book is found, it is replaced. The tool also automatically takes care of correctly marking the cover files as covers in the OPF.
嵌入使用到的字體
Accessed via Tools → Embed reference fonts, this tool finds all fonts referenced in the book and if they are not already embedded, searches your computer for them and embeds them into the book, if found. Please make sure that you have the necessary copyrights for embedding commercially licensed fonts, before doing this.
子集化嵌入的字體
Accessed via Tools → Subset embedded fonts, this tool reduces all the fonts in the book to only contain glyphs for the text actually present in the book. This commonly reduces the size of the font files by ~ 50%. However, be aware that once the fonts are subset, if you add new text whose characters are not previously present in the subset font, the font will not work for the new text. So do this only as the last step in your workflow.
規範標點
Convert plain text dashes, ellipsis, quotes, multiple hyphens, etc. into their typographically correct equivalents. Note that the algorithm can sometimes generate incorrect results, especially when single quotes at the start of contractions are involved. Accessed via Tools → Smarten punctuation.
Transforming CSS properties
Create rules to transform the styling of the book. For example, create a rule to convert all red text to green or to double the font size of all text in the book or make text of a certain font family italic, etc.
Creating the rules is simple, the rules follow a natural language format, that looks like:
If the property color is red change it to green
If the property font-size is any value multiply the value by 2
Accessed via Tools → Transform styles.
移除沒使用到的 CSS 規則
Remove all unused CSS rules from stylesheets and <style> tags. Some books created from production templates can have a large number of extra CSS rules that don't match any actual content. These extra rules can slow down readers that need to process them all. Accessed via Tools → Remove unused CSS.
Fixing HTML
This tool simply converts HTML that cannot be parsed as XML into well-formed XML. It is very common in e-books to have non-well-formed XML, so this tool simply automates the process of fixing such HTML. The tool works by parsing the HTML using the HTML5 algorithm (the algorithm used in all modern browsers) and then converting the result into XML. Be aware that auto-fixing can sometimes have counter-intuitive results. If you prefer, you can use the Check Book tool discussed above to find and manually correct problems in the HTML. Accessed via Tools → Fix HTML.
美化文件
This tool is used to auto-format all HTML and CSS files so that they "look pretty". The code is auto-indented so that it lines up nicely, blank lines are inserted where appropriate and so on. Note that beautifying also auto-fixes broken HTML/CSS. Therefore, if you don't want any auto-fixing to be performed, first use the Check Book tool to correct all problems and only then run beautify. Accessed via Tools → Beautify all files.
備註
In HTML any text can have significant whitespace, via the CSS white-space directive. Therefore, beautification could potentially change the rendering of the HTML. To avoid this as far as possible, the beautify algorithm only beautifies block level tags that contain other block level tags. So, for example, text inside a <p> tag will not have its whitespace changed. But a <body> tag that contains only other <p> and <div> tags will be beautified. This can sometimes mean that a particular file will not be affected by beautify as it has no suitable block level tags. In such cases you can try different beautification tools, that are less careful, for example: HTML Tidy.
Inserting an inline Table of Contents
Normally in e-books, the Table of Contents is separate from the main text and is typically accessed via a special Table of Contents button/menu in the e-book reading device. You can also have calibre automatically generate an inline Table of Contents that becomes part of the text of the book. It is generated based on the currently defined Table of Contents.
If you use this tool multiple times, each invocation will cause the previously created inline Table of Contents to be replaced. The tool can be accessed via Tools → Table of Contents → Insert inline Table of Contents.
Setting Semantics
This tool is used to set semantics in EPUB files. Semantics are simply, links in the OPF file that identify certain locations in the book as having special meaning. You can use them to identify the foreword, dedication, cover, table of contents, etc. Simply choose the type of semantic information you want to specify and then select the location in the book the link should point to. This tool can be accessed via Tools → Set semantics.
Filtering style information
This tool can be used to easily remove specified CSS style properties from the
entire book. You can tell it what properties you want removed, for example,
color, background-color, line-height and it will remove them from
everywhere they occur --- stylesheets, <style> tags and inline style
attributes. After removing the style information, a summary of all the changes
made is displayed so you can see exactly what was changed. The tool can be
accessed via Tools → Filter style information.
Upgrading the book's internals
This tool can be used to upgrade the book's internals, if possible. For instance it will upgrade EPUB 2 books to EPUB 3 books. The tool can be accessed via Upgrade book internals.
檢查點
Checkpoints are a way to mark the current state of the book as "special". You can then go on to do whatever changes you want to the book and if you don't like the results, return to the checkpointed state. Checkpoints are automatically created every time you run any of the automated tools described in the previous section.
You can create a checkpoint via Edit → Create checkpoint. And go back to a previous checkpoint with Edit → Revert to ...
The check pointing functionality is in addition to the normal Undo/redo mechanism when editing individual files. Checkpoints are needed for when changes are spread over multiple files in the book or when you wish to be able to revert a large group of related changes as a whole.
You can see a list of available checkpoints via View → Checkpoints. You can compare the current state of the book to a specified checkpoint using the 比較電子書 tool -- by selecting the checkpoint of interest and clicking the Compare button. The Revert to button restores the book to the selected checkpoint, undoing all changes since that checkpoint was created.
The Live preview panel
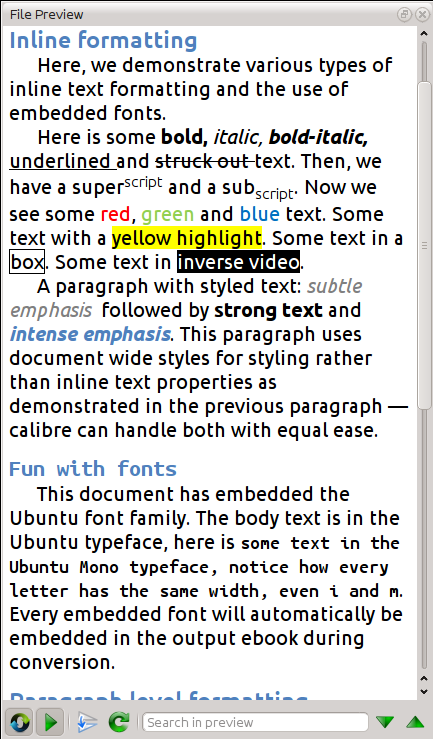
The live preview panel shows you the changes you are making live (with a second or two of delay). As you edit HTML or CSS files, the preview panel is updated automatically to reflect your changes. As you move the cursor around in the editor, the preview panel will track its location, showing you the corresponding location in the book. Clicking in the preview panel, will cause the cursor in the editor to be positioned over the element you clicked. If you click a link pointing to another file in the book, that file will be opened in the edit and the preview panel, automatically.
You can turn off the automatic syncing of position and live preview of changes -- by buttons under the preview panel. The live update of the preview panel only happens when you are not actively typing in the editor, so as not to be distracting or slow you down, waiting for the preview to render.
The preview panel shows you how the text will look when viewed. However, the preview panel is not a substitute for actually testing your book on an actual reader device. It is both more, and less capable than an actual reader. It will tolerate errors and sloppy markup much better than most reader devices. It will also not show you page margins, page breaks and embedded fonts that use font name aliasing. Use the preview panel while you are working on the book, but once you are done, review it in an actual reader device or software emulator.
備註
The preview panel does not support embedded fonts if the name of the font inside the font file does not match the name in the CSS @font-face rule. You can use the Check Book tool to quickly find and fix any such problem fonts.
分割HTML文件
One, perhaps non-obvious, use of the preview panel is to split long HTML files.
While viewing the file you want to split, click the Split mode
button under the preview panel  . Then simply move your mouse to the place
where you want to split the file and click. A thick green line will show you
exactly where the split will happen as you move your mouse. Once you have found
the location you want, simply click and the split will be performed.
. Then simply move your mouse to the place
where you want to split the file and click. A thick green line will show you
exactly where the split will happen as you move your mouse. Once you have found
the location you want, simply click and the split will be performed.
Splitting the file will automatically update all links and references that pointed into the bottom half of the file and will open the newly split file in an editor.
You can also split a single HTML file at multiple locations automatically, by right clicking inside the file in the editor and choosing Split at multiple locations. This will allow you to easily split a large file at all heading tags or all tags having a certain class and so on.
The Live CSS panel
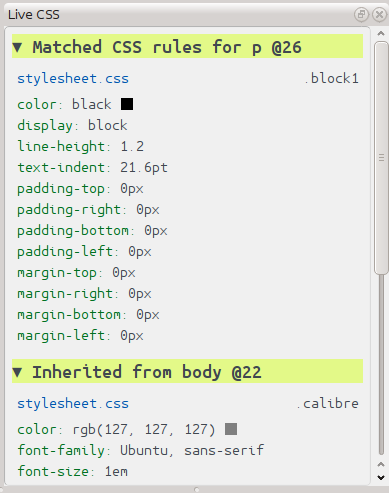
The Live CSS panel shows you all the style rules that apply to the tag you are currently editing. The name of tag, along with its line number in the editor are displayed, followed by a list of matching style rules.
It is a great way to quickly see which style rules apply to any tag. The view also has clickable links (in blue), which take you directly to the location where the style was defined, in case you wish to make any changes to the style rules. Style rules that apply directly to the tag, as well as rules that are inherited from parent tags are shown.
The panel also shows you what the finally calculated styles for the tag are. Properties in the list that are superseded by higher priority rules are shown with a line through them.
You can enable the Live CSS panel via View → Live CSS.
Miscellaneous tools
There are a few more tools that can be useful while you edit the book.
The Table of Contents view
The Table of Contents view shows you the current table of contents in the book. Double clicking on any entry opens the place that entry points to in an editor. You can right click to edit the Table of Contents, refresh the view or expand/collapse all items. Access this view via View → Table of Contents.
Checking the spelling of words in the book
You can run a spelling checker via Tools → Check spelling.
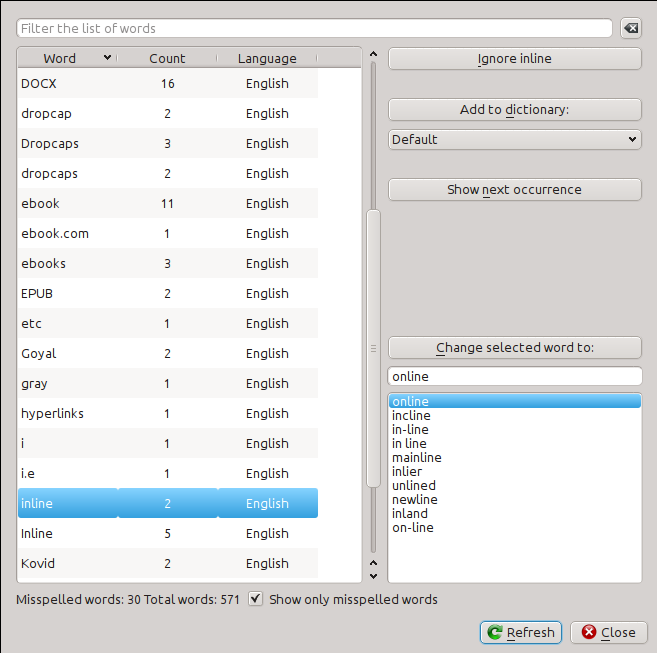
Words are shown with the number of times they occur in the book and the
language the word belongs to. Language information is taken from the books
metadata and from lang attributes in the HTML files. This allows the spell
checker to work well even with books that contain text in multiple languages.
For example, in the following HTML extract, the word color will be checked
using American English and the word colour using British English:
<div lang="en_US">color <span lang="en_GB">colour</span></div>
備註
You can double click a word to highlight the next occurrence of that word in the editor. This is useful if you wish to manually edit the word, or see what context it is in.
To change a word, simply double click one of the suggested alternative spellings on the right, or type in your own corrected spelling and click the Change selected word to button. This will replace all occurrences of the word in the book. You can also right click on a word in the main word list to change the word conveniently from the right click menu.
You can have the spelling checker ignore a word for the current session by clicking the Ignore button. You can also add a word to the user dictionary by clicking the Add to dictionary button. The spelling checker supports multiple user dictionaries, so you can select the dictionary you want the word added to.
You can also have the spelling checker display all the words in your book, not just the incorrectly spelled ones. This is useful to see what words are most common in your book and to run a simple search and replace on individual words.
備註
If you make any changes to the book by editing files while the spell check tool is open, you should click the Refresh button in the Spell check tool. If you do not do this and continue to use the Spell check tool, you could lose the changes you have made in the editor.
備註
To exclude an individual file from being spell checked when running the spell check tool, you can use the Exclude files button or add the following comment just under the opening tag in the file:
<!-- calibre-no-spell-check -->
Adding new dictionaries
The spelling checker comes with builtin dictionaries for the English and Spanish languages. You can install your own dictionaries via Preferences → Editor → Manage spelling dictionaries. The spell checker can use dictionaries from the LibreOffice program (in the .oxt format). You can download these dictionaries from The LibreOffice Extensions repository.
插入特殊字符
You can insert characters that are difficult to type by using the Edit → Insert special character tool. This shows you all Unicode characters, simply click on the character you want to type. If you hold Ctrl while clicking, the window will close itself after inserting the selected character. This tool can be used to insert special characters into the main text or into any other area of the user interface, such as the Search and replace tool.
Because there are a lot of characters, you can define your own Favorite characters, that will be shown first. Simply right click on a character to mark it as favorite. You can also right click on a character in favorites to remove it from favorites. Finally, you can re-arrange the order of characters in favorites by clicking the Re-arrange favorites button and then drag and dropping the characters in favorites around.
You can also directly type in special characters using the keyboard. To do this, you type the Unicode code for the character (in hexadecimal) and then press the Alt+X key which will convert the previously typed code into the corresponding character. For example, to type ÿ you would type ff and then Alt+X. To type a non-breaking space you would use a0 and then Alt+X, to type the horizontal ellipsis you would use 2026 and Alt+X and so on.
Finally, you can type in special characters by using HTML named entities. For example, typing will be replaced by a non breaking space when you type the semi-colon. The replacement happens only when typing the semi-colon.
The code inspector view
This view shows you the HTML coding and CSS that applies to the current element of interest. You open it by right clicking a location in the preview panel and choosing Inspect. It allows you to see the HTML coding for that element and more importantly, the CSS styles that apply to it. You can even dynamically edit the styles and see what effect your changes have instantly. Note that editing the styles does not actually make changes to the book contents, it only allows for quick experimentation. The ability to live edit inside the Inspector is under development.
Checking external links
You can use this tool to check all links in your book that point to external websites. The tool will try to visit every externally linked website, and if the visit fails, it will report all broken links in a convenient format for you to fix.
Downloading external resources
You can use this tool to automatically download any images/stylesheets/etc. in the book that are not bundled with the book (i.e. they have URLs pointing to a location on the internet). The tool will find all such resources and automatically download them, add them to the book and replace all references to them to use the downloaded files.
Arranging files into folders by type
Often when editing EPUB files that you get from somewhere, you will find that the files inside the EPUB are arranged haphazardly, in different sub-folders. This tool allows you to automatically move all files into sub-folders based on their types. Access it via Tools → Arrange into folders. Note that this tool only changes how the files are arranged inside the EPUB, it does not change how they are displayed in the File browser.
Importing files in other e-book formats as EPUB
The editor includes the ability to import files in some other e-book formats directly as a new EPUB, without going through a full conversion. This is particularly useful to directly create EPUB files from your own hand-edited HTML files. You can do this via File → Import an HTML or DOCX file as a new book.
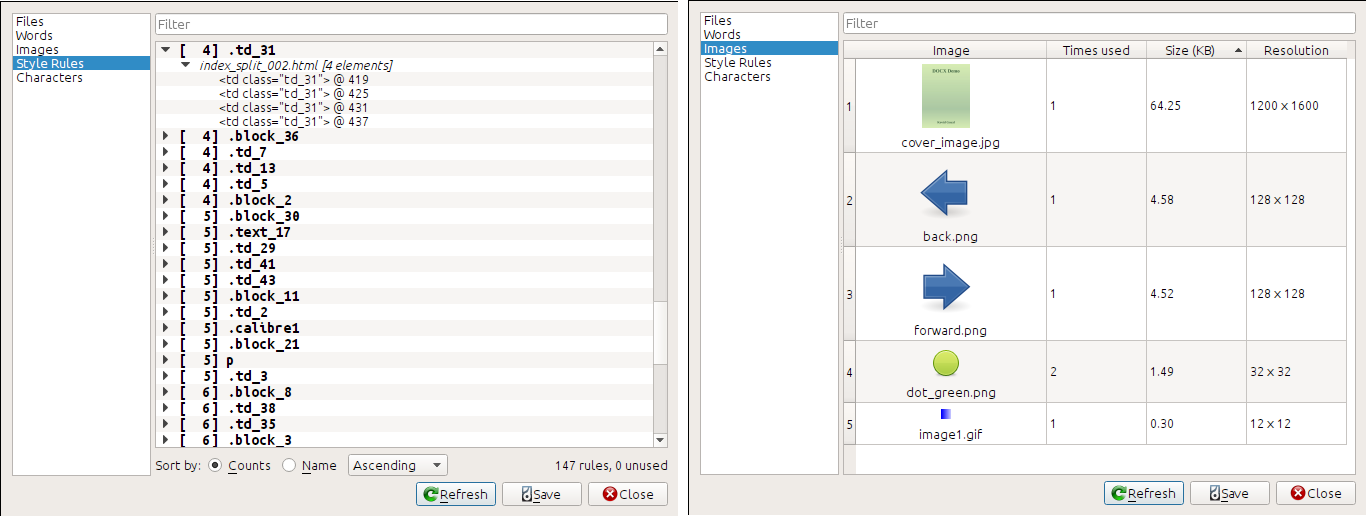
The Reports tool
The editor includes a nice Reports tool (via Tools → Reports) that shows summaries of the files, images, links, words, characters and styles used in the book. Every line in the report is hot-linked. Double clicking a line jumps to the place in the book where that item is used or defined (as appropriate). For example, in the Links view, you can double click entries in the Source column to jump to where the link is defined and entries in the Target column to jump to where the link points.
Special features in the code editor
The calibre HTML editor is very powerful. It has many features that make editing of HTML (and CSS) easier.
语法高亮
The HTML editor has very sophisticated syntax highlighting. Features include:
The text inside bold, italic and heading tags is made bold/italic
As you move your cursor through the HTML, the matching HTML tags are highlighted, and you can jump to the opening or closing tag with the keyboard shortcuts Ctrl+{ and Ctrl+}. Similarly, you can select the contents of a tag with Ctrl+Alt+T or Ctrl+Shift+T.
已用紅線間底無效的HTML
Spelling errors in the text inside HTML tags and attributes such as title are highlighted. The spell checking is language aware, based on the value of the
langattribute of the current tag and the overall book language.CSS embedded inside
<style>tags is highlightedSpecial characters that can be hard to distinguish such as non-breaking spaces, different types of hyphens, etc. are highlighted.
Links to other files in
<a>tags,<img>and<link>tags all have the filenames highlighted. If the filename they point to does not exist, the filename is marked with a red underline.
上下文帮助
You can right click on an HTML tag name or a CSS property name to get help for that tag or property.
You can also hold down the Ctrl key and click on any filename inside a link tag to open that file in the editor automatically. Similarly, Ctrl clicking a class name will take you to the first style rule that matches the tag and class.
Right clicking a class name in an HTML file will allow you to rename the class, changing all occurrences of the class throughout the book and all its stylesheets.
自動完成
When editing an e-book, one of the most tedious tasks is creating links to other files inside the book, or to CSS stylesheets, or images. You have to figure out the correct filename and relative path to the file. The editor has auto-complete to make that easier.
As you type a filename, the editor automatically pops up suggestions. Simply
use the Tab key to select the correct file name. The editor even offers
suggestions for links pointing to an anchor inside another HTML file. After you
type the # character, the editor will show you a list of all anchors in the
target file, with a small snippet of text to help you choose the right anchor.
Note that unlike most other completion systems, the editor's completion system
uses subsequence matching. This means that you can type just two or three
letters from anywhere in the filename to complete the filename. For example,
say you want the filename ../images/arrow1.png, you can simply type ia1
and press Tab to complete the filename. When searching for matches, the
completion system prioritizes letters that are at the start of a word, or
immediately after a path separator. Once you get used to this system, you will
find it saves you a lot of time and effort.
片段
The calibre E-book editor supports snippets. A snippet is a piece of text that is either re-used often or contains a lot of redundant text. The editor allows you to insert a snippet with only a few key strokes. The snippets are very powerful, with many features, such as placeholders you can jump between, automatic mirroring of repeated text and so on. For more information, see 片段.