 Taal veranderen
E-boeken bewerken
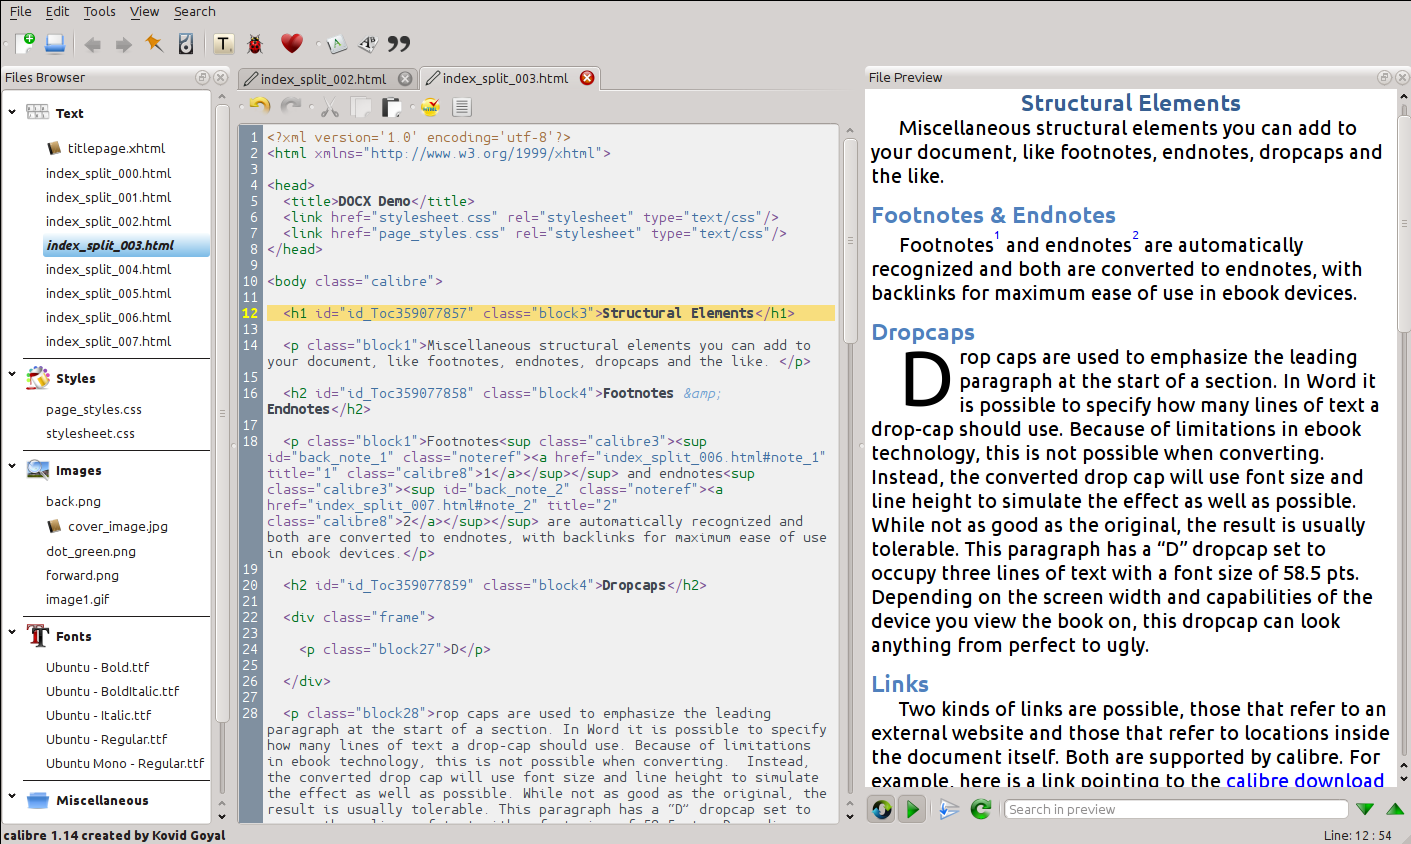
Calibre heeft een geïntegreerde e-book-editor waarmee boeken in de formaten EPUB, KEPUB (Kobo) en AZW3 (Kindle) kunnen worden bewerkt. De editor toont de HTML- en CSS-code die intern in de boekbestanden wordt gebruikt, met een live preview die wordt bijgewerkt terwijl u wijzigingen aanbrengt. Het bevat ook verschillende geautomatiseerde tools voor veelvoorkomende opschoon- en reparatietaken.
U kunt deze editor activeren door rechts te klikken op een boek in Calibre en kiezen voor Boek bewerken.
Basis werkstroom
Notitie
Er is een videorondleiding van de Calibre E-book Editor beschikbaar: website: hier <demo#tutorials>.
Wanneer u een boek voor het eerst opent met de tool Boek bewerken, krijgt u aan de linkerkant een lijst met bestanden te zien. Dit zijn de afzonderlijke HTML-bestanden, stylesheets, afbeeldingen enz. waaruit de inhoud van het boek bestaat. Dubbelklik op een bestand om het te bewerken. Let op: als u meer wilt doen dan alleen een paar kleine aanpassingen, moet u kennis hebben van HTML Tutorial en CSS Tutorial.
Wanneer u in de editor wijzigingen aanbrengt in de HTML of CSS, worden de wijzigingen in het voorbeeldvenster aan de rechterkant in een voorbeeld van de wijzigingen weergegeven. Als je tevreden bent met hoe de veranderingen die je hebt gemaakt kijken, klik dan op de Opslaan knop of gebruik :guilabel:` Bestand->Opslaan` om je wijzigingen in het e-boek op te slaan.
One useful feature is Checkpoints. Before you embark on some ambitious set of edits, you can create a checkpoint. The checkpoint will preserve the current state of your book, then if in the future you decide you don’t like the changes you have made, you can go back to the state when you created the checkpoint. To create a checkpoint, use Edit → Create checkpoint. Checkpoints will also be automatically created for you whenever you run any automated tool like global search and replace. The checkpointing functionality is in addition to the normal undo/redo mechanism when editing individual files. Checkpoints are needed for when changes are spread over multiple files in the book.
Dat is in feite de manier om boeken te bewerken – Open een bestand, maak veranderen, bekijk een voorbeeld en sla op. De rest van deze handleiding zal de verschillende hulpmiddelen behandelen die het mogelijk maken dat u specifieke taken zo goed mogelijk uit kan voeren.
De Verkenner
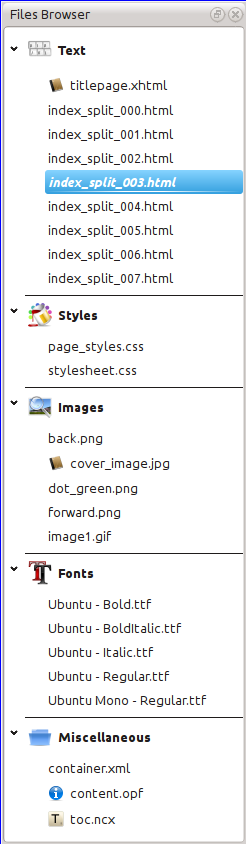
De Verkenner toont een overzicht van de diverse bestanden binnen het boek dat u bewerkt. De bestanden staan op gesorteerd op categorie, met tekst (HTML) bestanden bovenaan, gevolgd door stylesheet (CSS) bestanden, afbeeldingen enz. Dubbelklikken op een bestand opent deze voor het bewerken. Het bewerken wordt ondersteund voor HTML, CSS en afbeeldingen. De volgorde van tekstbestanden is dezelfde als tijdens het lezen in het boek. Alle andere bestanden zijn alfabetisch gesorteerd.
Door met de muisaanwijzer over een bestand te gaan toont de grootte en onderaan het scherm het gehele pad naar het bestand in het boek. Bedenk wel dat bestanden binnen e-boeken gecomprimeerd zijn. De grootte van het boek zelf is dus niet de som van de grootte van de individuele bestanden.
Veel bestanden hebben een speciale betekenis in het boek. Deze hebben normaal een icoon naast hun namen om de speciale betekenis aan te geven. Bv. in de afbeelding links ziet u dat de bestanden cover_image.jpg en titlepage.xhtml het icoon van een omslag naast zich hebben om aangevend dat het boekomslagafbeelding en titelpagina zijn. Het bestand content.opf heeft een metadata icoon om aan te geven dat de boek metadata er aanwezig zijn en het bestand toc.ncx heeft een T icoon om aan te geven dat er een Inhoudsopgave is.
U kunt meerdere acties uitvoeren op bestanden door er met de rechter muisknop op te klikken.
Bestanden hernoemen
U kunt een bestand hernoemen door er rechts op te klikken en kiezen voor Hernoemen. Hernoemen van een bestand zal automatisch alle links en referenties bijwerken in het gehele boek. Dus alles wat u moet doen is een nieuwe naam in te geven en Calibre doet de rest.
U kunt ook veel bestanden in groep hernoemen. Dit is bruikbaar als u wilt dat de bestanden een simpel naamschema volgen. Bv.: U wilt alle HTML bestanden hernoemen naar Hoofdstuk-1.html, Hoofdstuk-2.html enz. Selecteer de bestanden die u wilt hernoemen door de Shift or Ctrl toets ingedrukt te houden en op de bestanden te klikken. Dan rechtsklikken en selecteer In groep hernoemen. Geef een voorvoegsel in en het begingetal voor de automatische nummering, klik OK en het is klaar. De in groep hernoemen dialoog laat u ook bestanden hernoemen in de volgorde waarin ze verschijnen in het boek in plaats van waarin u ze selecteerde, bruikbaar, bijvoorbeeld, om alle afbeeldingen te hernoemen in de volgorde waarin ze verschijnen.
Tenslotte kan u de bestandsextensie in groep veranderen voor alle geselecteerde bestanden. Selecteer meerdere bestanden, zoals boven, rechtsklikken en kies Verander de extensie voor de geselecteerde bestanden.
Bestanden samenvoegen
Soms wilt u misschien twee HTML bestanden of twee CSS bestanden samenvoegen. Het kan soms bruikbaar zijn om alles in een enkel bestand te hebben. Pas op toch want veel inhoud in een enkel bestand zetten kan prestatieproblemen geven bij lezen van het boek in een standaard reader.
Om meerdere bestanden samen te voegen, selecteer door de Ctrl toets ingedrukt te houden en erop te klikken (selecteer enkel bestanden van één type, alle HTML bestanden of alle CSS-bestanden enz.). dan rechts klikken en selecteer samenvoegen. Dat is alles. calibre voegt de bestanden samen en let erop dat alle links en referenties wijzigen naar de samengevoegde bestanden. N.B.: Samenvoegen van bestanden kan soms tekstopmaak wijzigen omdat individuele bestanden misschien verschillende stijlbladen gebruikten.
U kan ook tekstbestanden selecteren en ze slepen en neerzetten op een ander tekstbestand om de geselecteerde met het doel tekstbestand samen te voegen.
Volgorde van tekstbestand veranderen
U kunt de volgorde waarin tekstbestanden (HTML) worden geopend bij het lezen van het boek wijzigen door ze eenvoudigweg te verslepen in de Bestandsbrowser of door op het bestand te klikken dat u wilt verplaatsen en vervolgens op de Ctrl+Shift-toetsen te drukken in combinatie met de Omhoog-, Omlaag-, Home- of Einde-toetsen. Voor technisch onderlegde gebruikers wordt dit het herschikken van de rug van het boek genoemd.
Let op: u moet de items tussen andere items neerzetten, niet er bovenop. Dit kan even wennen zijn. Als u een item bovenop een ander bestand neerzet, worden de bestanden samengevoegd.
Kaft markeren
E-boeken hebben normaal een omslagafbeelding. Deze afbeelding wordt aangegeven in de Verkenner door een icoon van een bruin boek naast de afbeeldingsnaam. Als u een andere afbeelding als omslag wilt, kunt u dit doen door rechtsklikken op het bestand en kiezen Markeer als omslag.
In addition, EPUB files have the concept of a titlepage. A title page is a HTML file that acts as the title page/cover for the book. You can mark an HTML file as the titlepage when editing EPUBs by right-clicking. Be careful that the file you mark contains only the cover information. If it contains other content, such as the first chapter, then that content will be lost if the user ever converts the EPUB file in calibre to another format. This is because when converting, calibre assumes that the marked title page contains only the cover and no other content.
Bestanden verwijderen
U kunt bestanden verwijderen door er rechts op te klikken of door ze te selecteren en de Del-toets in te drukken. Het verwijderen van een bestand verwijdert alle referenties tot het bestand van het OPF-bestand zodat u dit klusje niet zelf hoeft te doen. Hoewel referenties op andere locaties niet worden verwijderd, kunt u het gereedschap Boek controleren gebruiken om deze makkelijk te vinden en verwijderen/vervangen.
Bestanden exporteren
U kunt een bestand exporteren van een boek naar ergens anders op uw computer. Dit is nuttig als u aan een bestand wilt werken met gespecialiseerde software. Om dit te doen rechtsklikt u op het bestand en selecteer Export.
Als u klaar bent met bewerken aan het geëxporteerde bestand unt u dit opnieuw importeren in het boek door weer rechts te klikken op het bestand en selecteer Vervangen door bestand… waardoor u het bestand in het boek kunt vervangen door het eerder geëxporteerde bestand.
U kan ook bestanden kopiëren tussen verschillende editor instanties. Selecteer de bestanden die u wilt kopiëren in Bestand browser, klik rechts en kies, Kopieer geselecteerde bestanden naar een andere editor instantie. Dan, in de andere editor instantie, klik rechts in de Bestand browser en kies Plak bestand van andere editor instantie.
Nieuwe afbeeldingn/lettertype/enz. toevoegen of nieuwe lege bestanden maken
U kunt een nieuwe afbeelding, lettertype, stijlblad, enz. toevoegen van uw computer in een boek door te klikken op Bestand → Nieuw bestand. Dit laat u ofwel een bestand importeren door te klikken op de Importeer bestand knop ofwel een nieuw leeg HTML bestand of stijlblad maken door een bestandsnaam in te vullen in het vakje voor het nieuwe bestand.
U kunt ook tegelijkertijd meerdere bestanden importeren in het boek met behulp van Bestand->Importeer bestanden in boek.
Bestanden vervangen
U kunt makkelijk bestaande bestanden in het boek vervangen door rechts te klikken op het bestand en selecteer vervangen. Hiermee worden alle links en referenties automatisch bijgewerkt, in het geval dat het vervangende bestand een andere naam heeft dan het bestand dat wordt vervangen.
Het efficiënt linken van sylesheets aan HTML-bestanden
Voor uw comfort kunt u meerdere HTML bestanden selecteren in de Bestand browser, rechtsklikken en Stijlbladen linken kiezen om automatisch de <link> tags in te voegen voor die stijlbladen in alle geselecteerde HTML bestanden.
Zoeken & vervangen
Boek bewerken heeft een zeer krachtige zoek/vervang interface waarmee u tekst kunt zoeken/vervangen in het huidige bestand, in alle bestanden en zelfs in een gemarkeerd deel van het huidige bestand. U kunt normaal zoeken of reguliere expressies gebruiken. Over het gebruik van reguliere expressies om geavanceerd te zoeken, zie Alles over het gebruik van reguliere expressies in calibre.

Start zoeken en vervangen met menu-item Zoeken → Zoek/vervang (u moet dan wel een HTML of CSS-bestand aan het bewerken zijn).
Type de tekst die u wilt vinden in het Zoek-vakje en de vervanger in het Vervang-vakje. U kunt de betreffende knoppen klikken om de volgende match te vinden, de huidige match vervangen en alle matches vervangen.
Door de keuzelijst onderaan het kader te gebruiken, kunt u zoeken in het huidig bestand, alle tekstbestanden, alle stylesheets of alle bestanden. U kunt ook de zoekmethode kiezen, dus een normale (tekenreeks) zoekopdracht of met een reguliere expressie.
U kunt alle matches tellen van een zoekopdracht met :guilabel:`Zoeken->Tellen `. De teller loopt over alles, bestanden/delen die u heeft geselecteerd in de keuzelijst.
U kunt ook springen naar een bepaalde regel in de huidige geopende editor met Zoeken → Spring naar regel.
Notitie
Benut de maximale kracht van zoeken en vervangen met reguliere expressies. Zie Alles over het gebruik van reguliere expressies in calibre.
Opgeslagen zoekopdrachten
U kunt regelmatig gebruikte zoek/vervang uitdrukkingen (ook functie modus expressies) opslaan en meermaals herbruiken. Om een zoekopdracht op te slaan, rechtsklik in het Zoek vak en selecteer Huidige zoekopdracht opslaan.
De opgeslagen zoekopdrachten kunt u tonen via Zoeken → Opgeslagen zoekopdrachten. U ziet een lijst met zoek/vervang opdrachten die u kunt toepassen. U kunt zelfs meerdere opdrachten selecteren uit de lijst door de Ctrl toets ingedrukt te houden tijden het klikken om meerdere zoek/vervang-opdrachten uit te voeren in één bewerking.
Functie modus
Functie modus laat u willekeurige, krachtige Python functies schrijven die draaien op elke Zoek/vervang. U kan ongeveer elke tekstmanipulatie doen die u wilt in functie modus. Voor meer informatie bekijk Functie modus voor zoek & vervangen in de editor.
Geautomatiseerde functies
Boek bewerken heeft diverse gereedschappen om te helpen met algemene taken. Deze zijn toegankelijk in het Gereedschappen menu.
Inhoudsopgave bewerken
Er is een speciaal gereedschap om het bewerken van de Inhoudsopgave te versoepelen. Zet het in gang met Gereedschappen → Inhoudsopgave → Inhoudsopgave bewerken.
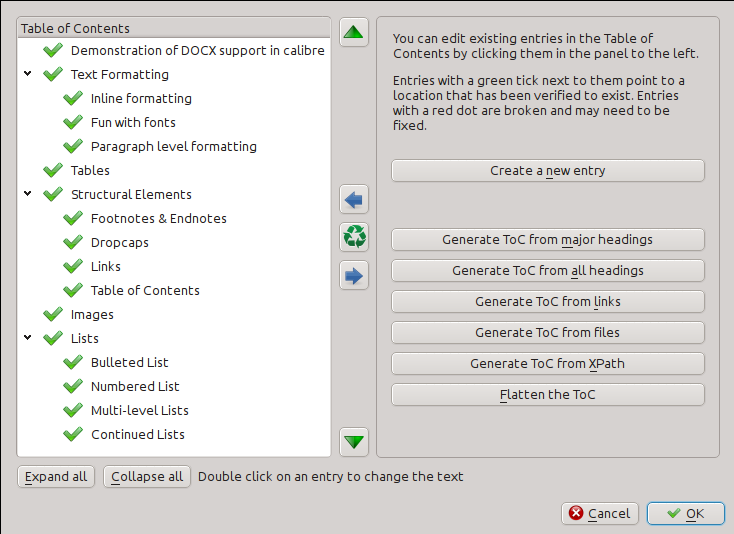
Dit gereedschap laat de de huidige Inhoudsopgave (indien aanwezig) zien aan de linkerkant. Dubbelklik op een vermelding om de tekst te wijzigen. U kunt ook de volgorde van vermeldingen wijzigen door deze te slepen en te plaatsen of de knoppen aan de rechterkant te gebruiken.
Voor boeken die geen inhoudsopgave hebben levert het gereedschap diverse opties om een Inhoudsopgave automatisch te laten genereren uit de tekst. U kunt de hierbij gebruik maken van de hoofdstukken in het document, van links, van individuele bestanden enzovoort.
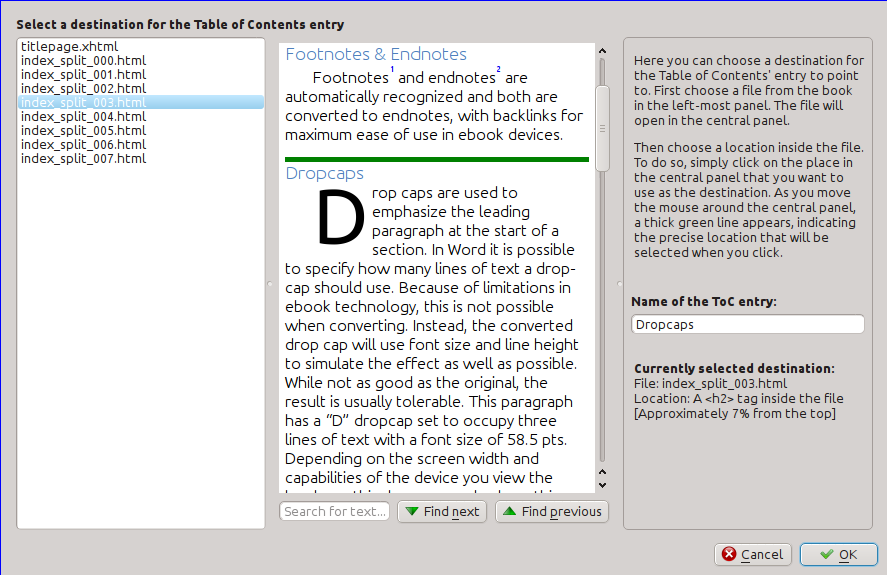
U kunt vermeldingen bewerken door erop te klikken en dan te klikken op de knop Wijzig de locatie waarheen deze vermelding verwijst. Dit opent een klein weergave-venster van het boek, beweeg de muisaanwijzer over het weergave-venster en klik waar u wilt dat de vermelding naartoe verwijst. Een dikke groene lijn toont u de plaats. Klik Ok als u tevreden bent met de plaats.
Het boek controleren
Het gereedschap Boek controleren zoekt naar mogelijke knelpunten in uw boek waardoor het op readers niet werkt als bedoeld. Activeer dit met Gereedschappen → Boek controleren.
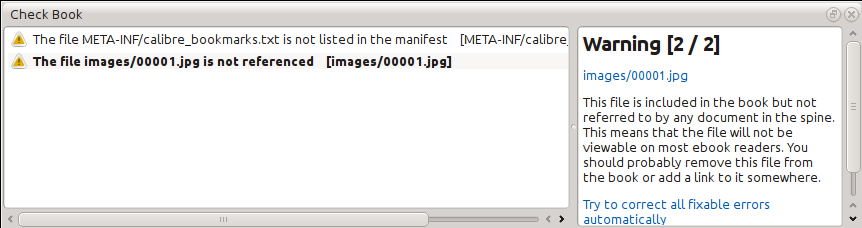
Alle gevonden problemen worden gerapporteerd in een mooie, gebruiksvriendelijke lijst. Op een vermelding klikken, toont u enige hulp over die fout en biedt u de optie die te auto-herstellen indien mogelijk. U kan ook dubbelklikken op de fout om de locatie in een editor te openen zodat u het zelf kan herstellen.
Sommige van onderdelen van de controle zijn:
Slechtgevormde HTML. Alle HTML die niet als goedgevormde XML verwerkt wordt, wordt gerapporteerd. Herstellen zorgt ervoor dat uw markup in elke context werkt zoals bedoeld. calibre kan deze fouten ook auto-herstellen maar dit heeft soms onverwachte effecten, omzichtig te gebruiken dus. Zoals altijd wordt een checkpunt gemaakt vóór auto-herstellen zodat u alles gemakkelijk terug kan draaien. Auto-herstellen werkt door markup verwerking door het zeer fout tolerante HTML5 algoritme, gevolgd door conversie naar doed gevormde XML.
Verkeerde of onbekende CSS stijlen. Alle ongeldige CSS of met eigenschappen niet gedefinieerd in de CSS 2.1 standaard (plus enkele van CSS3) wordt gerapporteerd. CSS wordt gecontroleerd in alle stijlbladen, inline stijlattributen en <style> tags in HTML bestanden.
Onbekende linken. Linken die wijzen naar bestanden in het boek die niet bestaan, worden gerapporteerd.
Niet-gebruikte bestanden. Bestanden in het boek, niet gebruikt door andere bestanden of niet in de opbouw worden gerapporteerd.
Verscheidene doorsnee problemen in OPF bestanden zoals dubbele opbouw of manifest items, gebroken idrefs or meta omslag tags, ontbrekende vereiste onderdelen en zo voort.
Diverse controles op compatibiliteit betreffende bekende veelvoorkomende problemen die het boek slecht laten werken op e-readers.
Cover toevoegen
U kunt eenvoudig een omslag aan het boek toevoegen via Tools → Add cover. Hiermee kunt u een bestaande afbeelding in het boek als omslag kiezen of een nieuwe afbeelding in het boek importeren en deze als omslag instellen. Bij het bewerken van EPUB-bestanden wordt de HTML-wrapper voor de omslag automatisch gegenereerd. Als er een bestaande omslag in het boek wordt gevonden, wordt deze vervangen. De tool zorgt er ook automatisch voor dat de omslagbestanden correct als omslagen in het OPF worden gemarkeerd.
Insluiten van gerefereerde lettertypes
Deze tool is toegankelijk via Tools → Embed reference fonts (Extra->Referentielettertypen insluiten) en zoekt alle lettertypen waarnaar in het boek wordt verwezen. Als deze nog niet zijn ingesloten, zoekt de tool ze op uw computer en sluit ze in het boek in, indien gevonden. Zorg ervoor dat u over de nodige auteursrechten beschikt voor het insluiten van commercieel gelicentieerde lettertypen voordat u dit doet.
Ingevoegde lettertypes uitdunnen
Deze tool is toegankelijk via Tools → Subset embedded fonts en reduceert alle lettertypen in het boek zodat ze alleen glyphs bevatten voor de tekst die daadwerkelijk in het boek voorkomt. Dit vermindert de grootte van de lettertypebestanden doorgaans met ~ 50%. Houd er echter rekening mee dat als de lettertypen eenmaal zijn gereduceerd tot een subset, het lettertype niet zal werken voor nieuwe tekst waarvan de tekens niet eerder in het subset-lettertype voorkwamen. Voer deze stap dus alleen uit als laatste stap in uw workflow.
Interpunctie verbeteren
Converteer platte tekst streepjes, weglatingstekens, aanhalingstekens, meerdere afbreekstreepjes, enz. om naar de typografisch juiste equivalenten. NB, het algoritme kan soms foute resultaten geven, met name als enkele aanhalingstekens in het spel zijn bij het begin van samentrekkingen. Toegankelijk via Gereedschappen → Slimme interpunctie.
Transformeer CSS eigenschappen
Maak regels om de opmaak van het boek te veranderen. Maak bijvoorbeeld een regel om alle rode tekst om te zetten in groen, of om de lettergrootte van alle tekst in het boek te verdubbelen, of om tekst van een bepaald lettertype cursief te maken, enz.
De regels creëren is eenvoudig, de regels volgen een natuurlijk taalformaat dat eruit ziet als:
Als de eigenschap kleur rood is, verander het naar groen
Als de eigenschap lettertype-grootte elke waarde is, vermenigvuldig de waarde met 2
Toegankelijk via Gereedschappen → Transformeer stijlen.
Ongebruikte CSS regels verwijderen
Verwijder alle ongebruikte CSS-regels uit stylesheets en ` <style> -tags. Sommige boeken die zijn gemaakt op basis van productiesjablonen kunnen een groot aantal extra CSS-regels bevatten die niet overeenkomen met de daadwerkelijke inhoud. Deze extra regels kunnen de lezer vertragen, omdat deze alle regels moet verwerken. Toegankelijk via :guilabel:`Tools->Remove unused CSS.
Repareer HTML
Deze tool zet HTML die niet als XML kan worden geparseerd, eenvoudigweg om in goed opgebouwde XML. Het komt in e-books vaak voor dat XML niet goed is opgebouwd, dus deze tool automatiseert het proces om dergelijke HTML te corrigeren. De tool parseert de HTML met behulp van het HTML5-algoritme (het algoritme dat in alle moderne browsers wordt gebruikt) en zet het resultaat vervolgens om in XML. Houd er rekening mee dat automatisch corrigeren soms contra-intuïtieve resultaten kan opleveren. Als u dat wilt, kunt u de hierboven besproken tool Check Book gebruiken om problemen in de HTML te vinden en handmatig te corrigeren. Toegankelijk via Tools → Fix HTML.
Alle bestanden leesbaarder maken
Dit gereedschap wordt gebruikt om alle HTML en CSS-bestanden automatisch te formatteren zo dat ze er “netjes uitzien”. De code springt automatisch in zodat alle regels er netjes bijstaan, lege regels worden toegevoegd waar passend enzovorts. Dit verfraaien reparereert automatisch ook defecte HTML/CSS. daarom kunt u beter eerst het Boek controleren gereedschap gebruiken om alle problemen te corrigeren en pas daarna het verfraaien te doorlopen. Toegankelijk met Gereedschappen → Alle bestanden verfraaien.
Notitie
In HTML kan elke tekst significante witruimte hebben, via de CSS-richtlijn white-space. Daarom kan opmaak mogelijk de weergave van de HTML veranderen. Om dit zoveel mogelijk te voorkomen, maakt het opmaakalgoritme alleen blokniveau-tags mooier die andere blokniveau-tags bevatten. Zo wordt bijvoorbeeld de witruimte in tekst binnen een <p> -tag wordt de witruimte niet gewijzigd. Maar een <body> -tag die alleen andere <p> en <div> -tags bevat, wel worden verfraaid. Dit kan soms betekenen dat een bepaald bestand niet wordt beïnvloed door verfraaiing, omdat het geen geschikte blokniveau-tags bevat. In dergelijke gevallen kunt u verschillende verfraaiingstools proberen die minder zorgvuldig zijn, bijvoorbeeld: HTML Tidy.
Een inline Inhoudsopgave invoegen
Normaal gesproken staat de inhoudsopgave in e-books apart van de hoofdtekst en is deze meestal toegankelijk via een speciale knop/menu voor de inhoudsopgave in het e-book-leesapparaat. U kunt Calibre ook automatisch een inline inhoudsopgave laten genereren die onderdeel wordt van de tekst van het boek. Deze wordt gegenereerd op basis van de momenteel gedefinieerde inhoudsopgave.
Als u deze tool meerdere keren gebruikt, wordt bij elke keer dat u deze oproept de eerder gemaakte inline inhoudsopgave vervangen. De tool is toegankelijk via Tools → Table of Contents → Insert inline Table of Contents.
Semantiek instellen
Deze tool wordt gebruikt om semantiek in EPUB-bestanden in te stellen. Semantiek zijn simpelweg links in het OPF-bestand die bepaalde locaties in het boek identificeren als locaties met een speciale betekenis. U kunt ze gebruiken om het voorwoord, de opdracht, de omslag, de inhoudsopgave enz. te identificeren. Kies gewoon het type semantische informatie dat u wilt specificeren en selecteer vervolgens de locatie in het boek waarnaar de link moet verwijzen. Deze tool is toegankelijk via Tools → Set semantics.
Stijl informatie filteren
Met deze tool kun je makkelijk bepaalde CSS-stijleigenschappen uit het hele boek verwijderen. U kunt aangeven welke eigenschappen u wilt verwijderen, bijvoorbeeld color, background-color, line-height, waarna deze overal worden verwijderd waar ze voorkomen: in stylesheets, <style>-tags en inline style-attributen. Na het verwijderen van de stijlinformatie wordt een overzicht van alle aangebrachte wijzigingen weergegeven, zodat u precies kunt zien wat er is gewijzigd. De tool is toegankelijk via Tools → Filter style information.
Boek ingewanden upgraden
Deze tool kan worden gebruikt om de interne structuur van het boek te upgraden, indien mogelijk. Zo kan het bijvoorbeeld EPUB 2-boeken upgraden naar EPUB 3-boeken. De tool is toegankelijk via Upgrade book internals.
Checkpoints
Checkpoints zijn een manier om de huidige status van het boek als “speciaal” te markeren. Je kunt dan alle gewenste wijzigingen aanbrengen in het boek en als het resultaat je niet bevalt, terugkeren naar de status van het checkpoint. Checkpoints worden automatisch aangemaakt telkens wanneer je een van de geautomatiseerde tools gebruikt die in het vorige gedeelte zijn beschreven.
U kunt een controlepunt aanmaken via Bewerken → Controlepunt aanmaken. En teruggaan naar een vorig controlepunt met Bewerken → Terugkeren naar …
De checkpoint-functionaliteit is een aanvulling op het normale ongedaan maken/opnieuw uitvoeren-mechanisme bij het bewerken van afzonderlijke bestanden. Checkpoints zijn nodig wanneer wijzigingen verspreid zijn over meerdere bestanden in het boek of wanneer u een grote groep gerelateerde wijzigingen in hun geheel wilt terugdraaien.
U kunt een lijst met beschikbare controlepunten bekijken via View → Checkpoints. U kunt de huidige status van het boek vergelijken met een bepaald controlepunt met behulp van de E-books vergelijken-tool – door het gewenste controlepunt te selecteren en op de knop Compare te klikken. Met de knop Revert to wordt het boek teruggezet naar het geselecteerde controlepunt, waarbij alle wijzigingen sinds dat controlepunt is aangemaakt ongedaan worden gemaakt.
Het Live voorbeeld paneel
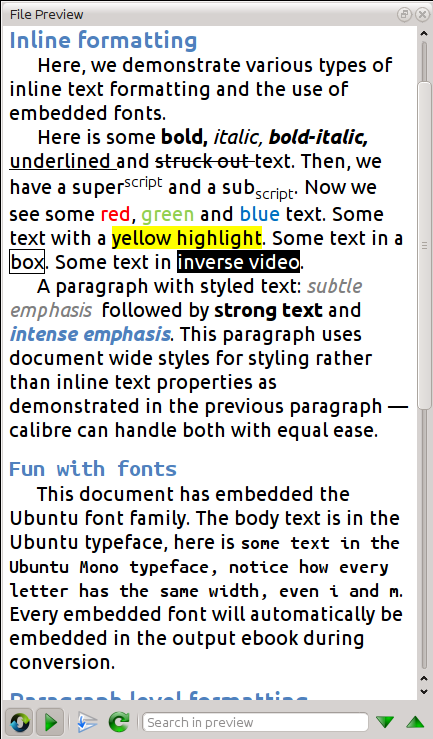
The live preview panel shows you the changes you are making live (with a second or two of delay). As you edit HTML or CSS files, the preview panel is updated automatically to reflect your changes. As you move the cursor around in the editor, the preview panel will track its location, showing you the corresponding location in the book. Clicking in the preview panel, will cause the cursor in the editor to be positioned over the element you clicked. If you click a link pointing to another file in the book, that file will be opened in the edit and the preview panel, automatically.
U kunt de automatische synchronisatie van de positie en het live voorbeeld van wijzigingen uitschakelen met de knoppen onder het voorbeeldvenster. Het live voorbeeldvenster wordt alleen bijgewerkt wanneer u niet actief aan het typen bent in de editor, zodat u niet wordt afgeleid of vertraagd door te wachten tot het voorbeeld wordt weergegeven.
The preview panel shows you how the text will look when viewed. However, the preview panel is not a substitute for actually testing your book on an actual reader device. It is both more, and less capable than an actual reader. It will tolerate errors and sloppy markup much better than most reader devices. It will also not show you page margins, page breaks and embedded fonts that use font name aliasing. Use the preview panel while you are working on the book, but once you are done, review it in an actual reader device or software emulator.
Notitie
Het voorbeeldvenster ondersteunt geen ingesloten lettertypen als de naam van het lettertype in het lettertypebestand niet overeenkomt met de naam in de CSS @font-face-regel. U kunt de tool Check Book gebruiken om dergelijke probleemlettertypen snel op te sporen en te corrigeren.
HTML bestanden splitsen
Een misschien niet voor de hand liggende toepassing van het voorbeeldvenster is het splitsen van lange HTML-bestanden. Terwijl u het bestand bekijkt dat u wilt splitsen, klikt u op de knop Split mode onder het voorbeeldvenster  . Vervolgens beweegt u de muis naar de plaats waar u het bestand wilt splitsen en klikt u. Een dikke groene lijn geeft precies aan waar de splitsing zal plaatsvinden terwijl u uw muis beweegt. Zodra u de gewenste locatie hebt gevonden, klikt u gewoon en wordt de splitsing uitgevoerd.
Door het bestand te splitsen worden alle links en verwijzingen die naar de onderste helft van het bestand verwijzen automatisch bijgewerkt en wordt het nieuw gesplitste bestand in een editor geopend.
U kunt ook automatisch één HTML-bestand op meerdere locaties splitsen door met de rechtermuisknop in het bestand in de editor te klikken en Splits op meerdere locaties te kiezen. Zo kunt u eenvoudig een groot bestand splitsen op alle kopteksttags of alle tags met een bepaalde klasse, enzovoort.
Het realtime CSS paneel
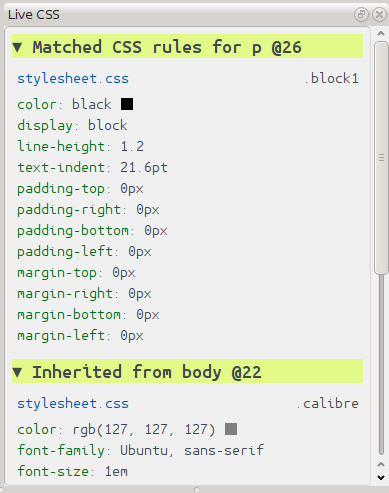
Het paneel Live CSS toont alle stijlregels die van toepassing zijn op de tag die u momenteel bewerkt. De naam van de tag wordt weergegeven, samen met het regelnummer in de editor, gevolgd door een lijst met overeenkomende stijlregels.
Het is een geweldige manier om snel te zien welke stijlregels van toepassing zijn op een tag. De weergave bevat ook klikbare links (in blauw) die u rechtstreeks naar de locatie brengen waar de stijl is gedefinieerd, voor het geval u wijzigingen wilt aanbrengen in de stijlregels. Stijlregels die rechtstreeks van toepassing zijn op de tag, evenals regels die zijn overgenomen van bovenliggende tags, worden weergegeven.
Het paneel toont ook wat de uiteindelijk berekende stijlen voor de tag zijn. Eigenschappen in de lijst die worden overschreven door regels met een hogere prioriteit, worden weergegeven met een streep erdoorheen.
U kunt het Live CSS-paneel inschakelen via View → Live CSS.
Diverse gereedschappen
Er zijn nog een paar andere gereedschappen die handig kunnen zijn tijdens het bewerken van het boek.
De Inhoudsopgave weergave
De inhoudsopgave geeft u een overzicht van de huidige inhoudsopgave van het boek. Door te dubbelklikken op een item wordt de betreffende plaats in een editor geopend. U kunt met de rechtermuisknop klikken om de inhoudsopgave te bewerken, de weergave te vernieuwen of alle items uit te vouwen/samen te vouwen. U kunt deze weergave openen via Weergave → Inhoudsopgave.
Spellingscontrole van woorden in het boek
Je kunt de spellingscontrole laten lopen via Tools → Check spelling.
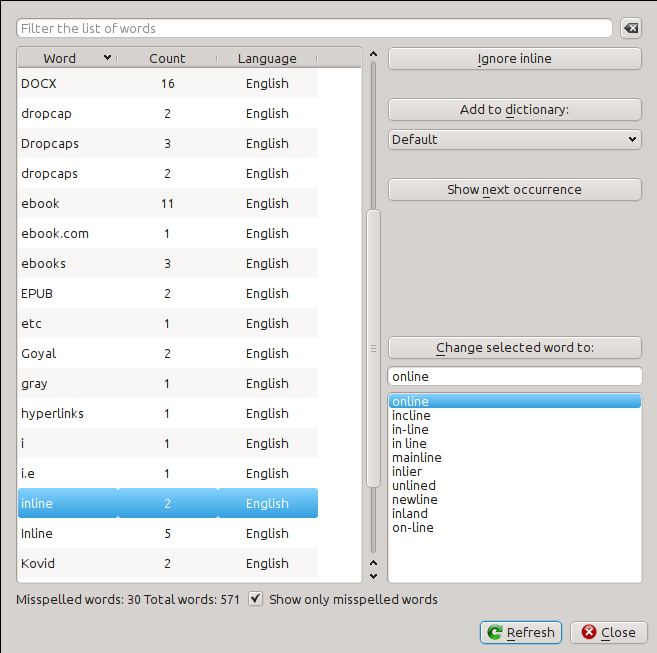
Woorden worden weergegeven met het aantal keren dat ze in het boek voorkomen en de taal waartoe het woord behoort. Taalinformatie wordt ontleend aan de metagegevens van het boek en aan de lang-attributen in de HTML-bestanden. Hierdoor werkt de spellingcontrole zelfs goed bij boeken die tekst in meerdere talen bevatten. In het volgende HTML-fragment wordt bijvoorbeeld het woord color gecontroleerd aan de hand van Amerikaans Engels en het woord colour aan de hand van Brits Engels:
<div lang="en_US">color <span lang="en_GB">colour</span></div>
Notitie
U kan dubbelklikken op een woord om het volgende voorkomen te accentueren in de editor. Nuttig als u het handmatig wil bewerken of de context bekijken.
Om een woord te wijzigen, dubbelklikt u op een van de voorgestelde alternatieve spellingen aan de rechterkant, of typt u uw eigen gecorrigeerde spelling in en klikt u op de knop Gewoon woord wijzigen in. Hierdoor worden alle voorkomens van het woord in het boek vervangen. U kunt ook met de rechtermuisknop op een woord in de hoofdwoordenlijst klikken om het woord gemakkelijk te wijzigen via het rechtsklikmenu.
U kunt de spellingcontrole een woord voor de huidige sessie laten negeren door op de knop Negeren te klikken. U kunt ook een woord aan het gebruikerswoordenboek toevoegen door op de knop Toevoegen aan woordenboek te klikken. De spellingcontrole ondersteunt meerdere gebruikerswoordenboeken, zodat u het woordenboek kunt selecteren waaraan u het woord wilt toevoegen.
U kunt de spellingcontrole ook alle woorden in uw boek laten weergeven, niet alleen de verkeerd gespelde woorden. Dit is handig om te zien welke woorden het meest voorkomen in uw boek en om een eenvoudige zoek- en vervangactie uit te voeren op afzonderlijke woorden.
Notitie
Als u wijzigingen aanbrengt in het boek door bestanden te bewerken terwijl de spellingcontrole open is, moet u op de knop Vernieuwen in de spellingcontrole klikken. Als u dit niet doet en de spellingcontrole blijft gebruiken, kunt u de wijzigingen die u in de editor hebt aangebracht, kwijtraken.
Notitie
Om een individueel bestand uit te sluiten van spellingcontrole wanneer u de spellingcontrole uitvoert, kunt u de knop Bestanden uitsluiten gebruiken of de volgende opmerking toevoegen net onder de openingstag in het bestand:
<!-- calibre-no-spell-check -->
Nieuwe woordenboeken toevoegen
De spellingcontrole wordt geleverd met ingebouwde woordenboeken voor het Engels en Spaans. U kunt uw eigen woordenboeken installeren via Voorkeuren → Editor → Spellingwoordenboeken beheren. De spellingcontrole kan woordenboeken uit het LibreOffice-programma gebruiken (in het .oxt-formaat). U kunt deze woordenboeken downloaden van The LibreOffice Extensions repository.
Speciale tekens invoegen
U kunt moeilijk te typen tekens invoegen met behulp van de tool Bewerken → Speciaal teken invoegen. Hiermee worden alle Unicode-tekens weergegeven. Klik gewoon op het teken dat u wilt typen. Als u tijdens het klikken de toets Ctrl ingedrukt houdt, wordt het venster automatisch gesloten nadat het geselecteerde teken is ingevoegd. Deze tool kan worden gebruikt om speciale tekens in te voegen in de hoofdtekst of in een ander gedeelte van de gebruikersinterface, zoals de tool Zoeken en vervangen.
Omdat er veel personages zijn, kun je je eigen Favoriete personages definiëren, die als eerste worden weergegeven. Klik met de rechtermuisknop op een personage om het als favoriet te markeren. Je kunt ook met de rechtermuisknop op een personage in favorieten klikken om het uit favorieten te verwijderen. Ten slotte kun je de volgorde van personages in favorieten wijzigen door op de knop Favorieten opnieuw rangschikken te klikken en vervolgens de personages in favorieten te verslepen.
U kunt speciale tekens ook rechtstreeks via het toetsenbord invoeren. Hiervoor typt u de Unicode-code voor het teken (in hexadecimaal) en drukt u vervolgens op de toets Alt+X, waardoor de eerder ingevoerde code wordt omgezet in het bijbehorende teken. Om bijvoorbeeld ÿ te typen, typt u ff en vervolgens Alt+X. Om een niet-afbreekbare spatie te typen, gebruikt u a0 en vervolgens Alt+X, om de horizontale ellips te typen gebruikt u 2026 en Alt+X, enzovoort.
Ten slotte kunt u speciale tekens invoeren door gebruik te maken van HTML-entiteiten. Als u bijvoorbeeld typt, wordt dit vervangen door een niet-afbreekbare spatie wanneer u de puntkomma typt. De vervanging vindt alleen plaats wanneer u de puntkomma typt.
De code controle weergave
Deze weergave toont u de HTML-code en CSS die van toepassing zijn op het huidige element dat u interesseert. U opent deze weergave door met de rechtermuisknop op een locatie in het voorbeeldvenster te klikken en Inspecteren te selecteren. Hiermee kunt u de HTML-code voor dat element bekijken en, nog belangrijker, de CSS-stijlen die erop van toepassing zijn. U kunt de stijlen zelfs dynamisch bewerken en direct zien welk effect uw wijzigingen hebben. Houd er rekening mee dat het bewerken van de stijlen geen daadwerkelijke wijzigingen in de inhoud van het boek aanbrengt, maar alleen snel experimenteren mogelijk maakt. De mogelijkheid om live te bewerken in de Inspector is in ontwikkeling.
Controle van externe links
U kunt deze tool gebruiken om alle links in uw boek te controleren die naar externe websites verwijzen. De tool probeert elke extern gelinkte website te bezoeken en als dat niet lukt, rapporteert hij alle gebroken links in een handig formaat, zodat u ze kunt repareren.
Externe bronnen downloaden
U kunt deze tool gebruiken om automatisch alle afbeeldingen/stylesheets/enz. in het boek te downloaden die niet bij het boek zijn gebundeld (d.w.z. die URL’s hebben die naar een locatie op internet verwijzen). De tool zoekt alle dergelijke bronnen en downloadt ze automatisch, voegt ze toe aan het boek en vervangt alle verwijzingen naar deze bronnen door de gedownloade bestanden.
Bestanden sorteren in mappen op type
Wanneer u EPUB-bestanden bewerkt die u ergens vandaan hebt gehaald, zult u vaak merken dat de bestanden in de EPUB willekeurig zijn gerangschikt, in verschillende submappen. Met deze tool kunt u alle bestanden automatisch naar submappen verplaatsen op basis van hun type. U kunt deze tool openen via Tools → Arrange into folders. Let op: deze tool verandert alleen de manier waarop de bestanden in de EPUB zijn gerangschikt, niet de manier waarop ze worden weergegeven in de bestandsbrowser.
Importeren van bestanden in andere e-book formaten als EPUB
De editor biedt de mogelijkheid om bestanden in sommige andere e-boekformaten rechtstreeks als een nieuw EPUB-bestand te importeren, zonder dat er een volledige conversie nodig is. Dit is vooral handig om rechtstreeks EPUB-bestanden te maken op basis van uw eigen handmatig bewerkte HTML-bestanden. U kunt dit doen via Bestand → Een HTML- of DOCX-bestand als nieuw boek importeren.
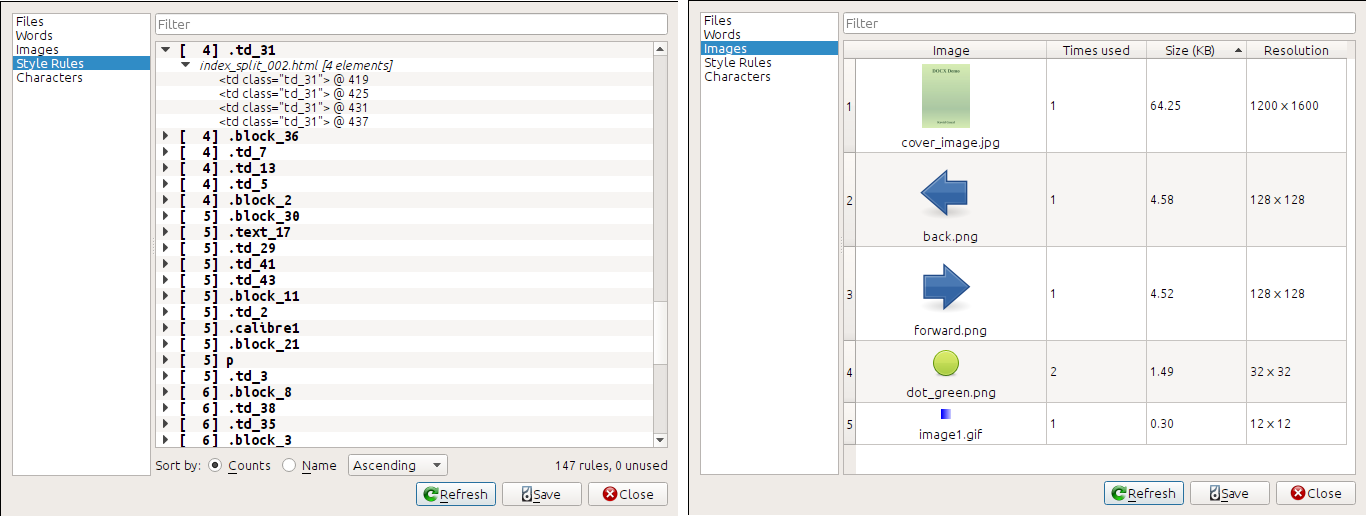
De rapporten functie
The editor includes a nice Reports tool (via Tools → Reports) that shows summaries of the files, images, links, words, characters and styles used in the book. Every line in the report is hot-linked. Double clicking a line jumps to the place in the book where that item is used or defined (as appropriate). For example, in the Links view, you can double click entries in the Source column to jump to where the link is defined and entries in the Target column to jump to where the link points.
Speciale mogelijkheden in de code editor
De HTML-editor van Calibre is zeer krachtig. Het heeft veel functies die het bewerken van HTML (en CSS) gemakkelijker maken.
Syntaxis markering
De HTML editor heeft een erg gesofistikeerd syntax accentuatie. Mogelijkheden zijn:
De tekst binnen vet, schuin en hoofdingen zijn vet/schuin gemaakt
Wanneer u uw cursor door de HTML beweegt, worden de overeenkomende HTML-tags gemarkeerd en kunt u met de sneltoetsen Ctrl+{ en Ctrl+} naar de openings- of sluitingstag springen. Op dezelfde manier kunt u de inhoud van een tag selecteren met Ctrl+Alt+T of Ctrl+Shift+T.
Foutieve HTML is gemarkeerd met rode onderstreping
Spelfouten in de tekst binnen HTML-tags en attributen zoals title worden gemarkeerd. De spellingcontrole is taalbewust en gebaseerd op de waarde van het attribuut
langvan de huidige tag en de algemene taal van het boek.CSS die is ingebed in
<style>-tags wordt gemarkeerdSpeciale karakters die moeilijk zijn te onderscheiden van niet-brekende spaties, zoals de verschillendes soorten hyphens, en zo verder zijn geaccentueerd.
Links naar andere bestanden in
<a>tags,<img>en<link>tags hebben allemaal de bestandsnamen geaccentueerd. Als de bestandsnaam waar ze naar wijzen niet bestaat, is de bestandsnaam gemarkeerd met een rode lijn eronder.
Contextgevoelige hulp
Je kan met de rechtermuisknop klikken op een HTML tag of CSS eigenschap om hulp te verkrijgen over die tag of eigenschap.
U kan ook de Ctrl toets ingedrukt houden en klikken op elke bestandsnaam in een link tag om dat bestand te openen in de editor. Ctrl klikken op een class naam brengt u naar de eerste stijlregel die overeenkomt met de tag en de class.
Rechtsklikken op een classnaam in een HTML bestand laat u de class hernoemen, elk voorkomen van de class veranderend doorheen het boek en al z’n stijlbladen.
Auto-aanvullen
Wanneer je een e-book aan het bewerken bent, is de lastigste taak om links te maken naar andere bestanden in het boek, of naar CSS stylesheets, of afbeeldingen. Je moet de goede bestandsnaam en het goede relatieve pad achterhalen. De editior heeft een auto-complete functie om dat makkelijker te maken.
Terwijl u een bestandsnaam typt, geeft de editor automatisch suggesties weer. Gebruik gewoon de Tab-toets om de juiste bestandsnaam te selecteren. De editor biedt zelfs suggesties voor links die verwijzen naar een anker in een ander HTML-bestand. Nadat u het teken # hebt getypt, toont de editor u een lijst met alle ankers in het doelbestand, met een klein stukje tekst om u te helpen het juiste anker te kiezen.
Merk op dat, in tegenstelling tot de meeste andere aanvulsystemen, het aanvulsysteem van de editor gebruikmaakt van subreeksovereenkomst. Dit betekent dat u slechts twee of drie letters uit de bestandsnaam hoeft in te voeren om de bestandsnaam aan te vullen. Stel dat u bijvoorbeeld de bestandsnaam ../images/arrow1.png wilt, dan kunt u gewoon ia1 typen en op Tab drukken om de bestandsnaam aan te vullen. Bij het zoeken naar overeenkomsten geeft het aanvulsysteem voorrang aan letters die aan het begin van een woord staan of direct na een padseparator. Als u eenmaal aan dit systeem gewend bent, zult u merken dat het u veel tijd en moeite bespaart.
Fragmenten
De Calibre E-book-editor ondersteunt snippets. Een snippet is een stuk tekst dat vaak wordt hergebruikt of veel redundante tekst bevat. Met de editor kunt u een snippet invoegen met slechts een paar toetsaanslagen. De snippets zijn zeer krachtig en hebben veel functies, zoals plaatshouders waar u tussen kunt springen, automatische spiegeling van herhaalde tekst, enzovoort. Zie voor meer informatie Fragmenten.